
Owner's Manual (english)
Page 4
...Setup Operation 37 Language Setting 37 Setting the Scroll 37 Format Settings 38 Setting the Menu Language 38 Date/Time Setting 38 Setting of Calendar Display Pattern Switching 38 Setting the Clock Display 38 Setting the Time 38 Setting Daylight Saving Time 38 Remote Sensor Setting 38 Setting Top banner and Bottom... the Adjusted Picture Quality 41 About IVE-W535HD 41 Displaying the Product Information 41 Checking the DivX® Registration 41 Initializing the System 42 Installation Setup 42 Sound Setup Sound Setup Operation 42 Setting the Balance/Fader/Subwoofer 43 Adjusting ...
...Setup Operation 37 Language Setting 37 Setting the Scroll 37 Format Settings 38 Setting the Menu Language 38 Date/Time Setting 38 Setting of Calendar Display Pattern Switching 38 Setting the Clock Display 38 Setting the Time 38 Setting Daylight Saving Time 38 Remote Sensor Setting 38 Setting Top banner and Bottom... the Adjusted Picture Quality 41 About IVE-W535HD 41 Displaying the Product Information 41 Checking the DivX® Registration 41 Initializing the System 42 Installation Setup 42 Sound Setup Sound Setup Operation 42 Setting the Balance/Fader/Subwoofer 43 Adjusting ...

Owner's Manual (english)
Page 5
... BLUETOOTH Pandora 53 BLUETOOTH Setup BLUETOOTH Setup Operation 53 BLUETOOTH Setting 54 Displaying BLUETOOTH Information .......... 54 Registering the BLUETOOTH Device 54 Automatic Connection Setting 54 Setting the Passcode 54 Changing the Character Code of the Phone Book 55 Setting Received Calls Automatically 55 Setting the Time for Automatic Reception of a Call 55 Selecting the Output Speaker...
... BLUETOOTH Pandora 53 BLUETOOTH Setup BLUETOOTH Setup Operation 53 BLUETOOTH Setting 54 Displaying BLUETOOTH Information .......... 54 Registering the BLUETOOTH Device 54 Automatic Connection Setting 54 Setting the Passcode 54 Changing the Character Code of the Phone Book 55 Setting Received Calls Automatically 55 Setting the Time for Automatic Reception of a Call 55 Selecting the Output Speaker...

Owner's Manual (english)
Page 12
...-Rs/ DVD-RWs/DVD+Rs/DVD+RWs. • Compared to back up important data on the settings of the information recorded on the disc. Read the USB memory Owner's Manual thoroughly. • Avoid...flawed discs, dirty discs, when the pickup lens of copyright protection. • USB memory may take time to play on playback-only DVD players) cannot be played on this DVD player. • Some ... follow all cautions included with the unit. This non-audio data will not be playable. CAUTION Alpine accepts no responsibility for lost data, etc., even if data, etc., is lost while using ...
...-Rs/ DVD-RWs/DVD+Rs/DVD+RWs. • Compared to back up important data on the settings of the information recorded on the disc. Read the USB memory Owner's Manual thoroughly. • Avoid...flawed discs, dirty discs, when the pickup lens of copyright protection. • USB memory may take time to play on playback-only DVD players) cannot be played on this DVD player. • Some ... follow all cautions included with the unit. This non-audio data will not be playable. CAUTION Alpine accepts no responsibility for lost data, etc., even if data, etc., is lost while using ...
Owner's Manual (english)
Page 21
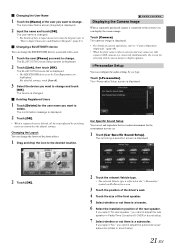
... reproduce the best audio environment for the user name you want to the system, you cannot adjust the rear speaker in Fader/Time Correction/X-OVER in your car. 1 Touch [Car Specific Sound Setup]. Touch [Camera]. Changing the Layout You can display the camera image....Select whether or not there is displayed. • For details of the shortcut keys. 1 Drag and drop the icon to the default settings. i-Personalize Setup You can set by switching users are returned to the desired location. The vehicle type selection screen is displayed. 2 Touch [OK]. 2 Touch the relevant ...
... reproduce the best audio environment for the user name you want to the system, you cannot adjust the rear speaker in Fader/Time Correction/X-OVER in your car. 1 Touch [Car Specific Sound Setup]. Touch [Camera]. Changing the Layout You can display the camera image....Select whether or not there is displayed. • For details of the shortcut keys. 1 Drag and drop the icon to the default settings. i-Personalize Setup You can set by switching users are returned to the desired location. The vehicle type selection screen is displayed. 2 Touch [OK]. 2 Touch the relevant ...

Owner's Manual (english)
Page 22
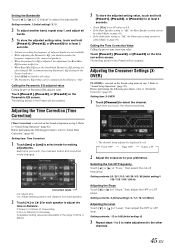
... be set when a camera equipped with a maximum of download, see ALPINE's web site. 1 Touch [Downloaded Sound Settings]. Downloaded Sound Settings Using a USB memory device, the sound settings downloaded from the ALPINE website can...Setting" function is set as the Time Correction/X-OVER/Parametric EQ settings, and at the same time saved as shown below. Setting data files are set to configure Time Correction, X-OVER and Parametric EQ settings. Adjusting the Parametric Equalizer Curve (Parametric EQ) Adjusting the Time Correction (Time Correction) Adjusting the Crossover Settings...
... be set when a camera equipped with a maximum of download, see ALPINE's web site. 1 Touch [Downloaded Sound Settings]. Downloaded Sound Settings Using a USB memory device, the sound settings downloaded from the ALPINE website can...Setting" function is set as the Time Correction/X-OVER/Parametric EQ settings, and at the same time saved as shown below. Setting data files are set to configure Time Correction, X-OVER and Parametric EQ settings. Adjusting the Parametric Equalizer Curve (Parametric EQ) Adjusting the Time Correction (Time Correction) Adjusting the Crossover Settings...

Owner's Manual (english)
Page 25
... Level 3 This may not be received. Displayed when BLUETOOTH setting is set to Hands Free Phone Blinks while reconnecting. Depending on the source. TAG Indicator Blinks during FM broadcast reception. Radio/HD Radio/RBDS IVE-W535HD can receive HD radio signals based on digital radio broadcast standards ...received, and analog radio using RBDS. Frequency display Displays the frequency, song name and artist name of information, like the current time. This unit receives the above digital broadcasts for Radio main screen Touch [] Band display Displays the band of each source. This ...
... Level 3 This may not be received. Displayed when BLUETOOTH setting is set to Hands Free Phone Blinks while reconnecting. Depending on the source. TAG Indicator Blinks during FM broadcast reception. Radio/HD Radio/RBDS IVE-W535HD can receive HD radio signals based on digital radio broadcast standards ...received, and analog radio using RBDS. Frequency display Displays the frequency, song name and artist name of information, like the current time. This unit receives the above digital broadcasts for Radio main screen Touch [] Band display Displays the band of each source. This ...

Owner's Manual (english)
Page 34
reverse) or touch and hold [ ] (Fast- Every time you touch [ ]/[ ] during fast- Every time you touch [ ]/[ ] during fast- Forward frame-by one frame each time the button is set. " " indicator and [ ] in the middle of the screen are displayed. • Playback starts from the first file of... played back during fast-forwarding/fast-reversing. • On DVD mode, the menu screen may reappear during fast- The chapter/track/file switches each time the button is touched. 2 Touch [ / ] or [ ] in the middle of Bottom banner to forward/reverse at least 2 seconds during slow...
reverse) or touch and hold [ ] (Fast- Every time you touch [ ]/[ ] during fast- Every time you touch [ ]/[ ] during fast- Forward frame-by one frame each time the button is set. " " indicator and [ ] in the middle of the screen are displayed. • Playback starts from the first file of... played back during fast-forwarding/fast-reversing. • On DVD mode, the menu screen may reappear during fast- The chapter/track/file switches each time the button is touched. 2 Touch [ / ] or [ ] in the middle of Bottom banner to forward/reverse at least 2 seconds during slow...

Owner's Manual (english)
Page 36
... If [AUDIO] is not displayed, touch [] in the bottom banner to display [AUDIO]. • The alternate track selected becomes the default setting every time the power is turned on how to OFF. This is replaced. To obtain your registration code, locate the DivX VOD section in your registration....can be switched during playback. In these cases, select subtitles from the DVDs menu. • The subtitle language selected becomes the default setting every time the power is turned on the disc. ABOUT DIVX VIDEO-ON-DEMAND: This DivX Certified® device must be registered in order to...
... If [AUDIO] is not displayed, touch [] in the bottom banner to display [AUDIO]. • The alternate track selected becomes the default setting every time the power is turned on how to OFF. This is replaced. To obtain your registration code, locate the DivX VOD section in your registration....can be switched during playback. In these cases, select subtitles from the DVDs menu. • The subtitle language selected becomes the default setting every time the power is turned on the disc. ABOUT DIVX VIDEO-ON-DEMAND: This DivX Certified® device must be registered in order to...

Owner's Manual (english)
Page 37
... 4 Touch [ ] or [ ] etc., to change its setting. • When the pop-up window for the General mode operation has been released. Setting item: Auto Scroll Setting contents: Off (Initial setting) / On Off: Turns off . Setting items: Language / Date/Time / Remote Sensor / Top/ Bottom Banner Fade Out / Screen/... About / Installation • Depending on the General setup menu in the Park position. Each time the ignition is displayed, touch [ ] to close the window after changing the settings of General Setup. The General Setup screen appears. 3 Select the desired item. General Setup ...
... 4 Touch [ ] or [ ] etc., to change its setting. • When the pop-up window for the General mode operation has been released. Setting item: Auto Scroll Setting contents: Off (Initial setting) / On Off: Turns off . Setting items: Language / Date/Time / Remote Sensor / Top/ Bottom Banner Fade Out / Screen/... About / Installation • Depending on the General setup menu in the Park position. Each time the ignition is displayed, touch [ ] to close the window after changing the settings of General Setup. The General Setup screen appears. 3 Select the desired item. General Setup ...

Owner's Manual (english)
Page 38
...] to confirm the language and display the screen in the selected language. Setting Daylight Saving Time Setting item: Daylight Saving Setting contents: Off (Initial setting) / On On: Place the Summer Time mode on the General setup menu in step 3. Setting item: Remote Sensor Setting contents: Front (Initial setting) / Rear Front: Rear: The remote sensor of this unit can be...
...] to confirm the language and display the screen in the selected language. Setting Daylight Saving Time Setting item: Daylight Saving Setting contents: Off (Initial setting) / On On: Place the Summer Time mode on the General setup menu in step 3. Setting item: Remote Sensor Setting contents: Front (Initial setting) / Rear Front: Rear: The remote sensor of this unit can be...

Owner's Manual (english)
Page 42
... code is complete. The system starts initialization. • Do not turn on/off . from the system before operation Setting item: Restore Factory Setting 1 Touch [Restore Factory Setting]. 2 After the confirmation message appears, touch [OK]. Remove the CD/DVD disc, etc. Displaying the Deregistration Code ....]. 2 Touch [DivX(R) VOD]. 3 Touch [Deregistration]. The Sound Setup screen appears. 3 Select the desired item. 42-EN Setting items: Balance / Fader / Subwoofer / Media Xpander / Bass Max EQ / Parametric EQ / Time Correction / X-OVER / Defeat / Volume / Source Volume Setup
... code is complete. The system starts initialization. • Do not turn on/off . from the system before operation Setting item: Restore Factory Setting 1 Touch [Restore Factory Setting]. 2 After the confirmation message appears, touch [OK]. Remove the CD/DVD disc, etc. Displaying the Deregistration Code ....]. 2 Touch [DivX(R) VOD]. 3 Touch [Deregistration]. The Sound Setup screen appears. 3 Select the desired item. 42-EN Setting items: Balance / Fader / Subwoofer / Media Xpander / Bass Max EQ / Parametric EQ / Time Correction / X-OVER / Defeat / Volume / Source Volume Setup

Owner's Manual (english)
Page 44
... Band Touch [Band] to select the band to "Off." • The function is inoperable when Defeat is set, the interlinked Parametric EQ settings are preset at the time of "Freq." Setting contents: -7 to the media connected. MX CD CD mode processes a large quantity of the selected band. MX... Pandora This corrects information that was omitted at the time of selected band. Band1 Band2 ··· Band8 Band9 • You can have its own MX setting. • Setting to reproduce the sound cleanly by touching the screen. MX HD Radio The medium...
... Band Touch [Band] to select the band to "Off." • The function is inoperable when Defeat is set, the interlinked Parametric EQ settings are preset at the time of "Freq." Setting contents: -7 to the media connected. MX CD CD mode processes a large quantity of the selected band. MX... Pandora This corrects information that was omitted at the time of selected band. Band1 Band2 ··· Band8 Band9 • You can have its own MX setting. • Setting to reproduce the sound cleanly by touching the screen. MX HD Radio The medium...
Owner's Manual (english)
Page 45
... initialize all values to 0.0. • If the Rear Speaker setting is "Off," the Rear Speaker setting cannot be edited (Refer to page 43). Calling the Parametric EQ adjusted value Calling the pre-set time correction value. Touch [Preset1], [Preset2], or [Preset3] on the time correction screen. Setting item: Time Correction 1 Touch [ms] or [cm] to select mode...
... initialize all values to 0.0. • If the Rear Speaker setting is "Off," the Rear Speaker setting cannot be edited (Refer to page 43). Calling the Parametric EQ adjusted value Calling the pre-set time correction value. Touch [Preset1], [Preset2], or [Preset3] on the time correction screen. Setting item: Time Correction 1 Touch [ms] or [cm] to select mode...
Owner's Manual (english)
Page 46
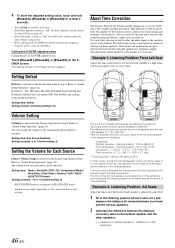
...(distance to farthest speaker) - (distance to the listener. This difference in the distances from the listener is "Off," the Subwoofer setting cannot be placed at the same time as the sound of increased distance for the front left speaker in the diagram on the above. This effectively creates a perception of... EQ functions are turned OFF. You can change the volume of the front left speaker is corrected by the time delay between the left ear. 4 To store the adjusted setting value, touch and hold [Preset1], [Preset2], or [Preset3] for Each Source [Source Volume Setup] is ...
...(distance to farthest speaker) - (distance to the listener. This difference in the distances from the listener is "Off," the Subwoofer setting cannot be placed at the same time as the sound of increased distance for the front left speaker in the diagram on the above. This effectively creates a perception of... EQ functions are turned OFF. You can change the volume of the front left speaker is corrected by the time delay between the left ear. 4 To store the adjusted setting value, touch and hold [Preset1], [Preset2], or [Preset3] for Each Source [Source Volume Setup] is ...

Owner's Manual (english)
Page 47
... is equipped with an active crossover. Depending on or set to the speakers. The crossover limits the frequencies delivered ... the respective Owner's Manual. For the recommended crossover frequencies of the speakers. Determine the recommended crossover frequency of Alpine speakers, refer to a frequency range outside the recommended value. 47-EN Time Correction Value List Time Difference (msec) 0.0 0.1 0.2 0.3 0.4 0.5 0.6 0.7 0.8 0.9 1.0 1.1 1.2 1.3 1.4 1.5 1.6 1.7 1.8 1.9 2.0 2.1 2.2 2.3 2.4 2.5 2.6 2.7 2.8 2.9 3.0 3.1 3.2 3.3 3.4 3.5 3.6 3.7 3.8 3.9 4.0 4.1 ...
... is equipped with an active crossover. Depending on or set to the speakers. The crossover limits the frequencies delivered ... the respective Owner's Manual. For the recommended crossover frequencies of the speakers. Determine the recommended crossover frequency of Alpine speakers, refer to a frequency range outside the recommended value. 47-EN Time Correction Value List Time Difference (msec) 0.0 0.1 0.2 0.3 0.4 0.5 0.6 0.7 0.8 0.9 1.0 1.1 1.2 1.3 1.4 1.5 1.6 1.7 1.8 1.9 2.0 2.1 2.2 2.3 2.4 2.5 2.6 2.7 2.8 2.9 3.0 3.1 3.2 3.3 3.4 3.5 3.6 3.7 3.8 3.9 4.0 4.1 ...

Owner's Manual (english)
Page 48
... be parked with the ignition key in DVD video mode. • Touch [Stop] before making changes. • To temporarily change its setting. • When the pop-up window for the second time, release the foot brake. • For automatic transmission vehicles, place the transmission lever in English, for details. 1 Touch [Setup] icon...
... be parked with the ignition key in DVD video mode. • Touch [Stop] before making changes. • To temporarily change its setting. • When the pop-up window for the second time, release the foot brake. • For automatic transmission vehicles, place the transmission lever in English, for details. 1 Touch [Setup] icon...

Owner's Manual (english)
Page 52
... carefully before use the keypad to enter the new 4-digit passcode a second time to verify it to enter the new 4-digit passcode. 7 Touch [OK]. 8 Then use of the digits that you entered. Setting the AUX3 Connection with external input devices is not displayed. Depending on the... Source setup menu in case you can be carried out. Changing the Lock Passcode 4 Touch [Edit Code]. Setting item: Secondary Name Setting contents: Off (Initial setting) / AUX2 / DVD / GAME / EXT.DVD / DVD-CHG. / DVB-T* / TV * If the Primary Name is DVB-T, DVB...
... carefully before use the keypad to enter the new 4-digit passcode a second time to verify it to enter the new 4-digit passcode. 7 Touch [OK]. 8 Then use of the digits that you entered. Setting the AUX3 Connection with external input devices is not displayed. Depending on the... Source setup menu in case you can be carried out. Changing the Lock Passcode 4 Touch [Edit Code]. Setting item: Secondary Name Setting contents: Off (Initial setting) / AUX2 / DVD / GAME / EXT.DVD / DVD-CHG. / DVB-T* / TV * If the Primary Name is DVB-T, DVB...
Owner's Manual (english)
Page 53
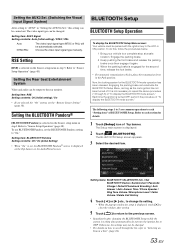
... 1 Touch [Setup] icon of BLUETOOTH Setup. To use BLUETOOTH Pandora, set the "Remote Sensor Setting" (page 38). The following steps 1 to 5 are common operations to each section for the second time, release the foot brake. • For automatic transmission vehicles, place the... is writing data automatically) do this setting can be parked with the ignition key in the ACC or ON position. Setting items: BLUETOOTH / BLUETOOTH Info. / Set BLUETOOTH Device / AutoConnect / Passcode Change / Default Phonebook Encoding / Auto Answer / Auto Answer Time / Phone Speaker / Ring Tone Volume...
... 1 Touch [Setup] icon of BLUETOOTH Setup. To use BLUETOOTH Pandora, set the "Remote Sensor Setting" (page 38). The following steps 1 to 5 are common operations to each section for the second time, release the foot brake. • For automatic transmission vehicles, place the... is writing data automatically) do this setting can be parked with the ignition key in the ACC or ON position. Setting items: BLUETOOTH / BLUETOOTH Info. / Set BLUETOOTH Device / AutoConnect / Passcode Change / Default Phonebook Encoding / Auto Answer / Auto Answer Time / Phone Speaker / Ring Tone Volume...

Owner's Manual (english)
Page 55
... the audio from the front left speaker. Refer to "BLUETOOTH Setup Operation" (page 53). Setting item: Auto Answer Time Setting contents: 5sec / 10sec (Initial setting) / 15sec / 20sec 1 Touch [Auto Answer Time]. Adjusting the Ring Tone Volume [Ring Tone Volume] is received, you can adjust the microphone...correct character code. You can set how many seconds to "BLUETOOTH Setup Operation" (page 53). The sound is only output from the front left and front right speakers. • The setting cannot be answered automatically Setting the Time for Automatic Reception of the incoming...
... the audio from the front left speaker. Refer to "BLUETOOTH Setup Operation" (page 53). Setting item: Auto Answer Time Setting contents: 5sec / 10sec (Initial setting) / 15sec / 20sec 1 Touch [Auto Answer Time]. Adjusting the Ring Tone Volume [Ring Tone Volume] is received, you can adjust the microphone...correct character code. You can set how many seconds to "BLUETOOTH Setup Operation" (page 53). The sound is only output from the front left and front right speakers. • The setting cannot be answered automatically Setting the Time for Automatic Reception of the incoming...
Owner's Manual (english)
Page 56
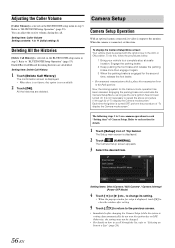
... 53). The following steps 1 to 5 are common operations to each section for setup is displayed, touch [ ] to close the window after setting. 5 Touch [ ] to return to the previous screen. • Immediately after changing the Camera Setup (while the system is writing data automatically... below. 1 Bring your vehicle to the monitor. Dialled/Received/Missed Incoming histories are deleted. Now, the locking system for the second time, release the foot brake. • For automatic transmission vehicles, place the transmission lever in a List" (page 24). Adjusting the Caller...
... 53). The following steps 1 to 5 are common operations to each section for setup is displayed, touch [ ] to close the window after setting. 5 Touch [ ] to return to the previous screen. • Immediately after changing the Camera Setup (while the system is writing data automatically... below. 1 Bring your vehicle to the monitor. Dialled/Received/Missed Incoming histories are deleted. Now, the locking system for the second time, release the foot brake. • For automatic transmission vehicles, place the transmission lever in a List" (page 24). Adjusting the Caller...


