
Owner's Manual (english)
Page 4
... 38 Setting of Calendar Display Pattern Switching 38 Setting the Clock Display 38 Setting the Time 38 Setting Daylight Saving Time 38 Remote Sensor Setting 38 Setting Top banner and Bottom banner Display 39 Screen/LED Customize 39 Setting the Brightness of the Backlighting 39 ... Tint of Picture 41 4-EN Adjusting Image Contrast 41 Adjusting Picture Quality 41 Saving and Calling the Adjusted Picture Quality 41 About IVE-W535HD 41 Displaying the Product Information 41 Checking the DivX® Registration 41 Initializing the System 42 Installation Setup 42 Sound Setup Sound ...
... 38 Setting of Calendar Display Pattern Switching 38 Setting the Clock Display 38 Setting the Time 38 Setting Daylight Saving Time 38 Remote Sensor Setting 38 Setting Top banner and Bottom banner Display 39 Screen/LED Customize 39 Setting the Brightness of the Backlighting 39 ... Tint of Picture 41 4-EN Adjusting Image Contrast 41 Adjusting Picture Quality 41 Saving and Calling the Adjusted Picture Quality 41 About IVE-W535HD 41 Displaying the Product Information 41 Checking the DivX® Registration 41 Initializing the System 42 Installation Setup 42 Sound Setup Sound ...

Owner's Manual (english)
Page 16
... turned on the unit, except (Release). • The IVE-W535HD is a precision device. Point the optional remote control transmitter at least 3 seconds to switch to activate the Sound Setup selection mode. Careful handling of the unit should provide you with an optional Alpine remote control. Optional Remote Control Interface Box This unit is connected, press and...
... turned on the unit, except (Release). • The IVE-W535HD is a precision device. Point the optional remote control transmitter at least 3 seconds to switch to activate the Sound Setup selection mode. Careful handling of the unit should provide you with an optional Alpine remote control. Optional Remote Control Interface Box This unit is connected, press and...

Owner's Manual (english)
Page 37
... scroll mode. The following steps 1 to 4 are common operations to each section for details. 1 Touch [Setup] icon of General Setup. Setting items: Language / Date/Time / Remote Sensor / Top/ Bottom Banner Fade Out / Screen/LED Customize / Visual / About / Installation • Depending on the Audio/Visual Playback screen to display the Setup main...
... scroll mode. The following steps 1 to 4 are common operations to each section for details. 1 Touch [Setup] icon of General Setup. Setting items: Language / Date/Time / Remote Sensor / Top/ Bottom Banner Fade Out / Screen/LED Customize / Visual / About / Installation • Depending on the Audio/Visual Playback screen to display the Setup main...

Owner's Manual (english)
Page 38
... ARA: CP1256 Setting the Menu Language The Setup menu, feedback information, etc. Refer to run through a change sequence automatically. Remote Sensor Setting [Remote Sensor] is selected on the General setup menu in the selected language. Setting item: Clock Mode Setting contents: 12h / 24h... / Greek / Hungarian / Polish / Slovak / Turkish) • Touch [OK] to confirm the language and display the screen in step 3. The remote control operates the source connected to the AUX OUTPUT terminals. • If the RSE (page 53) is "Off," the setting is effective. Hour: Adjust...
... ARA: CP1256 Setting the Menu Language The Setup menu, feedback information, etc. Refer to run through a change sequence automatically. Remote Sensor Setting [Remote Sensor] is selected on the General setup menu in the selected language. Setting item: Clock Mode Setting contents: 12h / 24h... / Greek / Hungarian / Polish / Slovak / Turkish) • Touch [OK] to confirm the language and display the screen in step 3. The remote control operates the source connected to the AUX OUTPUT terminals. • If the RSE (page 53) is "Off," the setting is effective. Hour: Adjust...
Owner's Manual (english)
Page 53
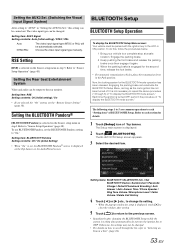
... repeat the above procedure (1 through the list, refer to each section for the BLUETOOTH mode operation has been released. To use BLUETOOTH Pandora, set the "Remote Sensor Setting" (page 38). Otherwise, the settings may not be carried out. The following steps 1 to 5 are common operations to "Selecting an Item in step...
... repeat the above procedure (1 through the list, refer to each section for the BLUETOOTH mode operation has been released. To use BLUETOOTH Pandora, set the "Remote Sensor Setting" (page 38). Otherwise, the settings may not be carried out. The following steps 1 to 5 are common operations to "Selecting an Item in step...

Owner's Manual (english)
Page 63
.../Artist title/Album title/Elapsed time do not display for BLUETOOTH Audio main screen Touch [ ] to A2DP (Advanced Audio Distribution Profile) or AVRCP (Audio/ Video Remote Control Profile) is displayed on the BLUETOOTH audio source is muted. Returning to select the desired track (file). Compatible AVRCP versions: 1.0, 1.3, 1.4 • Available functions may...
.../Artist title/Album title/Elapsed time do not display for BLUETOOTH Audio main screen Touch [ ] to A2DP (Advanced Audio Distribution Profile) or AVRCP (Audio/ Video Remote Control Profile) is displayed on the BLUETOOTH audio source is muted. Returning to select the desired track (file). Compatible AVRCP versions: 1.0, 1.3, 1.4 • Available functions may...

Owner's Manual (english)
Page 89
...not connected. • The Parking Brake is properly grounded at the minimum position. - make sure the rest of your authorized Alpine dealer. Make sure the antenna is not played back. • Writing error occurred. If above -mentioned solution does not ... • Brightness/Contrast control is very dirty. - The optional remote control is inoperative. • The remote control sensor setting of "Remote Sensor Setting" (page 38) is already in your nearest Alpine dealer. Check your nearest Alpine dealer. Allow enough time for "Front." Extend the antenna fully; ...
...not connected. • The Parking Brake is properly grounded at the minimum position. - make sure the rest of your authorized Alpine dealer. Make sure the antenna is not played back. • Writing error occurred. If above -mentioned solution does not ... • Brightness/Contrast control is very dirty. - The optional remote control is inoperative. • The remote control sensor setting of "Remote Sensor Setting" (page 38) is already in your nearest Alpine dealer. Check your nearest Alpine dealer. Allow enough time for "Front." Extend the antenna fully; ...

Owner's Manual (english)
Page 92
... +4 dBm Max. (Power class 2) HFP (Hands-Free Profile) OPP (Object Push Profile) PBAP (Phone Book Access Profile) A2DP (Advanced Audio Distribution Profile) AVRCP (Audio/Video Remote Control Profile) GENERAL Power Requirement Operating temperature Output Voltage Weight Audio output level Preout (Front, Rear): Preout (Subwoofer): AUX OUT: 14.4 V DC (11-16 V allowable...
... +4 dBm Max. (Power class 2) HFP (Hands-Free Profile) OPP (Object Push Profile) PBAP (Phone Book Access Profile) A2DP (Advanced Audio Distribution Profile) AVRCP (Audio/Video Remote Control Profile) GENERAL Power Requirement Operating temperature Output Voltage Weight Audio output level Preout (Front, Rear): Preout (Subwoofer): AUX OUT: 14.4 V DC (11-16 V allowable...
Owner's Manual (english)
Page 99
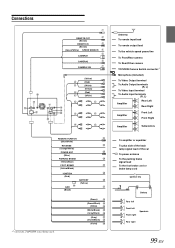
... (Brown) (Green/White) SPEED SENSOR CAMERA1 CAMERA2 CAMERA SW (Yellow) (Red) (White) (Yellow) (Red) (White) REMOTE TURN-ON (Blue/White) REVERSE (Orange/White) POWER ANT (Blue) PARKING BRAKE (Yellow/Blue) FOOT BRAKE (Yellow/Black) IGNITION (Red) GND (Black) BATTERY ...) *1 Currently, TOPVIEW is not being used. (Green) (Green/Black) (White) (White/Black) (Gray/Black) (Gray) (Violet/Black) (Violet) Antenna To remote input lead To remote output lead To the vehicle speed pause line To Front/Rear camera To Rear/Other camera TOPVIEW Camera Switch connector*1 Microphone (Included) To Video...
... (Brown) (Green/White) SPEED SENSOR CAMERA1 CAMERA2 CAMERA SW (Yellow) (Red) (White) (Yellow) (Red) (White) REMOTE TURN-ON (Blue/White) REVERSE (Orange/White) POWER ANT (Blue) PARKING BRAKE (Yellow/Blue) FOOT BRAKE (Yellow/Black) IGNITION (Red) GND (Black) BATTERY ...) *1 Currently, TOPVIEW is not being used. (Green) (Green/Black) (White) (White/Black) (Gray/Black) (Gray) (Violet/Black) (Violet) Antenna To remote input lead To remote output lead To the vehicle speed pause line To Front/Rear camera To Rear/Other camera TOPVIEW Camera Switch connector*1 Microphone (Included) To Video...

Owner's Manual (english)
Page 100
.... Battery Lead (Yellow) Connect this lead to turn -on lead of the parking brake switch to transmit the parking brake status signals to the IVE-W535HD. Left Rear (+) Speaker Output Lead (Green) Left Rear (-) Speaker Output Lead (Green/Black) Left Front (+) Speaker Output Lead (White) Left...INPUT) (Yellow) Input the video. Front Output RCA Connectors It can be performed by a trained, authorized Alpine dealer. Remote Control Input Lead (Brown) Connect the external Alpine product to bare metal and is securely fastened using the sheet metal screw provided. RED is right and WHITE ...
.... Battery Lead (Yellow) Connect this lead to turn -on lead of the parking brake switch to transmit the parking brake status signals to the IVE-W535HD. Left Rear (+) Speaker Output Lead (Green) Left Rear (-) Speaker Output Lead (Green/Black) Left Front (+) Speaker Output Lead (White) Left...INPUT) (Yellow) Input the video. Front Output RCA Connectors It can be performed by a trained, authorized Alpine dealer. Remote Control Input Lead (Brown) Connect the external Alpine product to bare metal and is securely fastened using the sheet metal screw provided. RED is right and WHITE ...

Owner's Manual (english)
Page 102
...can change the name of an External device Camera Connector AUX/PRE OUT cable (Yellow) (Red) (White) (Yellow) (Red) (White) REMOTE IN (Brown) Camera cable AUX/PRE OUT Connector To Video Output terminal DVD Changer (Sold separately) To Audio Output terminal To Video Input ...terminal Rear monitor (Sold separately) REMOTE OUT (Brown) To Audio Input terminal REMOTE OUT (White/Brown) REMOTE IN (White/Brown) 1 Video/Audio Input Connectors (AUX INPUT) 2 Video/Audio Output Connectors (AUX OUTPUT) Use ...
...can change the name of an External device Camera Connector AUX/PRE OUT cable (Yellow) (Red) (White) (Yellow) (Red) (White) REMOTE IN (Brown) Camera cable AUX/PRE OUT Connector To Video Output terminal DVD Changer (Sold separately) To Audio Output terminal To Video Input ...terminal Rear monitor (Sold separately) REMOTE OUT (Brown) To Audio Input terminal REMOTE OUT (White/Brown) REMOTE IN (White/Brown) 1 Video/Audio Input Connectors (AUX INPUT) 2 Video/Audio Output Connectors (AUX OUTPUT) Use ...

Owner's Manual (english)
Page 103
...(Red) (White) Mobile Digital TV Receiver (Sold separately) DVD Changer (Sold separately) REMOTE OUT (Brown) Camera cable To Audio Output Terminal REMOTE IN (White/Brown) To Audio Input Terminal REMOTE OUT (White/Brown) To Audio Output Terminal REMOTE IN (White/Brown) 1 Video/Audio Input Connectors (AUX INPUT) 2 RCA Extension Cable... Lead (Brown) Connect this lead to "Setting the AUX3" (page 52). 103-EN This lead outputs the controlling signals from the remote control. 4 AV/RCA interface cable (4-pole mini AV plug to "AUX3." Connection of a Mobile Digital TV Receiver/USB Player and ...
...(Red) (White) Mobile Digital TV Receiver (Sold separately) DVD Changer (Sold separately) REMOTE OUT (Brown) Camera cable To Audio Output Terminal REMOTE IN (White/Brown) To Audio Input Terminal REMOTE OUT (White/Brown) To Audio Output Terminal REMOTE IN (White/Brown) 1 Video/Audio Input Connectors (AUX INPUT) 2 RCA Extension Cable... Lead (Brown) Connect this lead to "Setting the AUX3" (page 52). 103-EN This lead outputs the controlling signals from the remote control. 4 AV/RCA interface cable (4-pole mini AV plug to "AUX3." Connection of a Mobile Digital TV Receiver/USB Player and ...

Owner's Manual (english)
Page 104
Connection of an External Amplifier Power Supply Connector AUX/PRE OUT Connector (Red) (White) (Red) (White) (Red) (White) REMOTE TURN-ON (Blue/White) Power cable 1 Front Output RCA Connectors RED is right and WHITE is left. 2 Rear Output RCA Connectors RED is right and WHITE is left. AUX/PRE OUT cable Amplifier 4 ch (Sold separately) Input Front speaker Input Rear speaker REMOTE ON (Blue/White) Amplifier for subwoofer (Sold separately) Input Subwoofer REMOTE ON (Blue/White) 3 Subwoofer RCA Connector 4 RCA Extension Cable (Sold separately) 104-EN
Connection of an External Amplifier Power Supply Connector AUX/PRE OUT Connector (Red) (White) (Red) (White) (Red) (White) REMOTE TURN-ON (Blue/White) Power cable 1 Front Output RCA Connectors RED is right and WHITE is left. 2 Rear Output RCA Connectors RED is right and WHITE is left. AUX/PRE OUT cable Amplifier 4 ch (Sold separately) Input Front speaker Input Rear speaker REMOTE ON (Blue/White) Amplifier for subwoofer (Sold separately) Input Subwoofer REMOTE ON (Blue/White) 3 Subwoofer RCA Connector 4 RCA Extension Cable (Sold separately) 104-EN


