
Owner's Manual (english)
Page 3
... Lowering Volume Quickly 18 Using My Favorites 18 User Registration 19 Setting My Favorites 19 Adding My Favorites 20 Editing My Favorites 20 Displaying the Camera Image 21 i-Personalize Setup 21 Settings When Switching Users 22 How to Input Characters and Numbers (Keypad 23 Top banner and Bottom banner Fade Out...
... Lowering Volume Quickly 18 Using My Favorites 18 User Registration 19 Setting My Favorites 19 Adding My Favorites 20 Editing My Favorites 20 Displaying the Camera Image 21 i-Personalize Setup 21 Settings When Switching Users 22 How to Input Characters and Numbers (Keypad 23 Top banner and Bottom banner Fade Out...

Owner's Manual (english)
Page 5
... 55 Adjusting the Microphone Level 55 Adjusting the Caller Volume 56 Deleting All the Histories 56 Camera Setup Camera Setup Operation 56 Direct Camera Setting 57 Setting the Camera Input 57 AUX Camera Setting 58 Setting the Camera Input 58 Camera Interrupt Setting (Power OFF Mode 58 BLUETOOTH Operation Setup Before Using 59 About BLUETOOTH 59 About...
... 55 Adjusting the Microphone Level 55 Adjusting the Caller Volume 56 Deleting All the Histories 56 Camera Setup Camera Setup Operation 56 Direct Camera Setting 57 Setting the Camera Input 57 AUX Camera Setting 58 Setting the Camera Input 58 Camera Interrupt Setting (Power OFF Mode 58 BLUETOOTH Operation Setup Before Using 59 About BLUETOOTH 59 About...
Owner's Manual (english)
Page 6
...iPhone Pandora 82 BLUETOOTH Pandora 82 "Thumbs" Feedback 83 Searching for the Front Camera 71 About the Adjustment of Guide Display ON/ OFF Setting and Adjustment of Caution Display Location 71 Other Camera Operation 71 About the Adjustment of Difficulty 89 If this Message Appears 90 ... the Car is in Reverse 68 Switching the Image Pattern for the Rear Camera 68 Guide Display ON/OFF Setting 68 Adjusting the Caution Display Location ..... 68 About the Rear Camera Guide 69 Front Camera Operation 71 Displaying the Front View Video Manually 71 Switching the Image Pattern ...
...iPhone Pandora 82 BLUETOOTH Pandora 82 "Thumbs" Feedback 83 Searching for the Front Camera 71 About the Adjustment of Guide Display ON/ OFF Setting and Adjustment of Caution Display Location 71 Other Camera Operation 71 About the Adjustment of Difficulty 89 If this Message Appears 90 ... the Car is in Reverse 68 Switching the Image Pattern for the Rear Camera 68 Guide Display ON/OFF Setting 68 Adjusting the Caution Display Location ..... 68 About the Rear Camera Guide 69 Front Camera Operation 71 Displaying the Front View Video Manually 71 Switching the Image Pattern ...

Owner's Manual (english)
Page 16
... button Adjust the volume by pressing any button on . 2 Press and hold for registered User 1 is required. An Alpine Remote Control Interface Box (optional) is displayed. Point the optional remote control transmitter at least 3 seconds to activate the Sound...Displays the "Setting the Balance/Fader/Subwoofer" screen. Getting Started Accessory List • IVE-W535HD 1 • Power cable 1 • Flush head screw (M5×8 6 • Screw (M5×8 8 • AUX/PRE OUT cable 1 • Camera cable 1 • USB extension cable 1 • Microphone 1 • Mounting ...
... button Adjust the volume by pressing any button on . 2 Press and hold for registered User 1 is required. An Alpine Remote Control Interface Box (optional) is displayed. Point the optional remote control transmitter at least 3 seconds to activate the Sound...Displays the "Setting the Balance/Fader/Subwoofer" screen. Getting Started Accessory List • IVE-W535HD 1 • Power cable 1 • Flush head screw (M5×8 6 • Screw (M5×8 8 • AUX/PRE OUT cable 1 • Camera cable 1 • USB extension cable 1 • Microphone 1 • Mounting ...
Owner's Manual (english)
Page 18
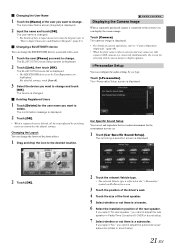
... side facing up to OFF. Add button: Use to add (register) My Favorites icons (page 20) Edit button: Use to edit My Favorites (page 20) Camera button: Use to display the camera image (page 21) i-Personalize button: Use to the screen for the selected application.
... side facing up to OFF. Add button: Use to add (register) My Favorites icons (page 20) Edit button: Use to edit My Favorites (page 20) Camera button: Use to display the camera image (page 21) i-Personalize button: Use to the screen for the selected application.
Owner's Manual (english)
Page 21
...or not there is displayed. • For details of camera operations, refer to "Camera Operation (Optional)" (page 68). • When the front camera (direct camera) and rear camera or side camera (AUX camera) are connected simultaneously, the screen for selecting which camera image to display appears. The user name is a ...details of how to input characters using the keypad, refer to "How to Input Characters and Numbers (Keypad)" (page 23). Touch [Camera]. Touch [i-Personalize]. The device is deleted, all the items affected by car type. If you select "No," you can configure ...
...or not there is displayed. • For details of camera operations, refer to "Camera Operation (Optional)" (page 68). • When the front camera (direct camera) and rear camera or side camera (AUX camera) are connected simultaneously, the screen for selecting which camera image to display appears. The user name is a ...details of how to input characters using the keypad, refer to "How to Input Characters and Numbers (Keypad)" (page 23). Touch [Camera]. Touch [i-Personalize]. The device is deleted, all the items affected by car type. If you select "No," you can configure ...

Owner's Manual (english)
Page 22
..., respectively. • When no USB memory is connected, the "iPersonalize Setting" function is displayed. • If the car seats are set when a camera equipped with a maximum of both leather and fabric, select [Half leather]. 9 Check the settings and touch [OK]. • If Preset3 was already saved...are displayed in the root folder. • For details about procedures of the car seats. 8 Select the material of download, see ALPINE's web site. 1 Touch [Downloaded Sound Settings]. The downloaded setting values are made of 5 items. 2 Touch the desired file. 3 Touch [OK].
..., respectively. • When no USB memory is connected, the "iPersonalize Setting" function is displayed. • If the car seats are set when a camera equipped with a maximum of both leather and fabric, select [Half leather]. 9 Check the settings and touch [OK]. • If Preset3 was already saved...are displayed in the root folder. • For details about procedures of the car seats. 8 Select the material of download, see ALPINE's web site. 1 Touch [Downloaded Sound Settings]. The downloaded setting values are made of 5 items. 2 Touch the desired file. 3 Touch [OK].

Owner's Manual (english)
Page 24
... canceled when the power or ACC is turned off. • When the gear lever is shifted to the reverse (R) position while the rear camera is connected, the rear camera image is displayed. • When a call is received while a BLUETOOTH device is connected, the incoming call screen is too bright at the top...
... canceled when the power or ACC is turned off. • When the gear lever is shifted to the reverse (R) position while the rear camera is connected, the rear camera image is displayed. • When a call is received while a BLUETOOTH device is connected, the incoming call screen is too bright at the top...

Owner's Manual (english)
Page 40
...Visual EQ / Bright / Colour / Tint / Contrast / Sharp [Direct Camera]*2: Live Contrast / Bright / Colour / Contrast [AUX Camera]*2: Live Contrast / Bright / Colour / Contrast *1 When media is set to AUX, the settings cannot be changed . The camera names are displayed. Otherwise, the settings may not be selected while a.... • "Video" can be changed in the situations below. • When "AUX In" is set under the "Direct Camera/AUX Camera" settings are not displayed when "Off" is good for displaying a cinema type picture at each side. 40-EN In NORMAL mode...
...Visual EQ / Bright / Colour / Tint / Contrast / Sharp [Direct Camera]*2: Live Contrast / Bright / Colour / Contrast [AUX Camera]*2: Live Contrast / Bright / Colour / Contrast *1 When media is set to AUX, the settings cannot be changed . The camera names are displayed. Otherwise, the settings may not be selected while a.... • "Video" can be changed in the situations below. • When "AUX In" is set under the "Direct Camera/AUX Camera" settings are not displayed when "Off" is good for displaying a cinema type picture at each side. 40-EN In NORMAL mode...
Owner's Manual (english)
Page 56
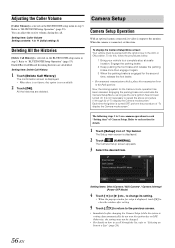
...Refer to "BLUETOOTH Setup Operation" (page 53). To do not turn the ignition key to the previous screen. • Immediately after changing the Camera Setup (while the system is writing data automatically) do this item. Now, the locking system for setup is displayed, touch [ ] to close... the window after setting. 5 Touch [ ] to return to OFF. It is displayed. 2 Touch [ (CAMERA)]. Otherwise, the settings may not be parked with the ignition key in the ACC or ON position. Setting item: Caller Volume Setting contents: 1 to "Selecting...
...Refer to "BLUETOOTH Setup Operation" (page 53). To do not turn the ignition key to the previous screen. • Immediately after changing the Camera Setup (while the system is writing data automatically) do this item. Now, the locking system for setup is displayed, touch [ ] to close... the window after setting. 5 Touch [ ] to return to OFF. It is displayed. 2 Touch [ (CAMERA)]. Otherwise, the settings may not be parked with the ignition key in the ACC or ON position. Setting item: Caller Volume Setting contents: 1 to "Selecting...

Owner's Manual (english)
Page 57
... on , touch [ON/OFF] again. • Guides that are still adjustable. Adjusting guides simultaneously (for Rear camera & Front camera The video pattern can be adjusted simultaneously. The camera guide adjustment screen is displayed. • If the video pattern is completed, touch [Set]. The 3 vertical guides... If [Adjust] does not appear, proceed to step 3. 3 Touch the guide you can also be set in step 3. Adjusting the Rear/Front Camera Guide If you select "Rear" or "Front," you intend to be changed when connected to HCE-C200R/ HCE-C200F/HCE-C210RD/HCE-C212F. Display...
... on , touch [ON/OFF] again. • Guides that are still adjustable. Adjusting guides simultaneously (for Rear camera & Front camera The video pattern can be adjusted simultaneously. The camera guide adjustment screen is displayed. • If the video pattern is completed, touch [Set]. The 3 vertical guides... If [Adjust] does not appear, proceed to step 3. 3 Touch the guide you can also be set in step 3. Adjusting the Rear/Front Camera Guide If you select "Rear" or "Front," you intend to be changed when connected to HCE-C200R/ HCE-C200F/HCE-C210RD/HCE-C212F. Display...
Owner's Manual (english)
Page 58
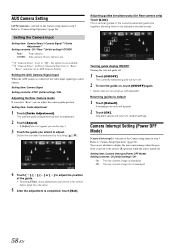
...Touching [Clear] clears adjustments and returns to be chosen. Adjusted values will return to "Camera Setup Operation" (page 56). Camera Interrupt Setting (Power OFF Mode) [Camera Interrupt] is not displayed 4 Touch or [ ] to adjust the position of the ...simultaneously (for Rear camera only) Touch [Link]. Setting the Camera Input Setting item: Camera Select / Camera Signal*1/ Guide Adjustment*1 Setting contents: Off / Rear*2 (Initial setting) / OTHER Rear: Rear camera OTHER: Side camera, Room camera, etc. *1 If "Camera Select" is set in Direct Camera Setting is displayed. ...
...Touching [Clear] clears adjustments and returns to be chosen. Adjusted values will return to "Camera Setup Operation" (page 56). Camera Interrupt Setting (Power OFF Mode) [Camera Interrupt] is not displayed 4 Touch or [ ] to adjust the position of the ...simultaneously (for Rear camera only) Touch [Link]. Setting the Camera Input Setting item: Camera Select / Camera Signal*1/ Guide Adjustment*1 Setting contents: Off / Rear*2 (Initial setting) / OTHER Rear: Rear camera OTHER: Side camera, Room camera, etc. *1 If "Camera Select" is set in Direct Camera Setting is displayed. ...
Owner's Manual (english)
Page 68
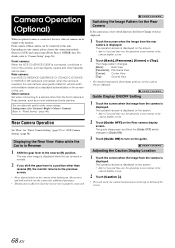
...Caution Display Location 1 Touch the screen when the image from the rear camera is displayed. Front camera or Rear camera can be output to turn and look and only use the camera for the Rear Camera If the camera has a view switch function, the Direct Change switch is displayed. 1... Touch the screen when the image from the camera is reversed, the rear camera view (guide marks for "Direct Camera Setting" (page 57) or "AUX Camera Setting" (page 58). For details, refer to the reverse (R) position. Switching the Image Pattern...
...Caution Display Location 1 Touch the screen when the image from the rear camera is displayed. Front camera or Rear camera can be output to turn and look and only use the camera for the Rear Camera If the camera has a view switch function, the Direct Change switch is displayed. 1... Touch the screen when the image from the camera is reversed, the rear camera view (guide marks for "Direct Camera Setting" (page 57) or "AUX Camera Setting" (page 58). For details, refer to the reverse (R) position. Switching the Image Pattern...

Owner's Manual (english)
Page 69
...is connected, smearing* may not be impaired. This is dark (during the night, etc.). - When sunlight or headlights directly strike the camera lens. - About the Rear Camera Guide To display the guide, set "Guide Display ON/OFF Setting" (page 68) to position A, you would collide with the truck...be in order of the sunlight on a car body) is different from the rear bumper. It is difficult to accurately estimate the distance to CCD cameras. * Smear phenomenon: A phenomenon which is shot by the guides. • In the following conditions, screen visibility may have a tint which occurs...
...is connected, smearing* may not be impaired. This is dark (during the night, etc.). - When sunlight or headlights directly strike the camera lens. - About the Rear Camera Guide To display the guide, set "Guide Display ON/OFF Setting" (page 68) to position A, you would collide with the truck...be in order of the sunlight on a car body) is different from the rear bumper. It is difficult to accurately estimate the distance to CCD cameras. * Smear phenomenon: A phenomenon which is shot by the guides. • In the following conditions, screen visibility may have a tint which occurs...

Owner's Manual (english)
Page 70
... closer than its actual position. Also, an error may occur between the screen guidance and the actual road surface. (The illustrations represent a case when the camera is installed in the case of a downward slope behind the car, the distance guides are displayed closer to a flat road surface. Error between the screen...
... closer than its actual position. Also, an error may occur between the screen guidance and the actual road surface. (The illustrations represent a case when the camera is installed in the case of a downward slope behind the car, the distance guides are displayed closer to a flat road surface. Error between the screen...

Owner's Manual (english)
Page 71
... Favorites screen is displayed. Refer to display appears. Displaying the Front View Video Manually 1 Press the (My Favorites) button. When the front camera (direct camera) and rear camera or side camera (AUX camera) are connected simultaneously, the screen for the operations. The image pattern changes. [Panorama]: Panorama View [Corner]: Corner View [Top]: Ground View •...
... Favorites screen is displayed. Refer to display appears. Displaying the Front View Video Manually 1 Press the (My Favorites) button. When the front camera (direct camera) and rear camera or side camera (AUX camera) are connected simultaneously, the screen for the operations. The image pattern changes. [Panorama]: Panorama View [Corner]: Corner View [Top]: Ground View •...

Owner's Manual (english)
Page 79
...16GB: Ver.1.1 iPod touch 4th generation 8GB/32GB/64GB: Ver.4.3.1 iPod touch 3rd generation 8GB/32GB/64GB: Ver.4.3.1 iPod nano 5th generation(video camera) 8GB/16GB: Ver.1.0.2 iPod classic(Late2009) 160GB: Ver.2.0.4 iPod touch 2nd generation 8GB/16GB/32GB/64GB: Ver.4.2.1 iPod nano 4th generation(... be distracted from the unit, but these functions can be controlled using the cable KCU461iV (sold separately). If the IVE-W535HD is applied. Install the IVE-W535HD correctly so that the driver cannot watch Video unless the vehicle is stopped and the emergency brake is not installed correctly...
...16GB: Ver.1.1 iPod touch 4th generation 8GB/32GB/64GB: Ver.4.3.1 iPod touch 3rd generation 8GB/32GB/64GB: Ver.4.3.1 iPod nano 5th generation(video camera) 8GB/16GB: Ver.1.0.2 iPod classic(Late2009) 160GB: Ver.2.0.4 iPod touch 2nd generation 8GB/16GB/32GB/64GB: Ver.4.2.1 iPod nano 4th generation(... be distracted from the unit, but these functions can be controlled using the cable KCU461iV (sold separately). If the IVE-W535HD is applied. Install the IVE-W535HD correctly so that the driver cannot watch Video unless the vehicle is stopped and the emergency brake is not installed correctly...
Owner's Manual (english)
Page 99
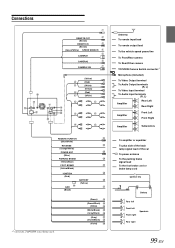
Connections REMOTE OUT (Brown) REMOTE IN (Brown) (Green/White) SPEED SENSOR CAMERA1 CAMERA2 CAMERA SW (Yellow) (Red) (White) (Yellow) (Red) (White) REMOTE TURN-ON (Blue/White) REVERSE (Orange/White) POWER ANT (Blue) PARKING BRAKE (Yellow/Blue) FOOT...Black) (Gray) (Violet/Black) (Violet) Antenna To remote input lead To remote output lead To the vehicle speed pause line To Front/Rear camera To Rear/Other camera TOPVIEW Camera Switch connector*1 Microphone (Included) To Video Output terminal To Audio Output terminals (R, L) To Video Input terminal To Audio Input terminals (R, L) ...
Connections REMOTE OUT (Brown) REMOTE IN (Brown) (Green/White) SPEED SENSOR CAMERA1 CAMERA2 CAMERA SW (Yellow) (Red) (White) (Yellow) (Red) (White) REMOTE TURN-ON (Blue/White) REVERSE (Orange/White) POWER ANT (Blue) PARKING BRAKE (Yellow/Blue) FOOT...Black) (Gray) (Violet/Black) (Violet) Antenna To remote input lead To remote output lead To the vehicle speed pause line To Front/Rear camera To Rear/Other camera TOPVIEW Camera Switch connector*1 Microphone (Included) To Video Output terminal To Audio Output terminals (R, L) To Video Input terminal To Audio Input terminals (R, L) ...

Owner's Manual (english)
Page 100
...Front Output RCA Connectors. This lamp illuminates when the transmission is shifted into reverse (R). With this lead to the rear camera whenever the car is put into reverse (R). Battery Lead (Yellow) Connect this lead properly wired, the video picture ...Alpine dealer. Switched Power Lead (Ignition) (Red) Connect this lead to an open terminal on the vehicle's fuse box or another unused power source which provides (+) 12V only when the ignition is turned on an amplifier or a signal processor, etc. Fuse Holder (10A) Ground Lead (Black) Connect this lead to the IVE-W535HD...
...Front Output RCA Connectors. This lamp illuminates when the transmission is shifted into reverse (R). With this lead to the rear camera whenever the car is put into reverse (R). Battery Lead (Yellow) Connect this lead properly wired, the video picture ...Alpine dealer. Switched Power Lead (Ignition) (Red) Connect this lead to an open terminal on the vehicle's fuse box or another unused power source which provides (+) 12V only when the ignition is turned on an amplifier or a signal processor, etc. Fuse Holder (10A) Ground Lead (Black) Connect this lead to the IVE-W535HD...

Owner's Manual (english)
Page 102
... inputs the controlling signals from the remote control. • You can change the name of an External device Camera Connector AUX/PRE OUT cable (Yellow) (Red) (White) (Yellow) (Red) (White) REMOTE IN (Brown) Camera cable AUX/PRE OUT Connector To Video Output terminal DVD Changer (Sold separately) To Audio Output terminal To...
... inputs the controlling signals from the remote control. • You can change the name of an External device Camera Connector AUX/PRE OUT cable (Yellow) (Red) (White) (Yellow) (Red) (White) REMOTE IN (Brown) Camera cable AUX/PRE OUT Connector To Video Output terminal DVD Changer (Sold separately) To Audio Output terminal To...


