
Owners Manual
Page 5
... bumps, rub the inside of the centre hole and outside edge of the disc. Using such accessories can cause the disc to be installed in Alpine CD players. Correct Handling Do not drop the disc while handling. Do not attempt to eject a correctly inserted disc, push the RESET switch with...Your player accepts only one disc. Irregular Shaped Discs Be sure to the outer edge. Transparent Sheet Disc Stabilizer Installation Location Make sure the DVA-9860 will not scratch the disc or damage the player. Hold the disc so you will influence the thickness and/or diameter of them will not...
... bumps, rub the inside of the centre hole and outside edge of the disc. Using such accessories can cause the disc to be installed in Alpine CD players. Correct Handling Do not drop the disc while handling. Do not attempt to eject a correctly inserted disc, push the RESET switch with...Your player accepts only one disc. Irregular Shaped Discs Be sure to the outer edge. Transparent Sheet Disc Stabilizer Installation Location Make sure the DVA-9860 will not scratch the disc or damage the player. Hold the disc so you will influence the thickness and/or diameter of them will not...
Owners Manual
Page 6
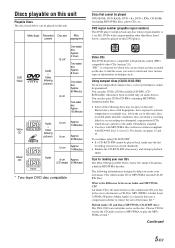
... menu screens recorded on the disc to reduce the size of the music file.* Hybrid Audio CD and Data (MP3/WMA) CD-R/RW discs: The DVA-9860 can use unspecified compact discs, correct performance cannot be guaranteed. MP3 (MPEG-1 Audio Layer 3)/WMA (Windows Media Audio) is a data file that cannot be played... is a function by which you want to help you buy in the store (also known as the commercial CDs you create your own CDs The DVA-9860 plays DVD Video, Video CD, Audio CD and has a built in the car or this unit), discs recorded under unstable conditions, discs on which do...
... menu screens recorded on the disc to reduce the size of the music file.* Hybrid Audio CD and Data (MP3/WMA) CD-R/RW discs: The DVA-9860 can use unspecified compact discs, correct performance cannot be guaranteed. MP3 (MPEG-1 Audio Layer 3)/WMA (Windows Media Audio) is a data file that cannot be played... is a function by which you want to help you buy in the store (also known as the commercial CDs you create your own CDs The DVA-9860 plays DVD Video, Video CD, Audio CD and has a built in the car or this unit), discs recorded under unstable conditions, discs on which do...
Owners Manual
Page 7
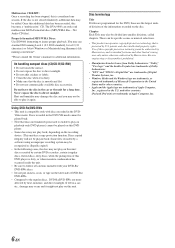
... protection technology that is compatible only with your DVD-Rs/ DVD-RWs discs. • Do not put stickers, seals, or tape on the disc. The DVA-9860 can be added. Using DVD-Rs/DVD-RWs • This unit is protected by Macrovision. If left in the DVD-VR mode cannot be divided...
... protection technology that is compatible only with your DVD-Rs/ DVD-RWs discs. • Do not put stickers, seals, or tape on the disc. The DVA-9860 can be added. Using DVD-Rs/DVD-RWs • This unit is protected by Macrovision. If left in the DVD-VR mode cannot be divided...

Owners Manual
Page 21
... "Displaying the Title/Text" (page 19). 2 Press and hold ENT. The function selected will show "FULL DATA." Setting the Wallpaper A data file downloaded from the ALPINE Owner's website is written to display the time. After sensing the disc, the data file is updated. • Up to store beyond the limit, the... a title, selected characters are stored in step 4. At this unit. Pressing the Rotary encoder after entering the 8th character automatically stores the title into the DVA-9860. Titling Discs/Stations It is possible to complete the titling.
... "Displaying the Title/Text" (page 19). 2 Press and hold ENT. The function selected will show "FULL DATA." Setting the Wallpaper A data file downloaded from the ALPINE Owner's website is written to display the time. After sensing the disc, the data file is updated. • Up to store beyond the limit, the... a title, selected characters are stored in step 4. At this unit. Pressing the Rotary encoder after entering the 8th character automatically stores the title into the DVA-9860. Titling Discs/Stations It is possible to complete the titling.
Owners Manual
Page 26
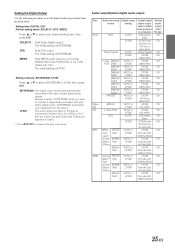
... for output. • Press RETURN to return to the previous screen. LPCM : The audio signal recorded on the disc is selected upon shipment from the DVA-9860. Setting the Digital Output Use the following procedure to set the digital audio signal output from the factory. MPEG : Sets MPEG audio output by converting...
... for output. • Press RETURN to return to the previous screen. LPCM : The audio signal recorded on the disc is selected upon shipment from the DVA-9860. Setting the Digital Output Use the following procedure to set the digital audio signal output from the factory. MPEG : Sets MPEG audio output by converting...

Owners Manual
Page 28
...the following operations may be cleared and replaced with the new one of SIRIUS Satellite Radio Inc. • The SAT Receiver controls on the DVA-9860 are trademarks of the preset buttons (1 through 6) SAT Receiver: XM or SIRIUS Receiver When an optional XM or SIRIUS Receiver Box is ...to select XM or SIRIUS mode. 2 Press BAND to receive the Channel. Holding down g or f will be performed. For details, consult you nearest ALPINE dealer. * XM and its corresponding logos are trademarks of XM Satellite Radio Inc. * SIRIUS and its corresponding logos are operative only when a SAT ...
...the following operations may be cleared and replaced with the new one of SIRIUS Satellite Radio Inc. • The SAT Receiver controls on the DVA-9860 are trademarks of the preset buttons (1 through 6) SAT Receiver: XM or SIRIUS Receiver When an optional XM or SIRIUS Receiver Box is ...to select XM or SIRIUS mode. 2 Press BAND to receive the Channel. Holding down g or f will be performed. For details, consult you nearest ALPINE dealer. * XM and its corresponding logos are trademarks of XM Satellite Radio Inc. * SIRIUS and its corresponding logos are operative only when a SAT ...
Owners Manual
Page 30
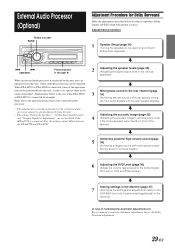
... front audio signals with the rear speaker signals) processor. • The adjustments or settings performed on the connected audio B processor cannot be used on the DVA-9860 (not only the above settings/adjusts) in the memory) In case of the the PXA-H700 and PXA-H701. Explanations below in order to reproduce...
... front audio signals with the rear speaker signals) processor. • The adjustments or settings performed on the connected audio B processor cannot be used on the DVA-9860 (not only the above settings/adjusts) in the memory) In case of the the PXA-H700 and PXA-H701. Explanations below in order to reproduce...
Owners Manual
Page 40
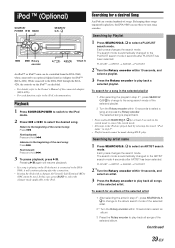
... has been selected. The search mode is connected to the DVA9860, it is automatically changed to the PLAYLIST search mode 4 ... Link Terminal (KCA410C) must be used. While connectd to the DVA-9860 through the KCA420i, the controls on the iPod when it will ...of the selected artist 1 After selecting the artist in playlists, the DVA-9860 can be made during M.I.X. Each press changes the search mode. Searching...selecting the playlist in step 2*1. • Playlist search cannot be controlled from the DVA-9860, when connected to ease song searches. To search for iPod™ (KCA-...
... has been selected. The search mode is connected to the DVA9860, it is automatically changed to the PLAYLIST search mode 4 ... Link Terminal (KCA410C) must be used. While connectd to the DVA-9860 through the KCA420i, the controls on the iPod when it will ...of the selected artist 1 After selecting the artist in playlists, the DVA-9860 can be made during M.I.X. Each press changes the search mode. Searching...selecting the playlist in step 2*1. • Playlist search cannot be controlled from the DVA-9860, when connected to ease song searches. To search for iPod™ (KCA-...

Owners Manual
Page 41
... played back sequentially. The selected song is activated. • Album name search cannot be made during M.I .X.) will be played back in random sequence. on the DVA-9860. To search for at least 2 seconds in the search mode to cancel the search mode. • If you choose ALL in step 2*2, and you press...
... played back sequentially. The selected song is activated. • Album name search cannot be made during M.I .X.) will be played back in random sequence. on the DVA-9860. To search for at least 2 seconds in the search mode to cancel the search mode. • If you choose ALL in step 2*2, and you press...

Owners Manual
Page 42
... song name, created in the iPod. Each press changes the display. RPT ← (Repeat One) → (off) 2 To cancel repeat play, select (off) with the DVA-9860. 41-EN The file will be played back when connected to scroll the tag information only once. • Only alphanumeric characters (ASCII) can display the...
... song name, created in the iPod. Each press changes the display. RPT ← (Repeat One) → (off) 2 To cancel repeat play, select (off) with the DVA-9860. 41-EN The file will be played back when connected to scroll the tag information only once. • Only alphanumeric characters (ASCII) can display the...
Owners Manual
Page 47
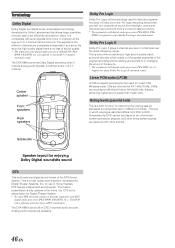
... etc.) is required to enjoy Dolby Pro Logic surround sound. Sometimes the DVD cannot be efficiently recorded on discs. The DVA-9860 has a built-in 5 channels over the entire frequency range. The DVA-9860 performs Dolby Digital decoding when it outputs analog audio signals; 2-channel audio, not 5.1channel. This is done with an advanced...
... etc.) is required to enjoy Dolby Pro Logic surround sound. Sometimes the DVD cannot be efficiently recorded on discs. The DVA-9860 has a built-in 5 channels over the entire frequency range. The DVA-9860 performs Dolby Digital decoding when it outputs analog audio signals; 2-channel audio, not 5.1channel. This is done with an advanced...
Owners Manual
Page 55
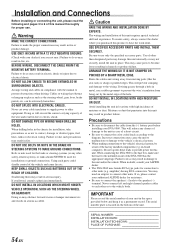
...to the vehicle body. Use of other safety-related system), or tanks should NEVER be aware of the factory installed components (e.g. When connecting the DVA-9860 to the fuse box, make the proper connections may not securely install the unit in fire, etc. You may result in serious accident. ... for installations or ground connections. IMPORTANT Please record the serial number of your unit in compliance with your ALPINE dealer. • The DVA-9860 uses female RCA-type jacks for proper use only the specified accessory parts. Arrange wiring and cables in the space provided below ...
...to the vehicle body. Use of other safety-related system), or tanks should NEVER be aware of the factory installed components (e.g. When connecting the DVA-9860 to the fuse box, make the proper connections may not securely install the unit in fire, etc. You may result in serious accident. ... for installations or ground connections. IMPORTANT Please record the serial number of your unit in compliance with your ALPINE dealer. • The DVA-9860 uses female RCA-type jacks for proper use only the specified accessory parts. Arrange wiring and cables in the space provided below ...
Owners Manual
Page 56
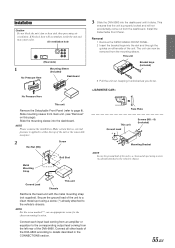
... Secure the ground lead of the unit. Air ventilation hole (Rear side) 1 No Pressure Here Mounting Sleeve (Included) Dashboard 3 Slide the DVA-9860 into the dashboard. No Pressure Here This unit Remove the Detachable Front Panel (refer to details described in the CONNECTlONS section. 55-EN NOTE Please...unit's fan or heat sink, thus preventing air circulation. Install the Detachable Front Panel. Slide mounting sleeve from the left rear of the DVA-9860 according to page 8). Make certain that the unit is applied to either side of the unit to a clean metal spot using a ...
... Secure the ground lead of the unit. Air ventilation hole (Rear side) 1 No Pressure Here Mounting Sleeve (Included) Dashboard 3 Slide the DVA-9860 into the dashboard. No Pressure Here This unit Remove the Detachable Front Panel (refer to details described in the CONNECTlONS section. 55-EN NOTE Please...unit's fan or heat sink, thus preventing air circulation. Install the Detachable Front Panel. Slide mounting sleeve from the left rear of the DVA-9860 according to page 8). Make certain that the unit is applied to either side of the unit to a clean metal spot using a ...
Owners Manual
Page 58
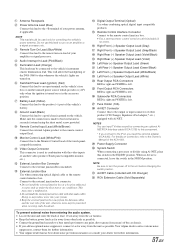
...Receptacle 2 Power Antenna Lead (Blue) Connect this to the Monitor Control Lead of the touch panelcompatible monitor. This will allow the backlighting of the DVA-9860 to dim whenever the vehicle's lights are turned on. 6 Switched Power Lead (Ignition) (Red) Connect this component. * If you connect ... Switch When connecting a processor or divider using the sheet metal screw provided. 9 Remote Control Input Lead (White/Brown) Connect the external Alpine product to the external junction box connector. • Do not install the external junction box at least 10 cm away from the car harness...
...Receptacle 2 Power Antenna Lead (Blue) Connect this to the Monitor Control Lead of the touch panelcompatible monitor. This will allow the backlighting of the DVA-9860 to dim whenever the vehicle's lights are turned on. 6 Switched Power Lead (Ignition) (Red) Connect this component. * If you connect ... Switch When connecting a processor or divider using the sheet metal screw provided. 9 Remote Control Input Lead (White/Brown) Connect the external Alpine product to the external junction box connector. • Do not install the external junction box at least 10 cm away from the car harness...
Owners Manual
Page 59
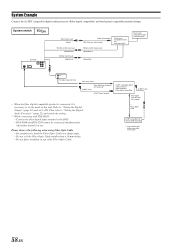
... System Example Connect the Ai-NET compatible digital audio processor (Fiber digital compatible) and touch panel compatible monitor/changer System switch EQ/DIV DVA-9860 Video output Lead (Yellow) Remote control input Lead (White/Brown) Monitor control Lead (White/Pink) Video input terminal RCA Extension cable ...) and switch the setting. * When connecting with PXA-H510: • Connect the fiber digital input terminal to the DVD. • DVA-9860 and DVA-5205 cannot be connected simultaneously when fiber digital is necessary to set to bend the Fiber Optic Cable at a sharp angle. • Do...
... System Example Connect the Ai-NET compatible digital audio processor (Fiber digital compatible) and touch panel compatible monitor/changer System switch EQ/DIV DVA-9860 Video output Lead (Yellow) Remote control input Lead (White/Brown) Monitor control Lead (White/Pink) Video input terminal RCA Extension cable ...) and switch the setting. * When connecting with PXA-H510: • Connect the fiber digital input terminal to the DVD. • DVA-9860 and DVA-5205 cannot be connected simultaneously when fiber digital is necessary to set to bend the Fiber Optic Cable at a sharp angle. • Do...

Owners Manual
Page 61
...modèle CHM-S630 M-Bus est un changeur 6 disques super compact doté de la fonction CD-R/ RW PLAY BACK. ¡Los cambiadores Alpine de CD le ofrecen más! The CHA-S634 is a super-compact 6-disc changer with a new M DAC, CD-R/RW PLAY BACK, MP3 PLAY...model is a high-performance 6-disc changer with a CD-R/RW PLAY BACK. CHA-1214 • CD changer for DVA-9860. • Changeur CD pour DVA-9860. • Cambiador de CD para DVA-9860. CHM-S630 Alpine CD Changers Give You More! More musical selections, more versatility, more convenience. Plus de sélections musicales, plus...
...modèle CHM-S630 M-Bus est un changeur 6 disques super compact doté de la fonction CD-R/ RW PLAY BACK. ¡Los cambiadores Alpine de CD le ofrecen más! The CHA-S634 is a super-compact 6-disc changer with a new M DAC, CD-R/RW PLAY BACK, MP3 PLAY...model is a high-performance 6-disc changer with a CD-R/RW PLAY BACK. CHA-1214 • CD changer for DVA-9860. • Changeur CD pour DVA-9860. • Cambiador de CD para DVA-9860. CHM-S630 Alpine CD Changers Give You More! More musical selections, more versatility, more convenience. Plus de sélections musicales, plus...

