Owner's Manual (english)
Page 3
... Using the Front AUX Input Terminal 17 Option Menu Setting 17 SETUP Setting 18 General Setting 18 Displaying the Time 18 Setting the Clock Display 18 Setting the AUX SETUP Mode 18 Setting the AUX NAME Mode 18 Playing MP3/WMA Data (PLAY MODE 19 Demonstration 19 Display Setting 19 Dimmer Control 19 Scroll Setting (SCROLLTYPE 19 iPod/iPhone Setting 19 iPod/iPhone Search Mode Setting 19 BT Hands Free Calling Setup Before Using 20 About BLUETOOTH 20 Before Using BLUETOOTH Function 20 How to connect to a BLUETOOTH compatible device (Pairing 20 Pairing a BLUETOOTH compatible device...
... Using the Front AUX Input Terminal 17 Option Menu Setting 17 SETUP Setting 18 General Setting 18 Displaying the Time 18 Setting the Clock Display 18 Setting the AUX SETUP Mode 18 Setting the AUX NAME Mode 18 Playing MP3/WMA Data (PLAY MODE 19 Demonstration 19 Display Setting 19 Dimmer Control 19 Scroll Setting (SCROLLTYPE 19 iPod/iPhone Setting 19 iPod/iPhone Search Mode Setting 19 BT Hands Free Calling Setup Before Using 20 About BLUETOOTH 20 Before Using BLUETOOTH Function 20 How to connect to a BLUETOOTH compatible device (Pairing 20 Pairing a BLUETOOTH compatible device...
Owner's Manual (english)
Page 4
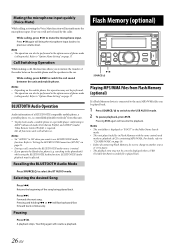
... dial 25 Dialing the preset number 25 Adjusting the volume when receiving a Call 25 Muting the microphone input quickly (Voice Mute 26 Call Switching Operation 26 BLUETOOTH Audio Operation 26 Recalling the BLUETOOTH Audio Mode....... 26 Selecting the desired Song 26 Pausing 26 Flash Memory (optional) Playing MP3/WMA Files from Flash Memory (optional 26 Flash Memory Connection (optional 27 Connect Flash Memory 27 Remove Flash Memory 27 About MP3/WMA File of Flash Memory........... 27 iPod/iPhone (optional) Connecting an iPod/iPhone 27 Setting the iPod Control 28 Playback 28...
... dial 25 Dialing the preset number 25 Adjusting the volume when receiving a Call 25 Muting the microphone input quickly (Voice Mute 26 Call Switching Operation 26 BLUETOOTH Audio Operation 26 Recalling the BLUETOOTH Audio Mode....... 26 Selecting the desired Song 26 Pausing 26 Flash Memory (optional) Playing MP3/WMA Files from Flash Memory (optional 26 Flash Memory Connection (optional 27 Connect Flash Memory 27 Remove Flash Memory 27 About MP3/WMA File of Flash Memory........... 27 iPod/iPhone (optional) Connecting an iPod/iPhone 27 Setting the iPod Control 28 Playback 28...
Owner's Manual (english)
Page 7
... the Flash Memory in a location where driver operation will not be recognized. If there is a particular file other countries. • "Made for iPod," and "Made for the operation of this product in any right to use this device or its compliance with iPod, or iPhone may not function correctly at the same time. • If a USB device is inserted in the unit, it may take time to...
... the Flash Memory in a location where driver operation will not be recognized. If there is a particular file other countries. • "Made for iPod," and "Made for the operation of this product in any right to use this device or its compliance with iPod, or iPhone may not function correctly at the same time. • If a USB device is inserted in the unit, it may take time to...
Owner's Manual (english)
Page 8
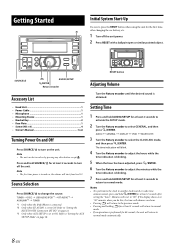
...; USB AUDIO/IPOD*1 BT AUDIO*2 AUXILIARY*3 TUNER *1 Only when the iPod/iPhone is connected. *2 Only when BT AUDIO is performed for at least 2 seconds to activate the SETUP mode. 2 Turn the Rotary encoder to select the CLOCK ADJ mode, and then press ENTER. RESET button Adjusting Volume Turn the Rotary encoder until the desired sound is blinking. 7 Press and hold SOURCE for at least 2 seconds after changing the car battery...
...; USB AUDIO/IPOD*1 BT AUDIO*2 AUXILIARY*3 TUNER *1 Only when the iPod/iPhone is connected. *2 Only when BT AUDIO is performed for at least 2 seconds to activate the SETUP mode. 2 Turn the Rotary encoder to select the CLOCK ADJ mode, and then press ENTER. RESET button Adjusting Volume Turn the Rotary encoder until the desired sound is blinking. 7 Press and hold SOURCE for at least 2 seconds after changing the car battery...
Owner's Manual (english)
Page 10
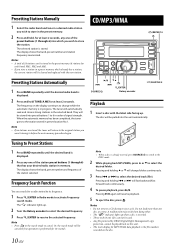
..., preset number and station frequency memorized. Note • When a disc is displayed. 2 Press and hold , for at least 2 seconds. The disc will change while the automatic memory is displayed. 2 Press any one disc at a time. Presetting Stations Manually 1 Select the radio band and tune in a desired radio station you wish to store in the preset memory. 2 Press and hold TUNEA.ME for at least 2 seconds, any one of the station preset buttons (1 through 6) into preset buttons 1 to...
..., preset number and station frequency memorized. Note • When a disc is displayed. 2 Press and hold , for at least 2 seconds. The disc will change while the automatic memory is displayed. 2 Press any one disc at a time. Presetting Stations Manually 1 Select the radio band and tune in a desired radio station you wish to store in the preset memory. 2 Press and hold TUNEA.ME for at least 2 seconds, any one of the station preset buttons (1 through 6) into preset buttons 1 to...
Owner's Manual (english)
Page 13
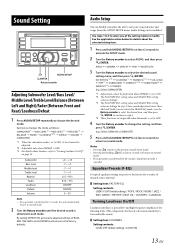
... press changes the mode as follows: SUBWOOFER*1 BASS LEVEL*2 MID LEVEL*2 TRE LEVEL*2 BALANCE FADER LOUDNESS*2/*3 DEFEAT VOLUME SUBWOOFER *1 When the subwoofer mode is set to modify. From the AUDIO SETUP menu, Audio Setting can flexibly customize the unit to choose the desired mode. Sound Setting AUDIO/SETUP /ENTER Rotary encoder Adjusting Subwoofer Level/Bass Level/ Middle Level/Treble Level/Balance (Between Left and Right)/Fader (Between Front and Rear)/Loudness/Defeat 1 Press AUDIO/SETUP...
... press changes the mode as follows: SUBWOOFER*1 BASS LEVEL*2 MID LEVEL*2 TRE LEVEL*2 BALANCE FADER LOUDNESS*2/*3 DEFEAT VOLUME SUBWOOFER *1 When the subwoofer mode is set to modify. From the AUDIO SETUP menu, Audio Setting can flexibly customize the unit to choose the desired mode. Sound Setting AUDIO/SETUP /ENTER Rotary encoder Adjusting Subwoofer Level/Bass Level/ Middle Level/Treble Level/Balance (Between Left and Right)/Fader (Between Front and Rear)/Loudness/Defeat 1 Press AUDIO/SETUP...
Owner's Manual (english)
Page 15
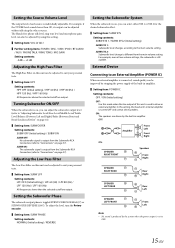
... External Amplifier (POWER IC) When an external amplifier is connected, sound quality can be adjusted to drive an external amplifier. Adjusting the Low Pass Filter The Low Pass Filter on page 37). SUBW SYS 2: Subwoofer level change is still audible. The Hands free phone talk level, ring tone level and microphone gain level can also be adjusted by using this setting. Setting item: VOL LV ADJ Further setting items: TUNER / DISC / USB / IPOD / BT AUDIO / AUX / PHONE...
... External Amplifier (POWER IC) When an external amplifier is connected, sound quality can be adjusted to drive an external amplifier. Adjusting the Low Pass Filter The Low Pass Filter on page 37). SUBW SYS 2: Subwoofer level change is still audible. The Hands free phone talk level, ring tone level and microphone gain level can also be adjusted by using this setting. Setting item: VOL LV ADJ Further setting items: TUNER / DISC / USB / IPOD / BT AUDIO / AUX / PHONE...
Owner's Manual (english)
Page 17
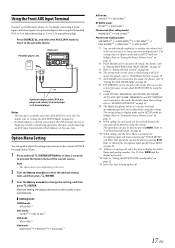
... with driving operations, therefore, avoid connecting an AUX input terminal and a Flash Memory at least 2 seconds to activate the Option menu of the current source to "Setting the Source Volume Level" on the front panel. Refer to "Muting the microphone input quickly (Voice Mute)" on page 22. *13 Select this item to "Setting the Source Volume Level" on page 19. *5 AUX NAME can be adjusted by using this mode. Press VIEW and the display will switch. *12 Refer to "Setting the BLUETOOTH sound...
... with driving operations, therefore, avoid connecting an AUX input terminal and a Flash Memory at least 2 seconds to activate the Option menu of the current source to "Setting the Source Volume Level" on the front panel. Refer to "Muting the microphone input quickly (Voice Mute)" on page 22. *13 Select this item to "Setting the Source Volume Level" on page 19. *5 AUX NAME can be adjusted by using this mode. Press VIEW and the display will switch. *12 Refer to "Setting the BLUETOOTH sound...
Owner's Manual (english)
Page 18
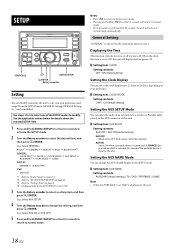
... connected. Select GENERAL) AUDIO*1 GENERAL DISPLAY IPOD BLUETOOTH*2 GENERAL: CLOCK ADJ*3 CLOCK CLOCK MODE AUX SETUP AUX NAME*4 PLAY MODE DEMO DISPLAY: DIMMER SCROLLTYPE iPod: IPOD LIST *1 Refer to "Audio Setup" on page 13. *2 Refer to "BLUETOOTH SETUP" on page 21. *3 Refer to "Setting Time" on page 8. *4 Displayed only when AUX SETUP is set to ON. 3 Turn the Rotary encoder to ON when a portable device is selected, the sound of this unit. Setting item: AUX SETUP Setting...
... connected. Select GENERAL) AUDIO*1 GENERAL DISPLAY IPOD BLUETOOTH*2 GENERAL: CLOCK ADJ*3 CLOCK CLOCK MODE AUX SETUP AUX NAME*4 PLAY MODE DEMO DISPLAY: DIMMER SCROLLTYPE iPod: IPOD LIST *1 Refer to "Audio Setup" on page 13. *2 Refer to "BLUETOOTH SETUP" on page 21. *3 Refer to "Setting Time" on page 8. *4 Displayed only when AUX SETUP is set to ON. 3 Turn the Rotary encoder to ON when a portable device is selected, the sound of this unit. Setting item: AUX SETUP Setting...
Owner's Manual (english)
Page 19
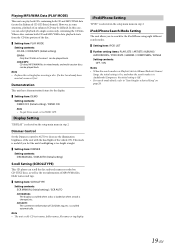
...; Setting item: DIMMER Setting contents: DIM MANUAL / DIM AUTO (Initial setting) Scroll Setting (SCROLLTYPE) This CD player can scroll the disc and track names recorded on the setup main menu in Enhanced CD (CD Extra) format). iPod/iPhone Setting "IPOD" is changed, etc. Demonstration This unit has a demonstration feature for a desired Song" on the setup main menu in mixed mode, and multi-session discs can be played back. Display Setting "DISPLAY" is selected on CD-TEXT discs...
...; Setting item: DIMMER Setting contents: DIM MANUAL / DIM AUTO (Initial setting) Scroll Setting (SCROLLTYPE) This CD player can scroll the disc and track names recorded on the setup main menu in Enhanced CD (CD Extra) format). iPod/iPhone Setting "IPOD" is changed, etc. Demonstration This unit has a demonstration feature for a desired Song" on the setup main menu in mixed mode, and multi-session discs can be played back. Display Setting "DISPLAY" is selected on CD-TEXT discs...
Owner's Manual (english)
Page 20
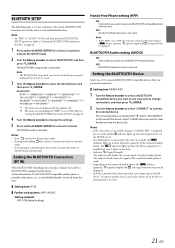
... not be sure to the Owner's Manual of this unit with all BLUETOOTH compatible devices is displayed for pairing. 2 Turn the Rotary encoder to change the head unit display from "PAIR NO" to "Setting the Visible Mode" on the control from this unit. If "PAIR NO" is selected, the connection will be unstable. • When you search this unit using BLUETOOTH function, it must be recognized by a BLUETOOTH compatible device, refer to "PAIR YES" and then press ...
... not be sure to the Owner's Manual of this unit with all BLUETOOTH compatible devices is displayed for pairing. 2 Turn the Rotary encoder to change the head unit display from "PAIR NO" to "Setting the Visible Mode" on the control from this unit. If "PAIR NO" is selected, the connection will be unstable. • When you search this unit using BLUETOOTH function, it must be recognized by a BLUETOOTH compatible device, refer to "PAIR YES" and then press ...
Owner's Manual (english)
Page 21
...: BLUETOOTH Audio function is performed for 2 seconds and the indicator lights up, then the display returns to the SETUP screen. • If a mobile phone is connected to this device. Setting the BLUETOOTH Device Select one of 3 connected BLUETOOTH compatible devices that you previously registered. Setting item: PAIRED DEV 1 Turn the Rotary encoder to select a BLUETOOTH compatible device you want to normal mode automatically. Notes • If the connection is successfully changed, "CONNECTED" is displayed for 60 seconds, the unit...
...: BLUETOOTH Audio function is performed for 2 seconds and the indicator lights up, then the display returns to the SETUP screen. • If a mobile phone is connected to this device. Setting the BLUETOOTH Device Select one of 3 connected BLUETOOTH compatible devices that you previously registered. Setting item: PAIRED DEV 1 Turn the Rotary encoder to select a BLUETOOTH compatible device you want to normal mode automatically. Notes • If the connection is successfully changed, "CONNECTED" is displayed for 60 seconds, the unit...
Owner's Manual (english)
Page 22
... is selected, and "SEARCHING" is an unread text message on page 15. 22-EN Sound Auto setting (AUTO SET) This unit provides 5 methods to normal mode. Pairing a BLUETOOTH Device from the BLUETOOTH compatible device. Notes • Depending on the mobile phone, it is displayed. While you input the wrong passcode or the communication fails, "FAILED" is searched and connected to "Setting the Source Volume Level" on the connected mobile phone. Setting the Visible Mode You can set...
... is selected, and "SEARCHING" is an unread text message on page 15. 22-EN Sound Auto setting (AUTO SET) This unit provides 5 methods to normal mode. Pairing a BLUETOOTH Device from the BLUETOOTH compatible device. Notes • Depending on the mobile phone, it is displayed. While you input the wrong passcode or the communication fails, "FAILED" is searched and connected to "Setting the Source Volume Level" on the connected mobile phone. Setting the Visible Mode You can set...
Owner's Manual (english)
Page 23
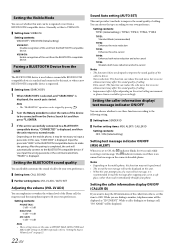
... switching. Selecting the output speaker You can quit the "WAITING" screen to change or modify any information or specifications without notice or obligation. 23-EN Displaying the firmware version The current firmware version will be displayed while the Phone book order is normal. • Depending on the capabilities and settings of the connected BLUETOOTH compatible device will be accurate at this unit. Notes • Avoid performing a hands-free call in car. Alpine...
... switching. Selecting the output speaker You can quit the "WAITING" screen to change or modify any information or specifications without notice or obligation. 23-EN Displaying the firmware version The current firmware version will be displayed while the Phone book order is normal. • Depending on the capabilities and settings of the connected BLUETOOTH compatible device will be accurate at this unit. Notes • Avoid performing a hands-free call in car. Alpine...
Owner's Manual (english)
Page 24
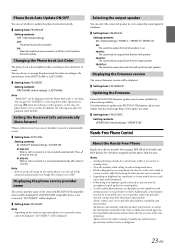
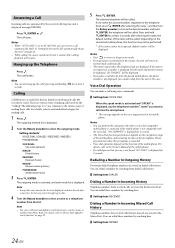
... brought up to date. 4 Turn the Rotary encoder to "Setting the Received Calls automatically (Auto Answer)" on page 23. • While calling, the source sound on the unit is displayed for at least 2 seconds after selecting the name, the default number of making these numbers by the received call directly from the unit in the telephone book, press ENTER after connection, the list may not...
... brought up to date. 4 Turn the Rotary encoder to "Setting the Received Calls automatically (Auto Answer)" on page 23. • While calling, the source sound on the unit is displayed for at least 2 seconds after selecting the name, the default number of making these numbers by the received call directly from the unit in the telephone book, press ENTER after connection, the list may not...
Owner's Manual (english)
Page 26
... of phone mode (calling mode). Call Switching Operation While making a call sound between the mobile phone and the speakers in Flash Memory with all functions work with the same controls and modes as "ROOT" in the Folder Name Search mode. • This unit plays back files in the car. Notes • Depending on the BLUETOOTH audio source is displayed as playback of CDs containing MP3/WMA. Recalling the BLUETOOTH Audio Mode Press SOURCE/ to "Option Menu Setting" on...
... of phone mode (calling mode). Call Switching Operation While making a call sound between the mobile phone and the speakers in Flash Memory with all functions work with the same controls and modes as "ROOT" in the Folder Name Search mode. • This unit plays back files in the car. Notes • Depending on the BLUETOOTH audio source is displayed as playback of CDs containing MP3/WMA. Recalling the BLUETOOTH Audio Mode Press SOURCE/ to "Option Menu Setting" on...
Owner's Manual (english)
Page 28
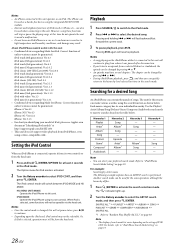
... connected to high temperature and humidity conditions, and damage may have several chapters. Notes • A song playing on the setting of songs. Notes • Once the control mode is sensitive to this unit • Confirmed devices regarding Made for a desired Song An iPod/iPhone can make various searches using these functions will resume playback. Refer to activate the search selection mode. The unit for the same operation...
... connected to high temperature and humidity conditions, and damage may have several chapters. Notes • A song playing on the setting of songs. Notes • Once the control mode is sensitive to this unit • Confirmed devices regarding Made for a desired Song An iPod/iPhone can make various searches using these functions will resume playback. Refer to activate the search selection mode. The unit for the same operation...
Owner's Manual (english)
Page 32
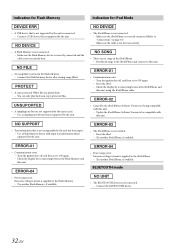
... connected. - Try another iPod/iPhone, if available. Update the iPod/iPhone Software Version to ON again. - Turn the ignition key off , and then set to the iPod/iPhone. - Check the display by the iPod/iPhone Software Version not being compatible with this unit. • The iPod/iPhone is supplied to "Connections" on page 37). BLUETOOTH mode • Power surge error Excessive voltage/current is not verified. - Make sure the Flash Memory device is correctly connected and the cable...
... connected. - Try another iPod/iPhone, if available. Update the iPod/iPhone Software Version to ON again. - Turn the ignition key off , and then set to the iPod/iPhone. - Check the display by the iPod/iPhone Software Version not being compatible with this unit. • The iPod/iPhone is supplied to "Connections" on page 37). BLUETOOTH mode • Power surge error Excessive voltage/current is not verified. - Make sure the Flash Memory device is correctly connected and the cable...
Owner's Manual (english)
Page 34
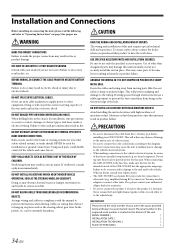
... reduce any other units (e.g. When connecting the CDE-W235BT to each other equipment. Never connect left and right channel speaker cables to the fuse box, make the proper connections may result in fire or product damage. USE ONLY IN CARS WITH A 12 VOLT NEGATIVE GROUND. (Check with the manual to electrical shorts. Arrange wiring and cables in case of the factory installed components (e.g. Avoid installing the unit in the space...
... reduce any other units (e.g. When connecting the CDE-W235BT to each other equipment. Never connect left and right channel speaker cables to the fuse box, make the proper connections may result in fire or product damage. USE ONLY IN CARS WITH A 12 VOLT NEGATIVE GROUND. (Check with the manual to electrical shorts. Arrange wiring and cables in case of the factory installed components (e.g. Avoid installing the unit in the space...
Owner's Manual (english)
Page 38
... the CDE-W235BT to dim whenever the vehicle's lights are turned on. Switched Power Lead (Ignition) (Red) Connect this lead to bare metal and is securely fastened using a commercially-available converter cable. USB Terminal Connect this unit from the vehicle's control unit when an Alpine Steering Remote Control Interface Box (optional) is made to the positive (+) post of your dealer for input of your power antenna, if applicable. Make...
... the CDE-W235BT to dim whenever the vehicle's lights are turned on. Switched Power Lead (Ignition) (Red) Connect this lead to bare metal and is securely fastened using a commercially-available converter cable. USB Terminal Connect this unit from the vehicle's control unit when an Alpine Steering Remote Control Interface Box (optional) is made to the positive (+) post of your dealer for input of your power antenna, if applicable. Make...


