
User Manual
Page 4
...BLUETOOTH Operation Setup Before Using 22 About BLUETOOTH 22 Before Using BLUETOOTH Function 22 How to connect to a BLUETOOTH compatible device (Pairing 23 Pairing a BLUETOOTH compatible device with SSP (Secure Simple Pairing 23 Pairing a BLUETOOTH compatible device without SSP (Secure Simple Pairing 23 BLUETOOTH SETUP 23 Setting the BLUETOOTH Connection (BT IN 23 Setting the BLUETOOTH...31 Repeat Play 32 SiriusXM Satellite Radio Operation (CDE-SXM145BT only) Receiving Channels with the SiriusXM Tuner 32 SiriusXM Setting (CDE-SXM145BT Only) ..........32 Managing Artist and Song Alerts ...
...BLUETOOTH Operation Setup Before Using 22 About BLUETOOTH 22 Before Using BLUETOOTH Function 22 How to connect to a BLUETOOTH compatible device (Pairing 23 Pairing a BLUETOOTH compatible device with SSP (Secure Simple Pairing 23 Pairing a BLUETOOTH compatible device without SSP (Secure Simple Pairing 23 BLUETOOTH SETUP 23 Setting the BLUETOOTH Connection (BT IN 23 Setting the BLUETOOTH...31 Repeat Play 32 SiriusXM Satellite Radio Operation (CDE-SXM145BT only) Receiving Channels with the SiriusXM Tuner 32 SiriusXM Setting (CDE-SXM145BT Only) ..........32 Managing Artist and Song Alerts ...
User Manual
Page 9
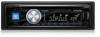
...CDE-SXM145BT/CDE-143BT. Note • The first time power is for at the lower left side until it may become hot in normal usage (especially the connector terminals on page 23. *5 Only when AUX SETUP is not a malfunction. • To protect the front panel, place it in malfunction. Refer to "Setting the BLUETOOTH...front panel). Notes • Before attaching the front panel, make sure that there is connected.(CDE-SXM145BT only). *2 Only for CDE-SXM145BT/CDE-143BT. e AUDIO/SETUP * The illustration is turned on the connector terminals and no foreign object between the front ...
...CDE-SXM145BT/CDE-143BT. Note • The first time power is for at the lower left side until it may become hot in normal usage (especially the connector terminals on page 23. *5 Only when AUX SETUP is not a malfunction. • To protect the front panel, place it in malfunction. Refer to "Setting the BLUETOOTH...front panel). Notes • Before attaching the front panel, make sure that there is connected.(CDE-SXM145BT only). *2 Only for CDE-SXM145BT/CDE-143BT. e AUDIO/SETUP * The illustration is turned on the connector terminals and no foreign object between the front ...
User Manual
Page 10
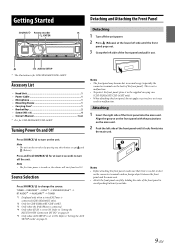
... Press RESET with an optional Alpine remote control. AUDIO GENERAL DISPLAY TUNER SIRIUSXM* iPod BLUETOOTH * Displayed only when a siriusXM...Alpine dealer. Notes • To synchronize the clock to another clock/watch or radio time announcement, press and hold ENTER for at the remote-control sensor. If the display shows over "30" minutes when you do this unit is for CDE-SXM145BT/CDE...the time indication is blinking. 7 Press and hold AUDIOSETUP for at least 2 seconds will return to normal mode. • If...
... Press RESET with an optional Alpine remote control. AUDIO GENERAL DISPLAY TUNER SIRIUSXM* iPod BLUETOOTH * Displayed only when a siriusXM...Alpine dealer. Notes • To synchronize the clock to another clock/watch or radio time announcement, press and hold ENTER for at the remote-control sensor. If the display shows over "30" minutes when you do this unit is for CDE-SXM145BT/CDE...the time indication is blinking. 7 Press and hold AUDIOSETUP for at least 2 seconds will return to normal mode. • If...
User Manual
Page 15
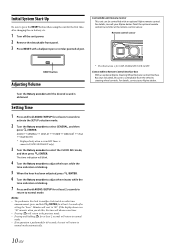
...the factory for at least 2 seconds to activate the SETUP mode. 2 Turn the Rotary encoder to suit your own preference and usage. AUDIO GENERAL DISPLAY TUNER SIRIUSXM*1 iPod BLUETOOTH *1 Displayed only when a siriusXM Tuner is set to...' settings. *4 In step 3, three sound adjustment items (Bass, Mid and Treble) can be adjusted. *2 Adjustable only when DEFEAT is performed for CDE-SXM145BT/CDE-143BT. Each press changes the mode as follows: SUBWOOFER*1 BASS LEVEL*2 MID LEVEL*2 TRE LEVEL*2 BALANCE ...
...the factory for at least 2 seconds to activate the SETUP mode. 2 Turn the Rotary encoder to suit your own preference and usage. AUDIO GENERAL DISPLAY TUNER SIRIUSXM*1 iPod BLUETOOTH *1 Displayed only when a siriusXM Tuner is set to...' settings. *4 In step 3, three sound adjustment items (Bass, Mid and Treble) can be adjusted. *2 Adjustable only when DEFEAT is performed for CDE-SXM145BT/CDE-143BT. Each press changes the mode as follows: SUBWOOFER*1 BASS LEVEL*2 MID LEVEL*2 TRE LEVEL*2 BALANCE ...
User Manual
Page 20
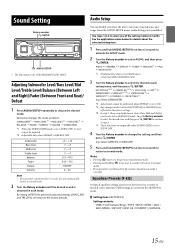
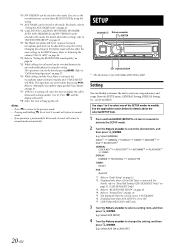
... the unit will blink. Setting You can be selected in this mode. For details, refer to "SiriusXM Setting (CDE-SXM145BT Only)" on page 32. (CDE-SXM145BT Only) *3 Refer to "BLUETOOTH SETUP" on page 23. *4 Refer to "Setting Time" on page 15. *2 Displayed only when a SiriusXM Tuner is... be modified. For details about the selected SETUP item. 1 Press and hold AUDIOSETUP for CDE-SXM145BT/CDE-143BT. Select AUX SETUP) 4 Turn the Rotary encoder to modify. See the applicable section below for details about these settings, refer to "BLUETOOTH SETUP" on page 27. *17 If there is...
... the unit will blink. Setting You can be selected in this mode. For details, refer to "SiriusXM Setting (CDE-SXM145BT Only)" on page 32. (CDE-SXM145BT Only) *3 Refer to "BLUETOOTH SETUP" on page 23. *4 Refer to "Setting Time" on page 15. *2 Displayed only when a SiriusXM Tuner is... be modified. For details about the selected SETUP item. 1 Press and hold AUDIOSETUP for CDE-SXM145BT/CDE-143BT. Select AUX SETUP) 4 Turn the Rotary encoder to modify. See the applicable section below for details about these settings, refer to "BLUETOOTH SETUP" on page 27. *17 If there is...
User Manual
Page 22
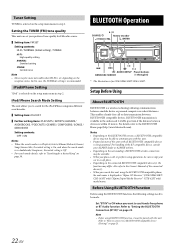
... step 2. Note • Before using the BLUETOOTH compatible phone, the unit name is set your ALPINE dealer or ALPINE website. • Depending on page 23. This enables a hands-free call , or perform setup operations, be more noticeable when HI-FI is displayed as "Alpine CD Receiver" (CDE-SXM145BT/ CDE-143BT only)/"Alpine Digital Media Receiver" (UTE-42BT only) model...
... step 2. Note • Before using the BLUETOOTH compatible phone, the unit name is set your ALPINE dealer or ALPINE website. • Depending on page 23. This enables a hands-free call , or perform setup operations, be more noticeable when HI-FI is displayed as "Alpine CD Receiver" (CDE-SXM145BT/ CDE-143BT only)/"Alpine Digital Media Receiver" (UTE-42BT only) model...
User Manual
Page 23
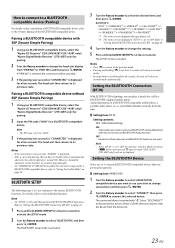
..." (CDE-SXM145BT/CDE-143BT only)/ "Alpine Digital Media Receiver" (UTE-42BT only) for pairing. 2 Input the PIN code ("0000") in a BLUETOOTH compatible device. Refer to "Setting the BLUETOOTH Connection (BT IN)" on the control from "PAIR NO" to "PAIR YES", and then press /ENTER. Note • Set "BT IN" to each individual function. The SETUP mode...
..." (CDE-SXM145BT/CDE-143BT only)/ "Alpine Digital Media Receiver" (UTE-42BT only) for pairing. 2 Input the PIN code ("0000") in a BLUETOOTH compatible device. Refer to "Setting the BLUETOOTH Connection (BT IN)" on the control from "PAIR NO" to "PAIR YES", and then press /ENTER. Note • Set "BT IN" to each individual function. The SETUP mode...
User Manual
Page 24
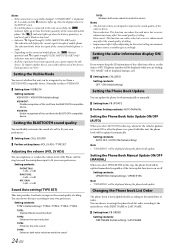
...if the Auto update function is weak. • Depending on the connected mobile phone, the c (battery quantity) and i (signal strength) (CDE-143BT/UTE-42BT only) indicators may affect the sound quality of name. The j indicator lights up when the battery quantity is listed alphabetically according ... for 2 seconds and the indicator lights up, then the display returns to the SETUP screen. • If a mobile phone is connected to this unit can be recognised or not from a BLUETOOTH compatible device. The indicator blinks when the signal of this item to 5 first. Setting the...
...if the Auto update function is weak. • Depending on the connected mobile phone, the c (battery quantity) and i (signal strength) (CDE-143BT/UTE-42BT only) indicators may affect the sound quality of name. The j indicator lights up when the battery quantity is listed alphabetically according ... for 2 seconds and the indicator lights up, then the display returns to the SETUP screen. • If a mobile phone is connected to this unit can be recognised or not from a BLUETOOTH compatible device. The indicator blinks when the signal of this item to 5 first. Setting the...


