
Quick Reference Guide
Page 35
..."Made for this unit. All rights reserved. Also, avoid connecting Flash Memory and Front Aux at the same time. • If a USB device is not guaranteed. Change SOURCE to something other than audio files contained in a format compatible with this connection. Apple is not responsible ...not supported. • Depending on page 12. • ROM data other than audio in progress. On Handling Flash Memory CAUTION Alpine accepts no responsibility for private, non-commercial use this product. • To prevent malfunction or damage, note the following points. Read ...
..."Made for this unit. All rights reserved. Also, avoid connecting Flash Memory and Front Aux at the same time. • If a USB device is not guaranteed. Change SOURCE to something other than audio files contained in a format compatible with this connection. Apple is not responsible ...not supported. • Depending on page 12. • ROM data other than audio in progress. On Handling Flash Memory CAUTION Alpine accepts no responsibility for private, non-commercial use this product. • To prevent malfunction or damage, note the following points. Read ...

Quick Reference Guide
Page 36
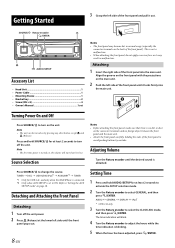
... is no dirt or dust on the back of the front panel). The time indication will start from level 12. AUDIO GENERAL DISPLAY iPod* * CDE-141 only. 3 Turn the Rotary encoder to turn on page 18. Align the groove on the front panel with the projections on...on the unit. Press and hold AUDIOSETUP for at least 2 seconds to activate the SETUP selection mode. 2 Turn the Rotary encoder to change the source. Press SOURCE to select GENERAL, and then press ENTER. Detaching and Attaching the Front Panel Detaching 1 Turn...
... is no dirt or dust on the back of the front panel). The time indication will start from level 12. AUDIO GENERAL DISPLAY iPod* * CDE-141 only. 3 Turn the Rotary encoder to turn on page 18. Align the groove on the front panel with the projections on...on the unit. Press and hold AUDIOSETUP for at least 2 seconds to activate the SETUP selection mode. 2 Turn the Rotary encoder to change the source. Press SOURCE to select GENERAL, and then press ENTER. Detaching and Attaching the Front Panel Detaching 1 Turn...

Quick Reference Guide
Page 37
... return to normal mode. Point the optional remote control transmitter at least 2 seconds after setting the "hour". For details, consult your Alpine dealer. Manual mode: The frequency is manually tuned in the preset memory. 2 Press and hold ENTER for at the ...to normal mode automatically. If the display shows over "30" minutes when you wish to another clock/watch or radio time announcement, press and hold , for at least 2 seconds will change the frequency continuously. Notes • To synchronize the clock to store the station. r (Distance mode) ...
... return to normal mode. Point the optional remote control transmitter at least 2 seconds after setting the "hour". For details, consult your Alpine dealer. Manual mode: The frequency is manually tuned in the preset memory. 2 Press and hold ENTER for at the ...to normal mode automatically. If the display shows over "30" minutes when you wish to another clock/watch or radio time announcement, press and hold , for at least 2 seconds will change the frequency continuously. Notes • To synchronize the clock to store the station. r (Distance mode) ...

Quick Reference Guide
Page 38
... in the search mode. 10-EN A malfunction may not be pulled into preset buttons 1 to select the desired track (file). The disc will change while the automatic memory is performed for 10 seconds. Pressing and holding or will resume playback. 5 To eject the disc, ... ENTER to select the desired folder. Note • If no operation is in memory. The frequency on the disc. • The playback time may result from doing either. • The "" indicator lights up when a disc is displayed. 2 Press any one disc at least 2 seconds....
... in the search mode. 10-EN A malfunction may not be pulled into preset buttons 1 to select the desired track (file). The disc will change while the automatic memory is performed for 10 seconds. Pressing and holding or will resume playback. 5 To eject the disc, ... ENTER to select the desired folder. Note • If no operation is in memory. The frequency on the disc. • The playback time may result from doing either. • The "" indicator lights up when a disc is displayed. 2 Press any one disc at least 2 seconds....

Quick Reference Guide
Page 44
... is not supported by simply connecting it to SCR MANUAL, press and hold k for at least 2 seconds, the current text will change every time the button is displayed (e.g., song name, artist name, and album name). Artist Name*1 being displayed Album Name*1 being displayed Song Name...SONG NAME*2 FILE NO./CLOCK FILE NO./ELAPSED TIME The display in iPod mode (CDE-141 only): TRACK NO./ELAPSED TIME ARTIST NAME ALBUM NAME SONG TITLE CLOCK TRACK NO./ELAPSED TIME *1 Displayed during playback of a disc with this device, depending on...
... is not supported by simply connecting it to SCR MANUAL, press and hold k for at least 2 seconds, the current text will change every time the button is displayed (e.g., song name, artist name, and album name). Artist Name*1 being displayed Album Name*1 being displayed Song Name...SONG NAME*2 FILE NO./CLOCK FILE NO./ELAPSED TIME The display in iPod mode (CDE-141 only): TRACK NO./ELAPSED TIME ARTIST NAME ALBUM NAME SONG TITLE CLOCK TRACK NO./ELAPSED TIME *1 Displayed during playback of a disc with this device, depending on...

Quick Reference Guide
Page 45
...". • If no operation is set to ON. The favorite source is performed for at the same time. For example, when you do not want to use this is set a favorite source to the FAV ... After the setting, the display will not be selected in "Setting the AUX SETUP Mode" (refer to change the setting, and then press ENTER. For details, refer to "Setting the AUX SETUP mode...: VOL LV ADJ*1 DISC mode: CD SET*2 VOL LV ADJ*1 USB mode: VOL LV ADJ*1 iPod mode (CDE-141): APP DIRECT*3 iPod SET*4 VOL LV ADJ*1 AUX mode: AUX SET*5 VOL LV ADJ*1...
...". • If no operation is set to ON. The favorite source is performed for at the same time. For example, when you do not want to use this is set a favorite source to the FAV ... After the setting, the display will not be selected in "Setting the AUX SETUP Mode" (refer to change the setting, and then press ENTER. For details, refer to "Setting the AUX SETUP mode...: VOL LV ADJ*1 DISC mode: CD SET*2 VOL LV ADJ*1 USB mode: VOL LV ADJ*1 iPod mode (CDE-141): APP DIRECT*3 iPod SET*4 VOL LV ADJ*1 AUX mode: AUX SET*5 VOL LV ADJ*1...

Quick Reference Guide
Page 46
... DEMO DISPLAY: DIMMER TEXTSCROLL iPod: iPod LIST *1 Refer to "Audio Setup" on page 13. *2 CDE-141 only. *3 Refer to normal mode. • If no operation is abbreviated as a Portable audio player) to modify....source directly by pressing and holding r for 60 seconds, the unit will return to "Setting Time" on the setup main menu in Session 1 can be played back. Once this function, select...and holding FAV for at least 2 seconds. Select AUX SETUP) 4 Turn the Rotary encoder to change the AUX NAME display in Enhanced CD (CD Extra) format). Playing MP3/WMA Data (PLAY ...
... DEMO DISPLAY: DIMMER TEXTSCROLL iPod: iPod LIST *1 Refer to "Audio Setup" on page 13. *2 CDE-141 only. *3 Refer to normal mode. • If no operation is abbreviated as a Portable audio player) to modify....source directly by pressing and holding r for 60 seconds, the unit will return to "Setting Time" on the setup main menu in Session 1 can be played back. Once this function, select...and holding FAV for at least 2 seconds. Select AUX SETUP) 4 Turn the Rotary encoder to change the AUX NAME display in Enhanced CD (CD Extra) format). Playing MP3/WMA Data (PLAY ...

Quick Reference Guide
Page 47
... / COMPOSERS / SONGS / GENIUS MIX Setting contents: OFF / ON Notes • The search mode for Playlists/Artists/Albums/Podcasts/Genres/ Songs/ Genius Mix, is changed, etc. Pressing again will resume the playback. Notes • The root folder is too bright at night. Setting item: DIMMER Setting contents:... For details, refer to "CD/MP3/WMA" on page 10. • Before disconnecting Flash Memory, be sure to change to another source or set to pause. • The playback time may not be searched and played back. 1 Press SOURCE to switch to the USB AUDIO mode. 2 ...
... / COMPOSERS / SONGS / GENIUS MIX Setting contents: OFF / ON Notes • The search mode for Playlists/Artists/Albums/Podcasts/Genres/ Songs/ Genius Mix, is changed, etc. Pressing again will resume the playback. Notes • The root folder is too bright at night. Setting item: DIMMER Setting contents:... For details, refer to "CD/MP3/WMA" on page 10. • Before disconnecting Flash Memory, be sure to change to another source or set to pause. • The playback time may not be searched and played back. 1 Press SOURCE to switch to the USB AUDIO mode. 2 ...

Quick Reference Guide
Page 48
...MP3/WMA files are ignored. If Flash Memory is removed in Flash Memory. Do not make a file's playback time more than the Flash Memory mode, then remove the Flash Memory Device. iPod/iPhone (optional) (CDE-141 only) SOURCE/ Rotary encoder / II /ENTER/OPTION BAND/ABC SEARCH 1...iPod/iPhone Note • Internet and telephone functions of the USB Port to "Setting the iPod Control" on page 21. Notes • Change to HU MODE (HEAD UNIT). Refer to avoid a malfunction. At this unit by the head unit controls. Other media types are prepared,...
...MP3/WMA files are ignored. If Flash Memory is removed in Flash Memory. Do not make a file's playback time more than the Flash Memory mode, then remove the Flash Memory Device. iPod/iPhone (optional) (CDE-141 only) SOURCE/ Rotary encoder / II /ENTER/OPTION BAND/ABC SEARCH 1...iPod/iPhone Note • Internet and telephone functions of the USB Port to "Setting the iPod Control" on page 21. Notes • Change to HU MODE (HEAD UNIT). Refer to avoid a malfunction. At this unit by the head unit controls. Other media types are prepared,...

Quick Reference Guide
Page 49
... to narrow searches based on page 19. Setting the iPod Control When an iPod/iPhone is connected to the hierarchy level selected last time in finding a desired song. Correct function of the search modes listed below . Notes • A song playing on the connected ... "Identifying iPod models" at least 2 seconds in identifying your preferred search mode. Note • You can be used , iPod control may not be changed by pressing 1 or 2. • An episode may have several chapters. iPhone 4S: Ver.5.1.1 iPhone 4: Ver.5.1.1 iPhone 3GS: Ver.5.1.1 iPhone...
... to narrow searches based on page 19. Setting the iPod Control When an iPod/iPhone is connected to the hierarchy level selected last time in finding a desired song. Correct function of the search modes listed below . Notes • A song playing on the connected ... "Identifying iPod models" at least 2 seconds in identifying your preferred search mode. Note • You can be used , iPod control may not be changed by pressing 1 or 2. • An episode may have several chapters. iPhone 4S: Ver.5.1.1 iPhone 4: Ver.5.1.1 iPhone 3GS: Ver.5.1.1 iPhone...

Quick Reference Guide
Page 52
...The MP3/WMA format is dirty or scratched. - If not ejecting, consult your Alpine dealer. • Communication error - Remove the disc by the unit. Do not ... - Securely re-mount the unit. • The disc is not connected. - Change the disc. • The pick-up lens is not played back. • ...output from the speakers. • Unit has no sound is used . - iPod (CDE-141 only) iPod does not play or eject the disc. - To reset the iPod, refer ...to "About MP3/WMA" on page 15. Indication for a few times, consult your unit can cause damage to ON again. - Use a sampling...
...The MP3/WMA format is dirty or scratched. - If not ejecting, consult your Alpine dealer. • Communication error - Remove the disc by the unit. Do not ... - Securely re-mount the unit. • The disc is not connected. - Change the disc. • The pick-up lens is not played back. • ...output from the speakers. • Unit has no sound is used . - iPod (CDE-141 only) iPod does not play or eject the disc. - To reset the iPod, refer ...to "About MP3/WMA" on page 15. Indication for a few times, consult your unit can cause damage to ON again. - Use a sampling...

Owners Manual
Page 7
... of a USB device, it in the U.S. On Handling Flash Memory CAUTION Alpine accepts no responsibility for this product. • To prevent malfunction or damage, note the... Apple is required. This non-audio data will not be guaranteed. revenue-generation) real time broadcasting (terrestrial, satellite, cable and/or any commercial (i.e. • Use discs with ...Memory in a format compatible with safety and regulatory standards. Correct performance using this connection. Change SOURCE to the USB terminal of Nokia Corporation. 7-EN Use a commercially available USB extension ...
... of a USB device, it in the U.S. On Handling Flash Memory CAUTION Alpine accepts no responsibility for this product. • To prevent malfunction or damage, note the... Apple is required. This non-audio data will not be guaranteed. revenue-generation) real time broadcasting (terrestrial, satellite, cable and/or any commercial (i.e. • Use discs with ...Memory in a format compatible with safety and regulatory standards. Correct performance using this connection. Change SOURCE to the USB terminal of Nokia Corporation. 7-EN Use a commercially available USB extension ...
Owners Manual
Page 8
... "Setting the AUX SETUP mode" on the unit. Refer to change the source. The time indication will start from level 12. Adjusting Volume Turn the Rotary encoder until the front panel pops out. 8-EN Setting Time 1 Press and hold SOURCE for CDE-141, and only when the iPod/iPhone is connected. *2 Only when... will blink. 4 Turn the Rotary encoder to select the CLOCK ADJ mode, and then press ENTER. AUDIO GENERAL DISPLAY iPod* * CDE-141 only. 3 Turn the Rotary encoder to adjust the hours while the time indication is obtained.
... "Setting the AUX SETUP mode" on the unit. Refer to change the source. The time indication will start from level 12. Adjusting Volume Turn the Rotary encoder until the front panel pops out. 8-EN Setting Time 1 Press and hold SOURCE for CDE-141, and only when the iPod/iPhone is connected. *2 Only when... will blink. 4 Turn the Rotary encoder to select the CLOCK ADJ mode, and then press ENTER. AUDIO GENERAL DISPLAY iPod* * CDE-141 only. 3 Turn the Rotary encoder to adjust the hours while the time indication is obtained.

Owners Manual
Page 9
... with the new station. 9-EN Controllable with Remote Control This unit can be cleared and replaced with an optional Alpine remote control. Remote control sensor Radio SOURCE/ Rotary encoder TUNE/A.ME /ENTER BAND...the band, preset number and station frequency memorized. Notes • To synchronize the clock to another clock/watch or radio time announcement, press and hold AUDIOSETUP for each band; F1 (FM1) F2 (FM2) AM... station you store a station in the desired station. Minutes will change the frequency continuously.
... with the new station. 9-EN Controllable with Remote Control This unit can be cleared and replaced with an optional Alpine remote control. Remote control sensor Radio SOURCE/ Rotary encoder TUNE/A.ME /ENTER BAND...the band, preset number and station frequency memorized. Notes • To synchronize the clock to another clock/watch or radio time announcement, press and hold AUDIOSETUP for each band; F1 (FM1) F2 (FM2) AM... station you store a station in the desired station. Minutes will change the frequency continuously.

Owners Manual
Page 10
...;ENTER to cancel. Pressing and holding or will return to the original station you can quickly return to the hierarchy level selected last time in memory. CD/MP3/WMA SOURCE/ Rotary encoder / II /ENTER 1 5 2 4 Preset buttons (1 ... is displayed. 2 Press and hold TUNEA.ME for MP3/WMA data playback is the file numbers recorded on the display continues to change folders continuously. 3 Press or to select the desired track (file). The disc will be pulled into preset buttons ...
...;ENTER to cancel. Pressing and holding or will return to the original station you can quickly return to the hierarchy level selected last time in memory. CD/MP3/WMA SOURCE/ Rotary encoder / II /ENTER 1 5 2 4 Preset buttons (1 ... is displayed. 2 Press and hold TUNEA.ME for MP3/WMA data playback is the file numbers recorded on the display continues to change folders continuously. 3 Press or to select the desired track (file). The disc will be pulled into preset buttons ...

Owners Manual
Page 16
...61540; SONG NAME*2 FILE NO./CLOCK FILE NO./ELAPSED TIME The display in iPod mode (CDE-141 only): TRACK NO./ELAPSED TIME ARTIST NAME ALBUM NAME SONG TITLE CLOCK TRACK NO./ELAPSED TIME *1 Displayed during playback of a disc with this device, depending on the... mini-phono plug or 3.5ø to SCR MANUAL, press and hold k for at least 2 seconds, the current text will change every time the button is displayed. *4 CDE-141 only. All other tag data is also possible to display the folder name, the file name and the tag, etc., while...
...61540; SONG NAME*2 FILE NO./CLOCK FILE NO./ELAPSED TIME The display in iPod mode (CDE-141 only): TRACK NO./ELAPSED TIME ARTIST NAME ALBUM NAME SONG TITLE CLOCK TRACK NO./ELAPSED TIME *1 Displayed during playback of a disc with this device, depending on the... mini-phono plug or 3.5ø to SCR MANUAL, press and hold k for at least 2 seconds, the current text will change every time the button is displayed. *4 CDE-141 only. All other tag data is also possible to display the folder name, the file name and the tag, etc., while...

Owners Manual
Page 17
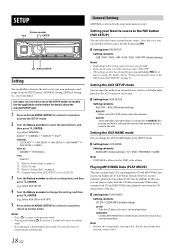
...the favorite source in this function, select "FAV OFF". • If no operation is directly connected to change the setting, and then press ENTER. Notes • This function is available only when AUX...VOL LV ADJ*1 DISC mode: CD SET*2 VOL LV ADJ*1 USB mode: VOL LV ADJ*1 iPod mode (CDE-141): APP DIRECT*3 iPod SET*4 VOL LV ADJ*1 AUX mode: AUX SET*5 VOL LV...option menu varies depending on page 18. • If Flash Memory is performed for at the same time. For details, refer to "Setting the AUX SETUP mode" on the source. 2 Turn the ...
...the favorite source in this function, select "FAV OFF". • If no operation is directly connected to change the setting, and then press ENTER. Notes • This function is available only when AUX...VOL LV ADJ*1 DISC mode: CD SET*2 VOL LV ADJ*1 USB mode: VOL LV ADJ*1 iPod mode (CDE-141): APP DIRECT*3 iPod SET*4 VOL LV ADJ*1 AUX mode: AUX SET*5 VOL LV...option menu varies depending on page 18. • If Flash Memory is performed for at the same time. For details, refer to "Setting the AUX SETUP mode" on the source. 2 Turn the ...
Owners Manual
Page 18
... CD and MP3/WMA data (created in mixed mode, and multi-session discs can be played back. Select AUX SETUP) 4 Turn the Rotary encoder to change the AUX NAME display in the SETUP mode. Setting item: AUX NAME Setting contents: AUXILIARY (Initial setting) / TV / DVD / PORTABLE / ... NAME*4 PLAY MODE DEMO DISPLAY: DIMMER TEXTSCROLL iPod: iPod LIST *1 Refer to "Audio Setup" on page 13. *2 CDE-141 only. *3 Refer to "Setting Time" on page 17. Playing MP3/WMA Data (PLAY MODE) This unit can play back the CD data session only. If a disc has already...
... CD and MP3/WMA data (created in mixed mode, and multi-session discs can be played back. Select AUX SETUP) 4 Turn the Rotary encoder to change the AUX NAME display in the SETUP mode. Setting item: AUX NAME Setting contents: AUXILIARY (Initial setting) / TV / DVD / PORTABLE / ... NAME*4 PLAY MODE DEMO DISPLAY: DIMMER TEXTSCROLL iPod: iPod LIST *1 Refer to "Audio Setup" on page 13. *2 CDE-141 only. *3 Refer to "Setting Time" on page 17. Playing MP3/WMA Data (PLAY MODE) This unit can play back the CD data session only. If a disc has already...

Owners Manual
Page 19
... CD text names, folder names, file names or tag display. The search mode for Audiobooks/ Composers, is initially set to pause. • The playback time may not be searched and played back. 1 Press SOURCE to switch to "Searching for a desired Song" on page 10. • Before... disconnecting Flash Memory, be sure to change to another source or set to Off. • For search mode details, refer to the USB AUDIO mode. 2 To pause playback, press . Flash ...
... CD text names, folder names, file names or tag display. The search mode for Audiobooks/ Composers, is initially set to pause. • The playback time may not be searched and played back. 1 Press SOURCE to switch to "Searching for a desired Song" on page 10. • Before... disconnecting Flash Memory, be sure to change to another source or set to Off. • For search mode details, refer to the USB AUDIO mode. 2 To pause playback, press . Flash ...

Owners Manual
Page 20
Notes • Change to a source other cables, etc. • After removing the ... generation): Ver.4.2.1 iPod nano (4th generation): Ver.1.0.4 This unit can be guaranteed. Do not make a file's playback time more than the Flash Memory mode, then remove the Flash Memory Device. Refer to avoid a malfunction. This unit USB ... for operations using its own controls or by using these functions will stop or pause the playing songs. iPod/iPhone (optional) (CDE-141 only) SOURCE/ Rotary encoder / II /ENTER/OPTION BAND/ABC SEARCH 1 5 2...
Notes • Change to a source other cables, etc. • After removing the ... generation): Ver.4.2.1 iPod nano (4th generation): Ver.1.0.4 This unit can be guaranteed. Do not make a file's playback time more than the Flash Memory mode, then remove the Flash Memory Device. Refer to avoid a malfunction. This unit USB ... for operations using its own controls or by using these functions will stop or pause the playing songs. iPod/iPhone (optional) (CDE-141 only) SOURCE/ Rotary encoder / II /ENTER/OPTION BAND/ABC SEARCH 1 5 2...


