

Owners Manual
Page 1
..., 95945 Roissy Charles de Gaulle Cedex, France Phone 01-48638989 ALPINE ITALIA S.p.A. R EN RUX-C701 CONTROL FOR PXA-H701 FR MULTIMEDIA MANAGER™ • OWNER'S MANUAL Please read before using this equipment. Phone 0870-33 33 763 ALPINE ELECTRONICS FRANCE S.A.R.L. (RCS PONTOISE B 338 101 280) 98, Rue de la Belle Etoile, Z.I. LTD. ES • MODE D'EMPLOI Veuillez lire avant d'utiliser cet...
..., 95945 Roissy Charles de Gaulle Cedex, France Phone 01-48638989 ALPINE ITALIA S.p.A. R EN RUX-C701 CONTROL FOR PXA-H701 FR MULTIMEDIA MANAGER™ • OWNER'S MANUAL Please read before using this equipment. Phone 0870-33 33 763 ALPINE ELECTRONICS FRANCE S.A.R.L. (RCS PONTOISE B 338 101 280) 98, Rue de la Belle Etoile, Z.I. LTD. ES • MODE D'EMPLOI Veuillez lire avant d'utiliser cet...

Owners Manual
Page 3
Contents Operating Instructions WARNING WARNING 2 CAUTION 3 PRECAUTIONS 3 Operation About the control unit operation 3 Installation and Connections Accessories 4 Installation 5 Basic Connections Diagram 6 Others Specifications 7 LIMITED WARRANTY ENGLISH FR ES DE IT SE 1-EN
Contents Operating Instructions WARNING WARNING 2 CAUTION 3 PRECAUTIONS 3 Operation About the control unit operation 3 Installation and Connections Accessories 4 Installation 5 Basic Connections Diagram 6 Others Specifications 7 LIMITED WARRANTY ENGLISH FR ES DE IT SE 1-EN
Owners Manual
Page 4
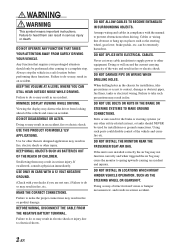
... electric shock. Using such parts could disable control of the wire and result in compliance with your prolonged attention should NEVER be extremely hazardous. DO NOT INSTALL THE MONITOR NEAR THE PASSENGER SEAT AIR BAG. MAKE THE CORRECT CONNECTIONS. Always stop . BEFORE WIRING, DISCONNECT THE CABLE FROM THE NEGATIVE BATTERY TERMINAL. Failure to electrical shorts. Never cut away cable insulation to supply power...
... electric shock. Using such parts could disable control of the wire and result in compliance with your prolonged attention should NEVER be extremely hazardous. DO NOT INSTALL THE MONITOR NEAR THE PASSENGER SEAT AIR BAG. MAKE THE CORRECT CONNECTIONS. Always stop . BEFORE WIRING, DISCONNECT THE CABLE FROM THE NEGATIVE BATTERY TERMINAL. Failure to electrical shorts. Never cut away cable insulation to supply power...
Owners Manual
Page 5
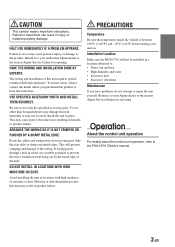
... EDGE. For details about the control unit operation, refer to repair the unit USE SPECIFIED ACCESSORY PARTS AND INSTALL THEM SECURELY. SE 3-EN HALT USE IMMEDIATELY IF A PROBLEM APPEARS. Temperature Be sure the temperature inside the vehicle is between +60°C (+140°F) and -10°C (+14°F) before turning your Alpine dealer or the nearest Alpine Service Station for repairing. To ensure safety, always...
... EDGE. For details about the control unit operation, refer to repair the unit USE SPECIFIED ACCESSORY PARTS AND INSTALL THEM SECURELY. SE 3-EN HALT USE IMMEDIATELY IF A PROBLEM APPEARS. Temperature Be sure the temperature inside the vehicle is between +60°C (+140°F) and -10°C (+14°F) before turning your Alpine dealer or the nearest Alpine Service Station for repairing. To ensure safety, always...
Owners Manual
Page 6
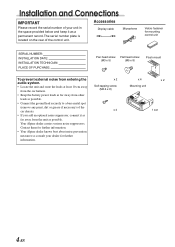
... Connections IMPORTANT Please record the serial number of your dealer for mounting control unit SERIAL NUMBER: INSTALLATION DATE: INSTALLATION TECHNICIAN: PLACE OF PURCHASE: Pan head screw Flat head screw (M3 x 5) (M5 x 8) Flush mount To prevent external noise from entering the audio system. • Locate the unit and route the leads at least 10 cm away from the car harness. • Keep the battery power...
... Connections IMPORTANT Please record the serial number of your dealer for mounting control unit SERIAL NUMBER: INSTALLATION DATE: INSTALLATION TECHNICIAN: PLACE OF PURCHASE: Pan head screw Flat head screw (M3 x 5) (M5 x 8) Flush mount To prevent external noise from entering the audio system. • Locate the unit and route the leads at least 10 cm away from the car harness. • Keep the battery power...
Owners Manual
Page 7
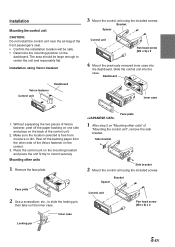
...control. 3. Inner case Locking pin Face plate 1 After step 2 on the back of the control unit. 2. Side bracket ES DE Side bracket 2 Mount the control unit using the included screws. IT Bracket Spacer Control unit Pan head screw (M3 x 5) x 2 SE 5-EN Installation using Velcro fastener Velcro fastener Control unit Dashboard 3 Mount the control unit using...Mounting other units" of "Mounting the control unit", remove the side bracket. Dashboard FR Inner case 1. Make sure the location selected is free from the other units 1 Remove the face plate. Slide the control unit into the...
...control. 3. Inner case Locking pin Face plate 1 After step 2 on the back of the control unit. 2. Side bracket ES DE Side bracket 2 Mount the control unit using the included screws. IT Bracket Spacer Control unit Pan head screw (M3 x 5) x 2 SE 5-EN Installation using Velcro fastener Velcro fastener Control unit Dashboard 3 Mount the control unit using...Mounting other units" of "Mounting the control unit", remove the side bracket. Dashboard FR Inner case 1. Make sure the location selected is free from the other units 1 Remove the face plate. Slide the control unit into the...

Owners Manual
Page 8
... mount brackets to the control unit. CHG DVD DIGITAL 1 DIGITAL 2 DIGITAL 3 INPUT GUIDE (L) (R) ANALOG 1 Ai-NET IN CHANGER IN POWER SUPPLY ANALOG 2 ANALOG 3 Flush mount Self-tapping screw (M2.6 x 8) x 4 Face plate Basic Connections Diagram CAUTION Do not connect or disconnect the display cable when the power of "Mounting the control unit" page 5, remove the side bracket. Installation and Connections 3 Mount the spacer and bracket to the control unit using the included screws.
... mount brackets to the control unit. CHG DVD DIGITAL 1 DIGITAL 2 DIGITAL 3 INPUT GUIDE (L) (R) ANALOG 1 Ai-NET IN CHANGER IN POWER SUPPLY ANALOG 2 ANALOG 3 Flush mount Self-tapping screw (M2.6 x 8) x 4 Face plate Basic Connections Diagram CAUTION Do not connect or disconnect the display cable when the power of "Mounting the control unit" page 5, remove the side bracket. Installation and Connections 3 Mount the spacer and bracket to the control unit using the included screws.
Owners Manual
Page 9
... product due to the PXA-H701 Owner's manual. Others Specifications Weight: Illumination color: Control unit 159 g (5 oz) blue Dimensions Control unit Width Height Depth 170 mm (6-3/4") 46 mm (1-13/16") 24 mm (15/16") Due to continuous product improvement, specifications and design are trademarks of Digital Theater Systems, Inc. The illustrations included in these instructions may appear different from Dolby Laboratories...
... product due to the PXA-H701 Owner's manual. Others Specifications Weight: Illumination color: Control unit 159 g (5 oz) blue Dimensions Control unit Width Height Depth 170 mm (6-3/4") 46 mm (1-13/16") 24 mm (15/16") Due to continuous product improvement, specifications and design are trademarks of Digital Theater Systems, Inc. The illustrations included in these instructions may appear different from Dolby Laboratories...

Owners Manual
Page 12
... other rights which service is not valid unless your Alpine car audio product has been installed in the United States, Puerto Rico or Canada. G WHAT IS NOT COVERED: This Warranty does not cover the following number for life against ...SET FORTH ABOVE AND NO PERSON IS AUTHORIZED TO ASSUME FOR ALPINE ANY OTHER LIABILITY IN CONNECTION WITH THE SALE OF THE PRODUCT. THE TERM "CONSEQUENTIAL DAMAGES" REFERS TO THE COST OF REPAIRING OR REPLACING OTHER PROPERTY WHICH IS DAMAGED WHEN THIS PRODUCT DOES NOT WORK PROPERLY. G LENGTH OF WARRANTY: This Warranty is in the Owner's manual...
... other rights which service is not valid unless your Alpine car audio product has been installed in the United States, Puerto Rico or Canada. G WHAT IS NOT COVERED: This Warranty does not cover the following number for life against ...SET FORTH ABOVE AND NO PERSON IS AUTHORIZED TO ASSUME FOR ALPINE ANY OTHER LIABILITY IN CONNECTION WITH THE SALE OF THE PRODUCT. THE TERM "CONSEQUENTIAL DAMAGES" REFERS TO THE COST OF REPAIRING OR REPLACING OTHER PROPERTY WHICH IS DAMAGED WHEN THIS PRODUCT DOES NOT WORK PROPERLY. G LENGTH OF WARRANTY: This Warranty is in the Owner's manual...


