User Manual
Page 3
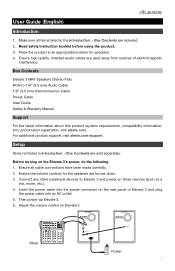
... Elevate 3. 6. Before turning on the rear panel of electromagnetic interference. Insert the power cable into an AC outlet. 5. Ensure the volume controls for operation. 4. Ensure all items listed in an appropriate location for the speakers are sold separately. Box Contents Elevate 3 MKII Speakers (Stereo Pair) RCA-to Elevate 3 and power on Elevate 3. For additional product support, visit alesis.com/support. Setup Items not listed in Introduction > Box Contents are turned down. 3. Ensure high quality, shielded audio cables are included. 2. User Guide...
... Elevate 3. 6. Before turning on the rear panel of electromagnetic interference. Insert the power cable into an AC outlet. 5. Ensure the volume controls for operation. 4. Ensure all items listed in an appropriate location for the speakers are sold separately. Box Contents Elevate 3 MKII Speakers (Stereo Pair) RCA-to Elevate 3 and power on Elevate 3. For additional product support, visit alesis.com/support. Setup Items not listed in Introduction > Box Contents are turned down. 3. Ensure high quality, shielded audio cables are included. 2. User Guide...
User Manual
Page 4
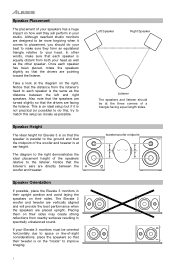
... listener. tweeter/woofer midpoint The diagram to the right demonstrates the ideal placement height of the speakers relative to make sure that their sides. Speaker Placement The placement of your speakers has a huge impact on how well they form an equilateral triangle relative to your head. Speaker Orientation If possible, place the Elevate 3 monitors in your studio. Also note that the speakers are turned slightly...
... listener. tweeter/woofer midpoint The diagram to the right demonstrates the ideal placement height of the speakers relative to make sure that their sides. Speaker Placement The placement of your speakers has a huge impact on how well they form an equilateral triangle relative to your head. Speaker Orientation If possible, place the Elevate 3 monitors in your studio. Also note that the speakers are turned slightly...
User Manual
Page 5
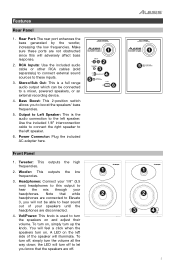
RCA Inputs: Use the included audio cable or other RCA cables (sold 3 separately) to connect external sound sources to the left speaker. Stereo/Sub Out: This is used to boost the speakers' bass frequencies. 5. Woofer: This outputs the low 1 frequencies. 3. A LED on the left speaker. 6. the LED will turn off to let you know that while 2 headphones are connected to Elevate 3, you to turn the speakers on and adjust their volume. Vol/Power: This knob is a full...
RCA Inputs: Use the included audio cable or other RCA cables (sold 3 separately) to connect external sound sources to the left speaker. Stereo/Sub Out: This is used to boost the speakers' bass frequencies. 5. Woofer: This outputs the low 1 frequencies. 3. A LED on the left speaker. 6. the LED will turn off to let you know that while 2 headphones are connected to Elevate 3, you to turn the speakers on and adjust their volume. Vol/Power: This knob is a full...
User Manual
Page 18
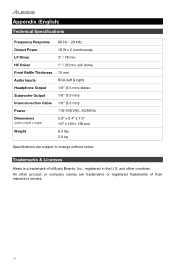
... a trademark of their respective owners. 18 and other product or company names are subject to change without notice. Appendix (English) Technical Specifications Frequency Response Output Power LF Driver HF Driver Front Baffle Thickness Audio Inputs Headphone Output Subwoofer Output Interconnection Cable Power Dimensions (width x depth x height) Weight 80 Hz - 20 kHz 10 W x 2 (continuous) 3" / 76 mm 1" / 25 mm; silk dome 15 mm RCA (left & right) 1/8" (3.5 mm) stereo 1/8" (3.5 mm) 1/8" (3.5 mm) 110-240...
... a trademark of their respective owners. 18 and other product or company names are subject to change without notice. Appendix (English) Technical Specifications Frequency Response Output Power LF Driver HF Driver Front Baffle Thickness Audio Inputs Headphone Output Subwoofer Output Interconnection Cable Power Dimensions (width x depth x height) Weight 80 Hz - 20 kHz 10 W x 2 (continuous) 3" / 76 mm 1" / 25 mm; silk dome 15 mm RCA (left & right) 1/8" (3.5 mm) stereo 1/8" (3.5 mm) 1/8" (3.5 mm) 110-240...

