Quick Start Guide
Page 3
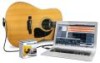
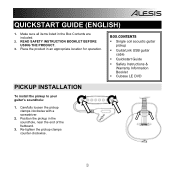
... USB guitar cable ƒ Quickstart Guide ƒ Safety Instructions & Warranty Information Booklet ƒ Cubase LE DVD PICKUP INSTALLATION To install the pickup to your guitar's soundhole: 1. Place the product in the Box Contents are included. 2. Carefully loosen the pickup clamps clockwise with a screwdriver. 2. Make sure all items listed in an appropriate location for operation. READ SAFETY INSTRUCTION BOOKLET BEFORE USING...
... USB guitar cable ƒ Quickstart Guide ƒ Safety Instructions & Warranty Information Booklet ƒ Cubase LE DVD PICKUP INSTALLATION To install the pickup to your guitar's soundhole: 1. Place the product in the Box Contents are included. 2. Carefully loosen the pickup clamps clockwise with a screwdriver. 2. Make sure all items listed in an appropriate location for operation. READ SAFETY INSTRUCTION BOOKLET BEFORE USING...
Quick Start Guide
Page 4
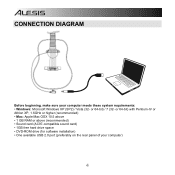
CONNECTION DIAGRAM Before beginning, make sure your computer) 4 or 64-bit) with Pentium-IV or Athlon XP, 1.6GHz or higher (recommended) • Mac: Apple Mac OSX 10.5 above • 1 GB RAM or above (recommended) • Sound card (AC97-compatible sound card) • 1GB free hard drive space • DVD-ROM drive (for software installation) • One available USB 2.0 port (preferably on the rear panel of your computer meets these system requirements: • Windows: Microsoft Windows XP (SP2) / Vista (32- or 64-bit) / 7 (32-
CONNECTION DIAGRAM Before beginning, make sure your computer) 4 or 64-bit) with Pentium-IV or Athlon XP, 1.6GHz or higher (recommended) • Mac: Apple Mac OSX 10.5 above • 1 GB RAM or above (recommended) • Sound card (AC97-compatible sound card) • 1GB free hard drive space • DVD-ROM drive (for software installation) • One available USB 2.0 port (preferably on the rear panel of your computer meets these system requirements: • Windows: Microsoft Windows XP (SP2) / Vista (32- or 64-bit) / 7 (32-

Quick Start Guide
Page 5
... incoming data and output a sound. Download and Install the free ASIO4ALL driver from www.asio4all.com. This will be automatically selected as your operating system. Please consult your computer's soundcard to make sure that supports USB audio devices. ideally lower than 15-20ms. 1. AUDIO SETUP (WINDOWS AND MAC) In most cases (especially if you are using Windows) AcousticLink will allow for more information. 5 You can use AcousticLink with AcousticLink, follow the instructions...
... incoming data and output a sound. Download and Install the free ASIO4ALL driver from www.asio4all.com. This will be automatically selected as your operating system. Please consult your computer's soundcard to make sure that supports USB audio devices. ideally lower than 15-20ms. 1. AUDIO SETUP (WINDOWS AND MAC) In most cases (especially if you are using Windows) AcousticLink will allow for more information. 5 You can use AcousticLink with AcousticLink, follow the instructions...
Quick Start Guide
Page 6
... "Audio" tab. 3. USB PnP Sound Device is selected as the default device, then click "OK." 4. Make sure Microphone - WINDOWS VISTA 1. WINDOWS XP 1. Go to Classic View," and the Sound Control Panel should become available.) 2. SoundMax, Conexant, etc.) is set as the default recording device. 4. Under "Sound Recording," make sure your internal soundcard (ie. Go to Start Menu f Control Panel f Sound. (If you don't see Sound, select "Switch to Start Menu f Control Panel f Sounds and Audio...
... "Audio" tab. 3. USB PnP Sound Device is selected as the default device, then click "OK." 4. Make sure Microphone - WINDOWS VISTA 1. WINDOWS XP 1. Go to Classic View," and the Sound Control Panel should become available.) 2. SoundMax, Conexant, etc.) is set as the default recording device. 4. Under "Sound Recording," make sure your internal soundcard (ie. Go to Start Menu f Control Panel f Sound. (If you don't see Sound, select "Switch to Start Menu f Control Panel f Sounds and Audio...
Quick Start Guide
Page 7
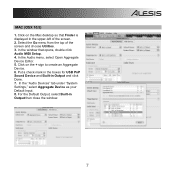
... so that opens, double click Audio MIDI Setup. 4. Select the Go menu from the top of the screen. 2. Put a check mark in the boxes for USB PnP Sound Device and Built-in Output then close the window. 7 For the Default Output, select Built-in Output and click Done. 7. MAC (OSX 10.5) 1. In the window that Finder is displayed in the upper-left of...
... so that opens, double click Audio MIDI Setup. 4. Select the Go menu from the top of the screen. 2. Put a check mark in the boxes for USB PnP Sound Device and Built-in Output then close the window. 7 For the Default Output, select Built-in Output and click Done. 7. MAC (OSX 10.5) 1. In the window that Finder is displayed in the upper-left of...
Quick Start Guide
Page 8
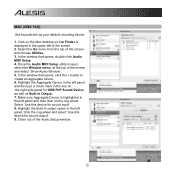
... panel for sound input'. 8. Make sure Aggregate Device is highlighted in the left panel, click the cog wheel and select 'Use this device for USB PnP Sound Device as well as your default recording device: 1. Click on the cog wheel. MAC (OSX 10.6) Set Acousticlink as Built-in Output. 7. Highlight the Built-In output option in the left panel and then click on the Mac...
... panel for sound input'. 8. Make sure Aggregate Device is highlighted in the left panel, click the cog wheel and select 'Use this device for USB PnP Sound Device as well as your default recording device: 1. Click on the cog wheel. MAC (OSX 10.6) Set Acousticlink as Built-in Output. 7. Highlight the Built-In output option in the left panel and then click on the Mac...
Quick Start Guide
Page 9
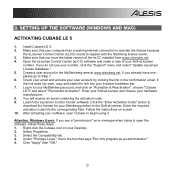
... your number, click the "Support" menu and select "Update eLicenser License Database." 5. Install Cubase LE 5. 2. Create a user account in the confirmation email. If you see your Soft-eLicenser number. If the link does not work, copy and paste the link into the corresponding field. Enter the required activation code into your hardware manufacturer. 8. Select Properties. 3. 3. Launch the eLicenser Control Center software. Attention, Windows Users: If...
... your number, click the "Support" menu and select "Update eLicenser License Database." 5. Install Cubase LE 5. 2. Create a user account in the confirmation email. If you see your Soft-eLicenser number. If the link does not work, copy and paste the link into the corresponding field. Enter the required activation code into your hardware manufacturer. 8. Select Properties. 3. 3. Launch the eLicenser Control Center software. Attention, Windows Users: If...
Quick Start Guide
Page 10
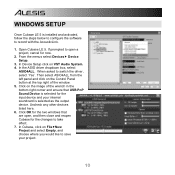
... record with the AcousticLink. 1. When asked to take effect. 7. Then select ASIO4ALL from the left panel and click on VST Audio System. 4. In the ASIO driver dropdown box, select ASIO4ALL. Uncheck any other devices listed here. 6. From the menus select Devicesf Device Setup. 3. Open Cubase LE 5. Click OK for the two windows that USB PnP Sound Device is selected as the output...
... record with the AcousticLink. 1. When asked to take effect. 7. Then select ASIO4ALL from the left panel and click on VST Audio System. 4. In the ASIO driver dropdown box, select ASIO4ALL. Uncheck any other devices listed here. 6. From the menus select Devicesf Device Setup. 3. Open Cubase LE 5. Click OK for the two windows that USB PnP Sound Device is selected as the output...
Quick Start Guide
Page 11
... internal soundcard as the Audio Device. 12. 8. Click on the input titled under the Bus Name column and press the delete key on Inputs at the top of the window. In the Device port column, select 'Sound Device 1' (Mono in the main project window and choose Add Audio Track. 14. Mono' and click OK. 15. Click the Record button at the top of the Cubase window, do a quick...
... internal soundcard as the Audio Device. 12. 8. Click on the input titled under the Bus Name column and press the delete key on Inputs at the top of the window. In the Device port column, select 'Sound Device 1' (Mono in the main project window and choose Add Audio Track. 14. Mono' and click OK. 15. Click the Record button at the top of the Cubase window, do a quick...
Quick Start Guide
Page 12
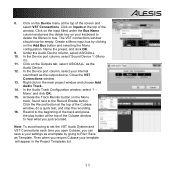
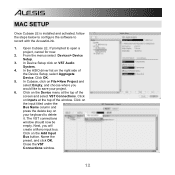
... the input titled under the Bus Name column and press the delete key on the Add Input Bus button. Click OK. 5. Next, you would like to delete it. MAC SETUP Once Cubase LE is installed and activated, follow the steps below to configure the software to open a project, cancel for now. 2. If prompted to record with the AcousticLink. 1. Close the VST Connections window. 12...
... the input titled under the Bus Name column and press the delete key on the Add Input Bus button. Click OK. 5. Next, you would like to delete it. MAC SETUP Once Cubase LE is installed and activated, follow the steps below to configure the software to open a project, cancel for now. 2. If prompted to record with the AcousticLink. 1. Close the VST Connections window. 12...
Quick Start Guide
Page 13
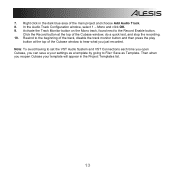
... the Track Monitor button on the Mono track, found next to the beginning of the track, disable the track monitor button and then press the play button at the top of the main project and choose Add Audio Track. 8. Right click in the Project Templates list. 13 Mono and click OK. 9. Click the Record button at the top of the Cubase window to set the VST Audio System and VST Connections each time...
... the Track Monitor button on the Mono track, found next to the beginning of the track, disable the track monitor button and then press the play button at the top of the main project and choose Add Audio Track. 8. Right click in the Project Templates list. 13 Mono and click OK. 9. Click the Record button at the top of the Cubase window to set the VST Audio System and VST Connections each time...


