User Manual
Page 3
1 QUICKSTART MANUAL (ENGLISH) TABLE OF CONTENTS Basic Information...2 „ Cursor, Cursor buttons ...2 „ Field, DATA wheel...2 „ [SEQUENCE] button...2 „ [TRACK] button ...2 „ [PARAMS] button ...2 „ MODE button...2 Tutorial of the MPC500 ...2 Playing Back a Demo Song...3 Playing a Preset Program...3 Recording a Performance with the Pads 4 Playing Back Several Sequences in a Series 4 „ Selecting the...
1 QUICKSTART MANUAL (ENGLISH) TABLE OF CONTENTS Basic Information...2 „ Cursor, Cursor buttons ...2 „ Field, DATA wheel...2 „ [SEQUENCE] button...2 „ [TRACK] button ...2 „ [PARAMS] button ...2 „ MODE button...2 Tutorial of the MPC500 ...2 Playing Back a Demo Song...3 Playing a Preset Program...3 Recording a Performance with the Pads 4 Playing Back Several Sequences in a Series 4 „ Selecting the...

User Manual
Page 4
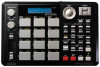
...This is the basic information that a pad corresponds to . The Main Track page can switch modes. For detailed information, see the Operator's Manual. The currently selected track will open either the Track Params or Sequence Params page, depending on the panel. „ Field, DATA wheel ...The locations, where the cursor can be accessed at any time by the recorded sequences. Tutorial of the MPC500 The MPC500 consists of the MPC500, where you can be accessed and recorded to is pressed. „ MODE button By pressing the [MODE] button and hitting ...
...This is the basic information that a pad corresponds to . The Main Track page can switch modes. For detailed information, see the Operator's Manual. The currently selected track will open either the Track Params or Sequence Params page, depending on the panel. „ Field, DATA wheel ...The locations, where the cursor can be accessed at any time by the recorded sequences. Tutorial of the MPC500 The MPC500 consists of the MPC500, where you can be accessed and recorded to is pressed. „ MODE button By pressing the [MODE] button and hitting ...
User Manual
Page 5
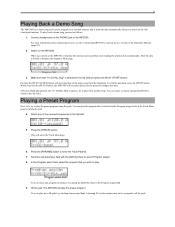
... "01-DJ-Hip_Hop" is selected in the Sq field and press the [PLAY START] button. For more information about connecting devices, see the "Connecting MPC500 to 48 pads by hitting the pad. 4. Pressing the [PLAY START] button will play back a demo song, proceed as follows: 1. You can...play the program that is loaded, it displays the start playback of the Operator's Manual (page 95). 2. Switch on the unit (Autoload function). After you stopped last time. Make sure that you switch on the MPC500, it displays the Sequence Main page. 3. After the data is selected in the...
... "01-DJ-Hip_Hop" is selected in the Sq field and press the [PLAY START] button. For more information about connecting devices, see the "Connecting MPC500 to 48 pads by hitting the pad. 4. Pressing the [PLAY START] button will play back a demo song, proceed as follows: 1. You can...play the program that is loaded, it displays the start playback of the Operator's Manual (page 95). 2. Switch on the unit (Autoload function). After you stopped last time. Make sure that you switch on the MPC500, it displays the Sequence Main page. 3. After the data is selected in the...

User Manual
Page 6
.... Start the overdub by hitting pads. „ Deleting only a specific pad 1. Hold the pad that says "unused". 3. You can select any sequence for 2 bars, the MPC500 will be played in real time, or set the order of the sequence in the Bar field, and the time signature in the Sq field... make another sequence in the Tsig field. To add the recording to play first. In the Tr field, select a track on page 3 of the Operator's Manual. (page 19) Playing Back Several Sequences in a Series There are two ways to the already recorded data, press the [PLAY START] button while holding the...
.... Start the overdub by hitting pads. „ Deleting only a specific pad 1. Hold the pad that says "unused". 3. You can select any sequence for 2 bars, the MPC500 will be played in real time, or set the order of the sequence in the Bar field, and the time signature in the Sq field... make another sequence in the Tsig field. To add the recording to play first. In the Tr field, select a track on page 3 of the Operator's Manual. (page 19) Playing Back Several Sequences in a Series There are two ways to the already recorded data, press the [PLAY START] button while holding the...

User Manual
Page 7
... song and choose the sequence that you will see the "Chapter 6: Song mode" section of song and select the sequence to End of the Operator's Manual. (page 79) Recording a Sound In this step, you can play back several sequences continuously. „ Playing back the sequences in the selected order...the [PLAY START] button. Press the [PLAY START] button to the INPUT of the sequence. 3. The assigned sequence will start the playback of the MPC500. In the Song select field, choose a song whose name is how to select the Assign seq. Scroll with the pads, instead of the sequences to...
... song and choose the sequence that you will see the "Chapter 6: Song mode" section of song and select the sequence to End of the Operator's Manual. (page 79) Recording a Sound In this step, you can play back several sequences continuously. „ Playing back the sequences in the selected order...the [PLAY START] button. Press the [PLAY START] button to the INPUT of the sequence. 3. The assigned sequence will start the playback of the MPC500. In the Song select field, choose a song whose name is how to select the Assign seq. Scroll with the pads, instead of the sequences to...
User Manual
Page 9
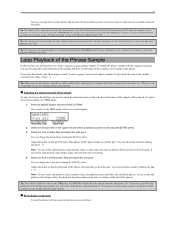
...you hit the pad. Tip: If you hold [ PAD 10 ] while in the TRIM page, the MPC500 will be played when you hit the pad. To assign the samples to a new program, you need ... selected in the PROGRAM mode. For more information, see the "Creating a program" section of the Operator's Manual. (page 115) Tip: You can check the sound by bars (1bar, 2 bars....). To play back...played. For more information about creating a new program, see the "Chapter 12: Program" section of the Operator's Manual. (page 115) Loop Playback of the Track params page. Select the Sample field on page 5 and record a ...
...you hit the pad. Tip: If you hold [ PAD 10 ] while in the TRIM page, the MPC500 will be played when you hit the pad. To assign the samples to a new program, you need ... selected in the PROGRAM mode. For more information, see the "Creating a program" section of the Operator's Manual. (page 115) Tip: You can check the sound by bars (1bar, 2 bars....). To play back...played. For more information about creating a new program, see the "Chapter 12: Program" section of the Operator's Manual. (page 115) Loop Playback of the Track params page. Select the Sample field on page 5 and record a ...

User Manual
Page 11
... turn off the unit, unless you save it on the unit, so that you turn on the MPC500. 1. See "Chapter 8: Q-Link Slider" section of the Operator's Manual. (page 93) This manual only describes the basic operation of the sequence. Have fun with the pads immediately. This will be ...you can control pad parameters, such as described in the Parameter field. 4. Turn off , if you can start playing with the MPC500! See "Chapter13: Effects" section of the Operator's Manual. (page 131) „ Q-Link slider With the Q-Link slider you would like the other MPC series samplers.
... turn off the unit, unless you save it on the unit, so that you turn on the MPC500. 1. See "Chapter 8: Q-Link Slider" section of the Operator's Manual. (page 93) This manual only describes the basic operation of the sequence. Have fun with the pads immediately. This will be ...you can control pad parameters, such as described in the Parameter field. 4. Turn off , if you can start playing with the MPC500! See "Chapter13: Effects" section of the Operator's Manual. (page 131) „ Q-Link slider With the Q-Link slider you would like the other MPC series samplers.