
Operation Manual
Page 5
... EXPRESSLY APPROVED BY THE MANUFACTURER FOR COMPLIANCE COULD VOID THE USER'S AUTHORITY TO OPERATE THE EQUIPMENT. 32-En COPYRIGHT NOTICE The AKAI professional MPC1000 is a computer-based device, and as such contains and uses software in ROMs. This software, and all related documentation,... accordance with the limits for radio noise emissions from digital apparatus set out in a residential installation. If this Operator's Manual, contain proprietary information which the receiver is protected by placing objects on the software and its documentation may cause harmful interference to...
... EXPRESSLY APPROVED BY THE MANUFACTURER FOR COMPLIANCE COULD VOID THE USER'S AUTHORITY TO OPERATE THE EQUIPMENT. 32-En COPYRIGHT NOTICE The AKAI professional MPC1000 is a computer-based device, and as such contains and uses software in ROMs. This software, and all related documentation,... accordance with the limits for radio noise emissions from digital apparatus set out in a residential installation. If this Operator's Manual, contain proprietary information which the receiver is protected by placing objects on the software and its documentation may cause harmful interference to...
Operation Manual
Page 9
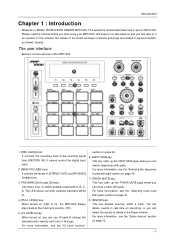
Please read this manual, the names of the knobs and keys on , you can use an MPC1000. For more information, see the "Selecting the sequence to ...pad" section on recording, or you can select the events to play with pads. In this manual before you start using your MPC1000, and keep it in square brackets, as needed. section on page 12. -1- For more ...function" 8. [ERASE] key: This key deletes event(s) within a track. The user interface Below is lit), the MPC1000 always plays back at the maximum velocity (127). 5. [16 LEVELS] key: When turned on panels and plugs are ...
Please read this manual, the names of the knobs and keys on , you can use an MPC1000. For more information, see the "Selecting the sequence to ...pad" section on recording, or you can select the events to play with pads. In this manual before you start using your MPC1000, and keep it in square brackets, as needed. section on page 12. -1- For more ...function" 8. [ERASE] key: This key deletes event(s) within a track. The user interface Below is lit), the MPC1000 always plays back at the maximum velocity (127). 5. [16 LEVELS] key: When turned on panels and plugs are ...
Operation Manual
Page 12
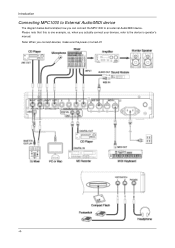
Please note that this is turned off. -4- Note: When you connect devices, make sure the power is one example, so, when you can connect the MPC1000 to the device's operator's manual. Introduction Connecting MPC1000 to External Audio/MIDI device The diagram below demonstrates how you actually connect your devices, refer to an external Audio/MIDI device.
Please note that this is turned off. -4- Note: When you connect devices, make sure the power is one example, so, when you can connect the MPC1000 to the device's operator's manual. Introduction Connecting MPC1000 to External Audio/MIDI device The diagram below demonstrates how you actually connect your devices, refer to an external Audio/MIDI device.
Operation Manual
Page 16
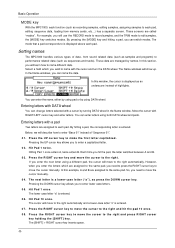
...to the right. The [SHIFT] + RIGHT cursor key inserts space. -8- In this example, A and B are called "modes". Setting names The MPC1000 handles various types of "Sequence 01". 01. However, when you enter the letters which you to enter a capitalized letter. 02. Basic Operation MODE ...key With the MPC1000, each function (such as recording samples, editing samples, assigning samples to each pad. For example, you need to move the cursor manually. 04. Entering letters with the cursor and turn the DATA wheel. In...
...to the right. The [SHIFT] + RIGHT cursor key inserts space. -8- In this example, A and B are called "modes". Setting names The MPC1000 handles various types of "Sequence 01". 01. However, when you enter the letters which you to enter a capitalized letter. 02. Basic Operation MODE ...key With the MPC1000, each function (such as recording samples, editing samples, assigning samples to each pad. For example, you need to move the cursor manually. 04. Entering letters with the cursor and turn the DATA wheel. In...
Operation Manual
Page 18
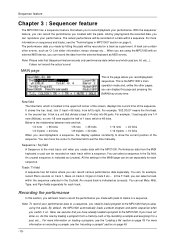
...information on loading a program, see the "recording a sample" section on page 5. You can contain other pages, you can set the time manually. Recording the performance In this page just pressing the [MAIN] key at any time. If you have already loaded a program to set ... left to a pad, etc... You can display this section, you switch it to right. Note: To record your performance. By default, the MPC1000 automatically loads a preset program and demo sequence when you will be recorded on a track as (unused). For more information on recording a sample, see...
...information on loading a program, see the "recording a sample" section on page 5. You can contain other pages, you can set the time manually. Recording the performance In this page just pressing the [MAIN] key at any time. If you have already loaded a program to set ... left to a pad, etc... You can display this section, you switch it to right. Note: To record your performance. By default, the MPC1000 automatically loads a preset program and demo sequence when you will be recorded on a track as (unused). For more information on recording a sample, see...
Operation Manual
Page 40
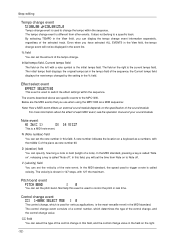
...Below are specific events to trigger a note is called "Note off . For more information about the effect of each MIDI event, see the operation manual of the sound module. Control change event The control change value. The control change event consists of a control number, which determines the type of ..., regardless of the note event. Note event This is the current tempo field. By selecting TEMPO in the View field, you use when using the MPC1000 as note number 60. In the MIDI standard, pressing a key is called "Note on", releasing a key is called velocity. Initial tempo field,...
...Below are specific events to trigger a note is called "Note off . For more information about the effect of each MIDI event, see the operation manual of the sound module. Control change event The control change value. The control change event consists of a control number, which determines the type of ..., regardless of the note event. Note event This is the current tempo field. By selecting TEMPO in the View field, you use when using the MPC1000 as note number 60. In the MIDI standard, pressing a key is called "Note on", releasing a key is called velocity. Initial tempo field,...
Operation Manual
Page 53
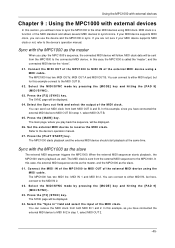
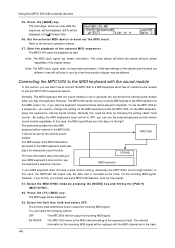
... the MIDI cable. You can connect to either MIDI output, but here, connect to the connected MIDI device. You can use the device and the MPC1000 in sync. Select the MIDI/SYNC mode by pressing the [MODE] key and hitting the [PAD 9] (MIDI/SYNC). 03. The main page, where you... MIDI device to the MIDI OUT B. 02. Press the [MAIN] key. Set the external MIDI device to the device's operation manual. 07. When the external MIDI sequencer starts playback, the MPC1000 starts playback as the master When you are not sure if your MIDI device supports MIDI clock, you play the...
... the MIDI cable. You can connect to either MIDI output, but here, connect to the connected MIDI device. You can use the device and the MPC1000 in sync. Select the MIDI/SYNC mode by pressing the [MODE] key and hitting the [PAD 9] (MIDI/SYNC). 03. The main page, where you... MIDI device to the MIDI OUT B. 02. Press the [MAIN] key. Set the external MIDI device to the device's operation manual. 07. When the external MIDI sequencer starts playback, the MPC1000 starts playback as the master When you are not sure if your MIDI device supports MIDI clock, you play the...
Operation Manual
Page 54
... the incoming MIDI signal will be entered to the internal sound MPC1000 module. By setting the MIDI keyboard's local control to OFF, you play the keyboard. AS TRACK The MPC1000 refers to the device's operation manual. 07. Refer to the MIDI channel setting of its internal sound... module separately. So, if you can learn how to connect the MPC1000 to a MIDI keyboard which will be replaced with ...
... the incoming MIDI signal will be entered to the internal sound MPC1000 module. By setting the MIDI keyboard's local control to OFF, you play the keyboard. AS TRACK The MPC1000 refers to the device's operation manual. 07. Refer to the MIDI channel setting of its internal sound... module separately. So, if you can learn how to connect the MPC1000 to a MIDI keyboard which will be replaced with ...
Operation Manual
Page 56
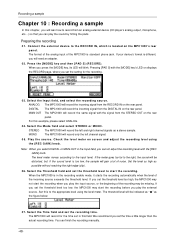
... external device to the input level. Press the [MODE] key and then [PAD 5] (RECORD). Pressing [PAD 5] with the [MODE] key's LED on the MPC1000's rear panel. STEREO The MPC1000 will record the left channel signal. 05. Check the level meter on the rear panel. Select the Threshold field and set in this...the same signal with the [REC GAIN] knob. The level meter moves according to the RECORD IN, which is different, you can finish the recording manually. -48- If the meter goes too far to the appropriate level using the [REC GAIN] knob. You can play the external source. When the...
... external device to the input level. Press the [MODE] key and then [PAD 5] (RECORD). Pressing [PAD 5] with the [MODE] key's LED on the MPC1000's rear panel. STEREO The MPC1000 will record the left channel signal. 05. Check the level meter on the rear panel. Select the Threshold field and set in this...the same signal with the [REC GAIN] knob. The level meter moves according to the RECORD IN, which is different, you can finish the recording manually. -48- If the meter goes too far to the appropriate level using the [REC GAIN] knob. You can play the external source. When the...

Operation Manual
Page 57
...assign to pad field. Recording a sample Starting the recording 08. Pressing the [F5] (CANCEL) key cancels the record ready mode and resets the MPC1000. Pressing the [F6] (START) key starts the recording, even when the incoming signal does not exceed the threshold level. Check the recorded sample ... right after you release the key. For more information about setting the sample name, see the "Connecting the MPC1000 to the RECORD page. You can stop the recording manually before the time set in the record ready mode, and the bottom of the input signal exceeds the threshold ...
...assign to pad field. Recording a sample Starting the recording 08. Pressing the [F5] (CANCEL) key cancels the record ready mode and resets the MPC1000. Pressing the [F6] (START) key starts the recording, even when the incoming signal does not exceed the threshold level. Check the recorded sample ... right after you release the key. For more information about setting the sample name, see the "Connecting the MPC1000 to the RECORD page. You can stop the recording manually before the time set in the record ready mode, and the bottom of the input signal exceeds the threshold ...
Operation Manual
Page 75
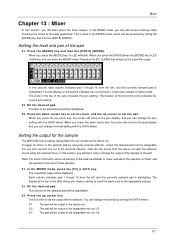
... Level/OUT page will be output to the assignable mix out 3/4. -67- The display at the top is highlighted. The column for the sample The MPC1000 has 4 outputs (assignable mix out) as well as the stereo out. You can change the setting by hitting the [MODE] key and then the [PAD... will be output to the assignable mix out 1/2. 3/4 The pad will be displayed. When you will learn about the operation of them, see the operation manual of the pad. The bar display on the bottom indicates the current level. Note: For more information about connecting to the external effecter or mixer...
... Level/OUT page will be output to the assignable mix out 3/4. -67- The display at the top is highlighted. The column for the sample The MPC1000 has 4 outputs (assignable mix out) as well as the stereo out. You can change the setting by hitting the [MODE] key and then the [PAD... will be output to the assignable mix out 1/2. 3/4 The pad will be displayed. When you will learn about the operation of them, see the operation manual of the pad. The bar display on the bottom indicates the current level. Note: For more information about connecting to the external effecter or mixer...
Operation Manual
Page 100
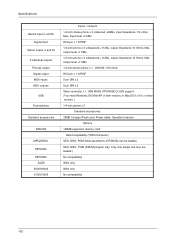
... need Windows 2000/Me/XP or later version, or MacOS 9.x/10.x or later version. ) 1/4-inch phone x 2 Standard accessories 32MB Compact Flash card, Power cable, Operator's manual Options 128MB expansion memory card Data Compatibility (THRU Computer) SEQ, WAV, PGM (Most parameters of PGM file can be loaded.) SEQ, WAV , PGM (DRUM program...
... need Windows 2000/Me/XP or later version, or MacOS 9.x/10.x or later version. ) 1/4-inch phone x 2 Standard accessories 32MB Compact Flash card, Power cable, Operator's manual Options 128MB expansion memory card Data Compatibility (THRU Computer) SEQ, WAV, PGM (Most parameters of PGM file can be loaded.) SEQ, WAV , PGM (DRUM program...
