Quick Installation Guide
Page 3
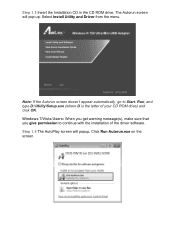
Select Install Utility and Driver from the menu. Note: If the Autorun screen doesn't appear automatically, go to continue with the installation of your CD ROM drive) and click OK. Windows 7/Vista Users: When you get warning message(s), make sure that you give permission to Start, Run, and type D:\Utility\Setup.exe (where D is the letter of the driver software. Step 1.3 Insert the Installation CD in the CD ROM drive. Click Run Autorun.exe on the screen. The Autorun screen will popup. Step 1.4 The AutoPlay screen will pop up.
Select Install Utility and Driver from the menu. Note: If the Autorun screen doesn't appear automatically, go to continue with the installation of your CD ROM drive) and click OK. Windows 7/Vista Users: When you get warning message(s), make sure that you give permission to Start, Run, and type D:\Utility\Setup.exe (where D is the letter of the driver software. Step 1.3 Insert the Installation CD in the CD ROM drive. Click Run Autorun.exe on the screen. The Autorun screen will popup. Step 1.4 The AutoPlay screen will pop up.
Quick Installation Guide
Page 4
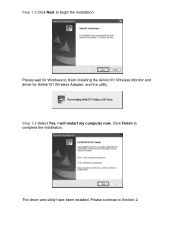
Click Finish to begin the installation. Step 1.5 Click Next to complete the installation. Step 1.6 Select Yes, I will restart my computer now. Please wait for Airlink101 Wireless Adapter, and the utility. The driver and utility have been installed. Please continue to finish installing the Airlink101 Wireless Monitor and driver for Windows to Section 2.
Click Finish to begin the installation. Step 1.5 Click Next to complete the installation. Step 1.6 Select Yes, I will restart my computer now. Please wait for Airlink101 Wireless Adapter, and the utility. The driver and utility have been installed. Please continue to finish installing the Airlink101 Wireless Monitor and driver for Windows to Section 2.


