User Manual
Page 1
Wireless AC 1200 PCI Adapter Model # AWLH7086-E User's Manual Rev. 1.0
Wireless AC 1200 PCI Adapter Model # AWLH7086-E User's Manual Rev. 1.0
User Manual
Page 2
Configure Wireless Utility...11 4.1 Wi-Fi Display (Windows 7 only 12 4.2 Wi-Fi Direct ...12 4.3 Available Networks ...12 4.4 Link Information...13 4.5 Profile Settings...14 4.6 Advanced Settings ...20 4.7 About...21 Troubleshooting ...21 Appendix A - Federal Communication Commission Interference Statement 23 Technical Support ...24 2 Introduction...3 1.1 Package Contents ...3 1.2 Features ...3 2. Connect to Wireless Network ...9 4. Specification ...22 Appendix B - Install the Wireless PCI Adapter 4 3. Table of Contents 1.
Configure Wireless Utility...11 4.1 Wi-Fi Display (Windows 7 only 12 4.2 Wi-Fi Direct ...12 4.3 Available Networks ...12 4.4 Link Information...13 4.5 Profile Settings...14 4.6 Advanced Settings ...20 4.7 About...21 Troubleshooting ...21 Appendix A - Federal Communication Commission Interference Statement 23 Technical Support ...24 2 Introduction...3 1.1 Package Contents ...3 1.2 Features ...3 2. Connect to Wireless Network ...9 4. Specification ...22 Appendix B - Install the Wireless PCI Adapter 4 3. Table of Contents 1.
User Manual
Page 3
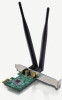
... speed wireless data rate of up the adapter with your existing wireless products. 1.1 Package Contents Before you to set up to 300Mbps* with Wireless N technology • Improved signal strength via two 5dBi omni-directional antennas • Connect easily with included Airlink101® Wireless Utility software • Great for all the Wireless AC 1200 PCI Adapter works with other 802.11 b /g / n / ac network devices which ensures the compatibility with an intuitive user...
... speed wireless data rate of up the adapter with your existing wireless products. 1.1 Package Contents Before you to set up to 300Mbps* with Wireless N technology • Improved signal strength via two 5dBi omni-directional antennas • Connect easily with included Airlink101® Wireless Utility software • Great for all the Wireless AC 1200 PCI Adapter works with other 802.11 b /g / n / ac network devices which ensures the compatibility with an intuitive user...

User Manual
Page 4
Adjust the antennas 90°away from each other for best results. Step 1.4 Click Cancel when you see the Found New Hardware Wizard. Install the Wireless PCI Adapter Step 1.1 SWITCH THE COMPUTER OFF, remove the cover and insert the wireless PCI adapter into an available PCI slot of your computer. Windows 7 users: Go to Step 1.5 when you see this message. Step 1.3 Switch on the wireless PCI adapter. Step 1.2 Fasten the provided antennas to Step 1.5. 4 2. Windows Vista users: Click Cancel and go to the antenna connectors on the computer.
Adjust the antennas 90°away from each other for best results. Step 1.4 Click Cancel when you see the Found New Hardware Wizard. Install the Wireless PCI Adapter Step 1.1 SWITCH THE COMPUTER OFF, remove the cover and insert the wireless PCI adapter into an available PCI slot of your computer. Windows 7 users: Go to Step 1.5 when you see this message. Step 1.3 Switch on the wireless PCI adapter. Step 1.2 Fasten the provided antennas to Step 1.5. 4 2. Windows Vista users: Click Cancel and go to the antenna connectors on the computer.

User Manual
Page 5
When the autorun screen appears, select Install Utility and Driver. 5 Windows XP users: Click Cancel and go to Step 1.5. Step 1.5 Insert the Installation CD in the CD drive.
When the autorun screen appears, select Install Utility and Driver. 5 Windows XP users: Click Cancel and go to Step 1.5. Step 1.5 Insert the Installation CD in the CD drive.

User Manual
Page 6
Step 1.6 Click Next. Windows XP users: Select the Airlink101® Configuration Tool and click Next. 6 Windows 7, Vista and XP Users: If a warning message(s) appears, make sure that you click Allow to continue with the installation of the driver software.
Step 1.6 Click Next. Windows XP users: Select the Airlink101® Configuration Tool and click Next. 6 Windows 7, Vista and XP Users: If a warning message(s) appears, make sure that you click Allow to continue with the installation of the driver software.

User Manual
Page 9
Select the wireless network you want to connect to a wireless network using the Airlink101 Wireless Utility. Connect to Wireless Network This section describes how to connect your wireless adapter to and click on the Available Networks icon to see the available wireless networks in the lower right-hand corner. 9 Step 1 Click on the Connect icon in your environment. 3.
Select the wireless network you want to connect to a wireless network using the Airlink101 Wireless Utility. Connect to Wireless Network This section describes how to connect your wireless adapter to and click on the Available Networks icon to see the available wireless networks in the lower right-hand corner. 9 Step 1 Click on the Connect icon in your environment. 3.

User Manual
Page 11
... of the wireless connection. Rate: Displays the link speed of the Airlink101® Wireless Utility that you selected will be described in Mbps). It depends on /off. Channel: Displays the radio channel being used now. The general layout will be displayed here. Link speed is the current available data transfer speed of wireless connection. 4. Mask: Shows the subnet of the wireless access point or wireless device you can configure. Security...
... of the wireless connection. Rate: Displays the link speed of the Airlink101® Wireless Utility that you selected will be described in Mbps). It depends on /off. Channel: Displays the radio channel being used now. The general layout will be displayed here. Link speed is the current available data transfer speed of wireless connection. 4. Mask: Shows the subnet of the wireless access point or wireless device you can configure. Security...

User Manual
Page 12
... will refresh the network list. 4.1 Wi-Fi Display (Windows 7 only) Wi-Fi Display is a standardized specification that your Wi-Fi Display device for more information. (Note: device must be Wi-Fi Direct enabled to use this feature) 4.3 Available Networks The Available Networks tab displays all the wireless networks that allows you to easily connect with other Wi-Fi Display devices such as wireless TVs or...
... will refresh the network list. 4.1 Wi-Fi Display (Windows 7 only) Wi-Fi Display is a standardized specification that your Wi-Fi Display device for more information. (Note: device must be Wi-Fi Direct enabled to use this feature) 4.3 Available Networks The Available Networks tab displays all the wireless networks that allows you to easily connect with other Wi-Fi Display devices such as wireless TVs or...
User Manual
Page 13
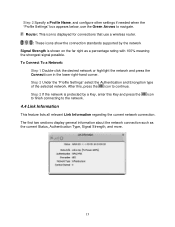
... lists all relevant Link Information regarding the current network connection. Router: This icon is displayed for connections that use the Green Arrows to continue. Step 2 If the network is shown on the far right as the current Status, Authentication Type, Signal Strength, and more. 13 Step 2 Specify a Profile Name, and configure other settings if needed when the "Profile Settings" box appears below, use a wireless...
... lists all relevant Link Information regarding the current network connection. Router: This icon is displayed for connections that use the Green Arrows to continue. Step 2 If the network is shown on the far right as the current Status, Authentication Type, Signal Strength, and more. 13 Step 2 Specify a Profile Name, and configure other settings if needed when the "Profile Settings" box appears below, use a wireless...
User Manual
Page 14
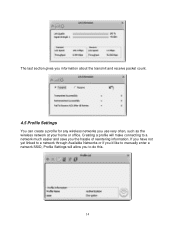
Creating a profile will allow you to a network much easier and save you use very often, such as the wireless network at your home or office. The last section gives you information about the transmit and receive packet count. 4.5 Profile Settings You can create a profile for any wireless networks you the hassle of reentering information. If you have not yet linked to a network through Available Networks or if you'd like to manually enter a network SSID, Profile Settings will make connecting to do this. 14
Creating a profile will allow you to a network much easier and save you use very often, such as the wireless network at your home or office. The last section gives you information about the transmit and receive packet count. 4.5 Profile Settings You can create a profile for any wireless networks you the hassle of reentering information. If you have not yet linked to a network through Available Networks or if you'd like to manually enter a network SSID, Profile Settings will make connecting to do this. 14
User Manual
Page 15
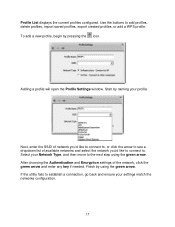
... open the Profile Settings window. After choosing the Authentication and Encryption settings of available networks and select the network you'd like to connect to, or click the arrow to see a dropdown list of the network, click the green arrow and enter any key if needed. To add a new profile, begin by naming your profile. Profile List displays the current profiles configured. Start by...
... open the Profile Settings window. After choosing the Authentication and Encryption settings of available networks and select the network you'd like to connect to, or click the arrow to see a dropdown list of the network, click the green arrow and enter any key if needed. To add a new profile, begin by naming your profile. Profile List displays the current profiles configured. Start by...
User Manual
Page 16
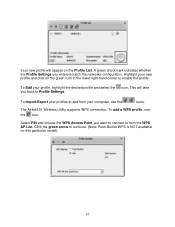
... profile, use the icons. This will appear on the green icon in the lower right-hand corner to enable the profile. The Airlink101 Wireless Utility supports WPS connection. Click the green arrow to continue. (Note: Push-Button WPS is NOT available for this particular model) 16 Select PIN and choose the WPS Access Point you back to Profile Settings. To Import...
... profile, use the icons. This will appear on the green icon in the lower right-hand corner to enable the profile. The Airlink101 Wireless Utility supports WPS connection. Click the green arrow to continue. (Note: Push-Button WPS is NOT available for this particular model) 16 Select PIN and choose the WPS Access Point you back to Profile Settings. To Import...
User Manual
Page 20
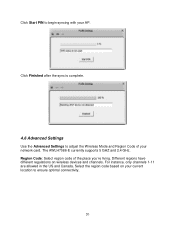
Region Code: Select region code of your network card. Different regions have different regulations on your AP. The AWLH7086-E currently supports 5 GHZ and 2.4 GHz. Click Finished after the sync is complete. 4.6 Advanced Settings Use the Advanced Settings to ensure optimal connectivity. 20 Click Start PIN to begin syncing with your current location to adjust the Wireless Mode and Region Code of the place you're living. For instance, only channels 1-11 are allowed in the US and Canada. Select the region code based on wireless devices and channels.
Region Code: Select region code of your network card. Different regions have different regulations on your AP. The AWLH7086-E currently supports 5 GHZ and 2.4 GHz. Click Finished after the sync is complete. 4.6 Advanced Settings Use the Advanced Settings to ensure optimal connectivity. 20 Click Start PIN to begin syncing with your current location to adjust the Wireless Mode and Region Code of the place you're living. For instance, only channels 1-11 are allowed in the US and Canada. Select the region code based on wireless devices and channels.
User Manual
Page 21
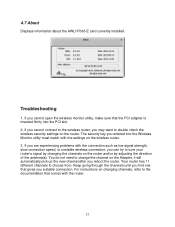
... the connection such as low signal strength, slow connection speed, or unstable wireless connection, you a stable connection. Keep going through the channels until you find one that the PCI adapter is inserted firmly into the Wireless Monitor utility must match with the router. 21 If you entered into the PCI slot. 2. You do not need to choose from. 4.7 About Displays information about the AWLH7086-E card currently installed.
... the connection such as low signal strength, slow connection speed, or unstable wireless connection, you a stable connection. Keep going through the channels until you find one that the PCI adapter is inserted firmly into the Wireless Monitor utility must match with the router. 21 If you entered into the PCI slot. 2. You do not need to choose from. 4.7 About Displays information about the AWLH7086-E card currently installed.
User Manual
Page 23
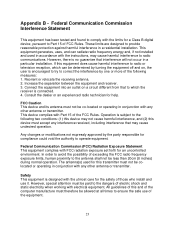
.... Connect the equipment into an outlet on , the user is subject to radio communications. FCC Caution This device and its antenna must not be paid to ensure the safe use it. However, special attention must therefore be colocated or operating in a particular installation. All guidelines of this and of electric shock and static electricity when working...
.... Connect the equipment into an outlet on , the user is subject to radio communications. FCC Caution This device and its antenna must not be paid to ensure the safe use it. However, special attention must therefore be colocated or operating in a particular installation. All guidelines of this and of electric shock and static electricity when working...
User Manual
Page 24
... without notice. Copyright ©2015 Airlink101® 24 Technical Support E-mail: support@airlink101.com Toll Free: 1-888-746-3238 Web Site: www.airlink101.com *Theoretical maximum wireless signal rate derived from other manufactures is not guaranteed. Compatibility with 802.11ac devices from IEEE standard 802.11 specifications. Actual data throughput will vary. Network conditions and environmental factors, including volume of...
... without notice. Copyright ©2015 Airlink101® 24 Technical Support E-mail: support@airlink101.com Toll Free: 1-888-746-3238 Web Site: www.airlink101.com *Theoretical maximum wireless signal rate derived from other manufactures is not guaranteed. Compatibility with 802.11ac devices from IEEE standard 802.11 specifications. Actual data throughput will vary. Network conditions and environmental factors, including volume of...
Quick Installation Guide
Page 1
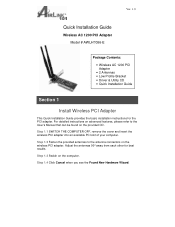
.... 1.0 Quick Installation Guide Wireless AC 1200 PCI Adapter Model # AWLH7086-E Package Contents: • Wireless AC 1200 PCI Adapter • 2 Antennas • Low Profile Bracket • Driver & Utility CD • Quick Installation Guide Section 1 Install Wireless PCI Adapter This Quick Installation Guide provides the basic installation instructions for best results. Step 1.3 Switch on the provided CD. Step 1.4 Click Cancel when you see the Found New Hardware Wizard. Step 1.2 Fasten the provided antennas to the User's Manual that can be found...
.... 1.0 Quick Installation Guide Wireless AC 1200 PCI Adapter Model # AWLH7086-E Package Contents: • Wireless AC 1200 PCI Adapter • 2 Antennas • Low Profile Bracket • Driver & Utility CD • Quick Installation Guide Section 1 Install Wireless PCI Adapter This Quick Installation Guide provides the basic installation instructions for best results. Step 1.3 Switch on the provided CD. Step 1.4 Click Cancel when you see the Found New Hardware Wizard. Step 1.2 Fasten the provided antennas to the User's Manual that can be found...

Quick Installation Guide
Page 5
The Wireless N 300 PCI Adapter has now been successfully installed on the Airlink101® Wireless Utility icon in the system tray, go to the Wireless Network Note: If the Airlink101® Wireless Utility does not open on your desktop, you can open the Airlink101® Wireless Utility by double clicking on your screen. Congratulations! If the icon does not appear in the system tray...
The Wireless N 300 PCI Adapter has now been successfully installed on the Airlink101® Wireless Utility icon in the system tray, go to the Wireless Network Note: If the Airlink101® Wireless Utility does not open on your desktop, you can open the Airlink101® Wireless Utility by double clicking on your screen. Congratulations! If the icon does not appear in the system tray...
Quick Installation Guide
Page 8
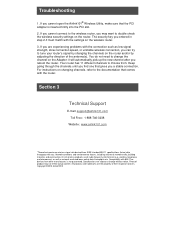
... wireless security settings on the Adapter; Your router has 11 different channels to tune your router's signal by changing the channels on the router and/or by adjusting the direction of their respective owners. For instructions on the wireless router. 3. The security key you may not reflect actual content. Compatibility with the connection such as network overhead lower actual data throughput rate. Photo of wireless products used...
... wireless security settings on the Adapter; Your router has 11 different channels to tune your router's signal by changing the channels on the router and/or by adjusting the direction of their respective owners. For instructions on the wireless router. 3. The security key you may not reflect actual content. Compatibility with the connection such as network overhead lower actual data throughput rate. Photo of wireless products used...


