User Manual
Page 4
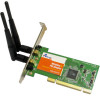
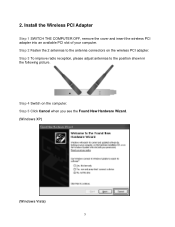
Step 4 Switch on the wireless PCI adapter. Step 3 To improve radio reception, please adjust antennas to the antenna connectors on the computer. Install the Wireless PCI Adapter Step 1 SWITCH THE COMPUTER OFF, remove the cover and insert the wireless PCI adapter into an available PCI slot of your computer. Step 2 Fasten the 2 antennas to the position shown in the following picture. Step 5 Click Cancel when you see the Found New Hardware Wizard. (Windows XP) (Windows Vista) 3 2.
Step 4 Switch on the wireless PCI adapter. Step 3 To improve radio reception, please adjust antennas to the antenna connectors on the computer. Install the Wireless PCI Adapter Step 1 SWITCH THE COMPUTER OFF, remove the cover and insert the wireless PCI adapter into an available PCI slot of your computer. Step 2 Fasten the 2 antennas to the position shown in the following picture. Step 5 Click Cancel when you see the Found New Hardware Wizard. (Windows XP) (Windows Vista) 3 2.
User Manual
Page 5
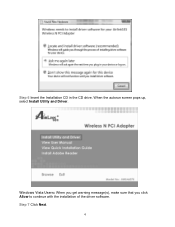
Step 6 Insert the Installation CD in the CD drive. When the autorun screen pops up, select Install Utility and Driver. Step 7 Click Next. 4 Windows Vista Users: When you get warning message(s), make sure that you click Allow to continue with the installation of the driver software.
Step 6 Insert the Installation CD in the CD drive. When the autorun screen pops up, select Install Utility and Driver. Step 7 Click Next. 4 Windows Vista Users: When you get warning message(s), make sure that you click Allow to continue with the installation of the driver software.

User Manual
Page 6
For Windows XP, click Continue Anyway at the Windows Logo Screen. 5 Step 8 Click Next to start installing the software.
For Windows XP, click Continue Anyway at the Windows Logo Screen. 5 Step 8 Click Next to start installing the software.

User Manual
Page 13
.... To activate a profile, select the profile you wish to manage and create new profiles. To modify an existing profile, select the profile from the popup window to manually add in these profiles. 4.1 Profile The Profile tab lists the current profiles and allows you to connect and click Activate. 12 To create...
.... To activate a profile, select the profile you wish to manage and create new profiles. To modify an existing profile, select the profile from the popup window to manually add in these profiles. 4.1 Profile The Profile tab lists the current profiles and allows you to connect and click Activate. 12 To create...
User Manual
Page 17
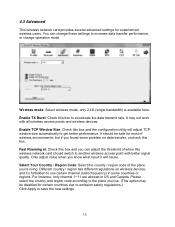
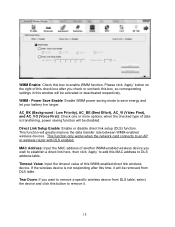
... should be disabled for experienced wireless users. For instance, only channel 1~11 are allowed in some problem on wireless devices, and it will adjust TCP window size automatically to another wireless access point with all wireless access points and wireless devices. It may be safe for most of wireless environments, but...
... should be disabled for experienced wireless users. For instance, only channel 1~11 are allowed in some problem on wireless devices, and it will adjust TCP window size automatically to another wireless access point with all wireless access points and wireless devices. It may be safe for most of wireless environments, but...
User Manual
Page 19
... devices. when the checked type of another WMM-enabled wireless device you want to remove a specific wireless device from DLS table. WMM Enable: Check this window will be activated or deactivated respectively. Please click 'Apply' button on the right of this time, it . 18 Timeout Value: Input the timeout value of...
... devices. when the checked type of another WMM-enabled wireless device you want to remove a specific wireless device from DLS table. WMM Enable: Check this window will be activated or deactivated respectively. Please click 'Apply' button on the right of this time, it . 18 Timeout Value: Input the timeout value of...
User Manual
Page 22
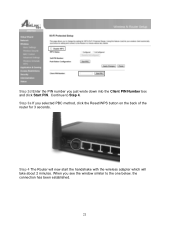
When you see the window similar to Step 4. Step 3a If you just wrote down into the Client PIN Number box and click Start PIN. Step 2d Enter the PIN number you selected PBC method, click the Reset/WPS button on the back of the router for 3 seconds. Continue to the one below, the connection has been established. 21 Step 4 The Router will now start the handshake with the wireless adapter which will take about 2 minutes.
When you see the window similar to Step 4. Step 3a If you just wrote down into the Client PIN Number box and click Start PIN. Step 2d Enter the PIN number you selected PBC method, click the Reset/WPS button on the back of the router for 3 seconds. Continue to the one below, the connection has been established. 21 Step 4 The Router will now start the handshake with the wireless adapter which will take about 2 minutes.

User Manual
Page 25
4.8 About The About window provides the information about the Wireless Monitor Utility version and the current driver version. 24
4.8 About The About window provides the information about the Wireless Monitor Utility version and the current driver version. 24
Quick Installation Guide
Page 1
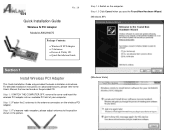
... on advanced features, please refer to the position shown in the picture. (Windows Vista) Step 1.5 Click Cancel when you see the Found New Hardware Wizard. (Windows XP) Section 1 Install Wireless PCI Adapter This Quick Installation Guide only provides ...the basic installation instructions. Step 1.1 SWITCH THE COMPUTER OFF, remove the cover and insert the wireless PCI adapter into an available PCI slot of your computer. Ver. 1.0 Quick Installation Guide Wireless N PCI Adapter Model # AWLH6075...
... on advanced features, please refer to the position shown in the picture. (Windows Vista) Step 1.5 Click Cancel when you see the Found New Hardware Wizard. (Windows XP) Section 1 Install Wireless PCI Adapter This Quick Installation Guide only provides ...the basic installation instructions. Step 1.1 SWITCH THE COMPUTER OFF, remove the cover and insert the wireless PCI adapter into an available PCI slot of your computer. Ver. 1.0 Quick Installation Guide Wireless N PCI Adapter Model # AWLH6075...

Quick Installation Guide
Page 2
Step 1.6 Insert the Installation CD in the CD drive. Step 1.8 Click Next to continue with the installation of the driver software. Windows Vista Users: When you get warning message(s), make sure that you click Allow to start installing the software. Step 1.7 Click Next. When the autorun screen pops up, select Install Utility and Driver. For Windows XP, click Continue Anyway at the Windows Logo Screen.
Step 1.6 Insert the Installation CD in the CD drive. Step 1.8 Click Next to continue with the installation of the driver software. Windows Vista Users: When you get warning message(s), make sure that you click Allow to start installing the software. Step 1.7 Click Next. When the autorun screen pops up, select Install Utility and Driver. For Windows XP, click Continue Anyway at the Windows Logo Screen.


