User Manual
Page 4
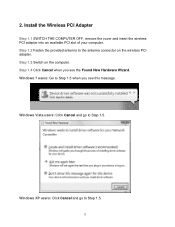
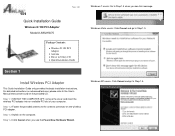
Step 1.2 Fasten the provided antenna to Step 1.5. 3 Step 1.3 Switch on the wireless PCI adapter. Windows XP users: Click Cancel and go to Step 1.5 when you see this message. 2. Step 1.4 Click Cancel when you see the Found New Hardware Wizard. Windows Vista users: Click Cancel and go to the antenna connector on the computer. Windows 7 users: Go to Step 1.5. Install the Wireless PCI Adapter Step 1.1 SWITCH THE COMPUTER OFF, remove the cover and insert the wireless PCI adapter into an available PCI slot of your computer.
Step 1.2 Fasten the provided antenna to Step 1.5. 3 Step 1.3 Switch on the wireless PCI adapter. Windows XP users: Click Cancel and go to Step 1.5 when you see this message. 2. Step 1.4 Click Cancel when you see the Found New Hardware Wizard. Windows Vista users: Click Cancel and go to the antenna connector on the computer. Windows 7 users: Go to Step 1.5. Install the Wireless PCI Adapter Step 1.1 SWITCH THE COMPUTER OFF, remove the cover and insert the wireless PCI adapter into an available PCI slot of your computer.

User Manual
Page 5
Step 1.5 Insert the Installation CD in the CD drive. When the autorun screen pops up, click Install Utility and Driver. Windows 7 and Vista Users: When you get warning message(s), make sure that you click Allow to continue with the installation of the driver software. 4
Step 1.5 Insert the Installation CD in the CD drive. When the autorun screen pops up, click Install Utility and Driver. Windows 7 and Vista Users: When you get warning message(s), make sure that you click Allow to continue with the installation of the driver software. 4

User Manual
Page 7
For Windows 7 and Vista users: Click Install this driver software anyway. For Windows XP users: click Continue Anyway at the Windows Logo. 6
For Windows 7 and Vista users: Click Install this driver software anyway. For Windows XP users: click Continue Anyway at the Windows Logo. 6
User Manual
Page 14
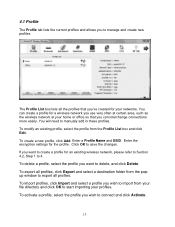
... file directory and click OK to start importing your profiles. To import profiles, click Import and select a profile you wish to import from the popup window to export all the profiles that you 've created for your home or office so that you can create a profile for a wireless network you use...
... file directory and click OK to start importing your profiles. To import profiles, click Import and select a profile you wish to import from the popup window to export all the profiles that you 've created for your home or office so that you can create a profile for a wireless network you use...
User Manual
Page 18
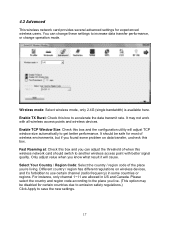
... box and the configuration utility will cause. For instance, only channel 1~11 are allowed in some problem on wireless devices, and it will adjust TCP window size automatically to increase data transfer performance, or change these settings to get better performance. It may be safe for experienced wireless users. Fast Roaming... this wireless network card should be disabled for certain countries due to emission safety regulations.) Click Apply to accelerate the data transmit rate. Enable TCP Window Size: Check this box.
... box and the configuration utility will cause. For instance, only channel 1~11 are allowed in some problem on wireless devices, and it will adjust TCP window size automatically to increase data transfer performance, or change these settings to get better performance. It may be safe for experienced wireless users. Fast Roaming... this wireless network card should be disabled for certain countries due to emission safety regulations.) Click Apply to accelerate the data transmit rate. Enable TCP Window Size: Check this box.

User Manual
Page 20
... address table. MAC Address: Input the MAC address of data is not responding after you check or uncheck this box, so corresponding settings in this window will be disabled. Timeout Value: Input the timeout value of this check box after this time, it . 19 Tear Down: If you wish to establish...
... address table. MAC Address: Input the MAC address of data is not responding after you check or uncheck this box, so corresponding settings in this window will be disabled. Timeout Value: Input the timeout value of this check box after this time, it . 19 Tear Down: If you wish to establish...

User Manual
Page 23
Step 3a If you just wrote down into the Client PIN Number box and click Start PIN. Continue to the one below, the connection has been established. 22 Step 2d Enter the PIN number you selected PBC method, click the Reset/WPS button on the back of the router for 3 seconds. (The WLAN LED will stop blinking while WPS mode is triggered.) Step 4 The Router will now start the handshake with the wireless adapter which will take about 2 minutes. When you see the window similar to Step 4.
Step 3a If you just wrote down into the Client PIN Number box and click Start PIN. Continue to the one below, the connection has been established. 22 Step 2d Enter the PIN number you selected PBC method, click the Reset/WPS button on the back of the router for 3 seconds. (The WLAN LED will stop blinking while WPS mode is triggered.) Step 4 The Router will now start the handshake with the wireless adapter which will take about 2 minutes. When you see the window similar to Step 4.

User Manual
Page 26
4.8 About The About window provides the information about the Wireless Monitor Utility version and the current driver version. 25
4.8 About The About window provides the information about the Wireless Monitor Utility version and the current driver version. 25

User Manual
Page 28
... (TKIP & AES) • WEP 64/128-bit • CCX LED • Link • Tx/Rx Quality of Service • WMM, WMM-PS System requirement • Windows 7, Vista, XP and 2000 • Available PCI slot Weight • 63.5 g Dimensions • 120 x 50 mm (L x W) Temperature • Operating: 0ºC to 55ºC • Storage...
... (TKIP & AES) • WEP 64/128-bit • CCX LED • Link • Tx/Rx Quality of Service • WMM, WMM-PS System requirement • Windows 7, Vista, XP and 2000 • Available PCI slot Weight • 63.5 g Dimensions • 120 x 50 mm (L x W) Temperature • Operating: 0ºC to 55ºC • Storage...
Quick Installation Guide
Page 1
Windows XP users: Click Cancel and go to Step 1.5. Quick Installation Guide Wireless N 150 PCI Adapter Model # AWLH5075 Package Contents: • Wireless N 150 PCI Adapter • Antenna • Driver & Utility CD &#...8226; Quick Installation Guide Section 1 Install Wireless PCI Adapter This Quick Installation Guide only provides the basic installation instructions. Step 1.3 Switch on the provided CD. Step 1.4 Click Cancel when you see the Found New Hardware Wizard. Windows...
Windows XP users: Click Cancel and go to Step 1.5. Quick Installation Guide Wireless N 150 PCI Adapter Model # AWLH5075 Package Contents: • Wireless N 150 PCI Adapter • Antenna • Driver & Utility CD &#...8226; Quick Installation Guide Section 1 Install Wireless PCI Adapter This Quick Installation Guide only provides the basic installation instructions. Step 1.3 Switch on the provided CD. Step 1.4 Click Cancel when you see the Found New Hardware Wizard. Windows...

Quick Installation Guide
Page 2
Step 1.6 Click Next. For Windows 7 and Vista users: Click Install this driver software anyway. Windows 7 and Vista Users: When you get warning message(s), make sure that you click Allow to start installing the software. Step 1.7 Click Next to continue with the installation of the driver software. When the autorun screen pops up, click Install Utility and Driver. Step 1.5 Insert the Installation CD in the CD drive.
Step 1.6 Click Next. For Windows 7 and Vista users: Click Install this driver software anyway. Windows 7 and Vista Users: When you get warning message(s), make sure that you click Allow to start installing the software. Step 1.7 Click Next to continue with the installation of the driver software. When the autorun screen pops up, click Install Utility and Driver. Step 1.5 Insert the Installation CD in the CD drive.

Quick Installation Guide
Page 3
For Windows XP users: click Continue Anyway at the Windows Logo. Step 1.9 You will see the Airlink101 Wireless Monitor pops up. The Wireless N 150 PCI Adapter has now been successfully installed on your computer. Congratulations! Step 1.8 Click Finish.
For Windows XP users: click Continue Anyway at the Windows Logo. Step 1.9 You will see the Airlink101 Wireless Monitor pops up. The Wireless N 150 PCI Adapter has now been successfully installed on your computer. Congratulations! Step 1.8 Click Finish.


