
Manual
Page 2
TABLE OF CONTENTS ABOUT THIS GUIDE 4 INTRODUCTION 5 PACKAGE CONTENTS 6 SYSTEM REQUIREMENTS 6 GENERAL FEATURES 7 PRODUCT VIEW 8 HARDWARE INSTALLATION 10 NETWORKING APPLICATION 10 INSTALLING THE PRINT SERVER 11 USING THE UTILITIES 12 AUTO-RUN INSTALLATION 12 PS-UTILITY 14 Installing PS-Utility 14 Using PS-Utility 15 PS WIZARD 18 PRINTING IN MAC OS 21 RENDEZVOUS USES IN MAC OS 10.2 21 SETTING UP APPLE TALK/LPR PRINTING 24 For MAC OS X User 24 For MAC OS 9 User 26 For MAC OS 9 User 27 WEB CONFIGURATION 30 WEB CONFIGURATION UTILITY 30 MANAGEMENT 31 - 2 -
TABLE OF CONTENTS ABOUT THIS GUIDE 4 INTRODUCTION 5 PACKAGE CONTENTS 6 SYSTEM REQUIREMENTS 6 GENERAL FEATURES 7 PRODUCT VIEW 8 HARDWARE INSTALLATION 10 NETWORKING APPLICATION 10 INSTALLING THE PRINT SERVER 11 USING THE UTILITIES 12 AUTO-RUN INSTALLATION 12 PS-UTILITY 14 Installing PS-Utility 14 Using PS-Utility 15 PS WIZARD 18 PRINTING IN MAC OS 21 RENDEZVOUS USES IN MAC OS 10.2 21 SETTING UP APPLE TALK/LPR PRINTING 24 For MAC OS X User 24 For MAC OS 9 User 26 For MAC OS 9 User 27 WEB CONFIGURATION 30 WEB CONFIGURATION UTILITY 30 MANAGEMENT 31 - 2 -
Manual
Page 4
... the web browser. ABOUT THIS GUIDE This manual provides instructions and illustrations on how to install and use your USB Print Server, including: z Chapter 1, Introduction, provides the general information on your network administrator or MIS staff for the product. z Chapter... 3, Using the Utilities, helps you complete printing task through your print server in this manual are not sure about the respective information, please ask your system and network. z Chapter 2, Hardware Installation,...
... the web browser. ABOUT THIS GUIDE This manual provides instructions and illustrations on how to install and use your USB Print Server, including: z Chapter 1, Introduction, provides the general information on your network administrator or MIS staff for the product. z Chapter... 3, Using the Utilities, helps you complete printing task through your print server in this manual are not sure about the respective information, please ask your system and network. z Chapter 2, Hardware Installation,...
Manual
Page 5
... further settings for direct communication between PC/Notebook and print server anywhere you to locate USB printer services. The USB Print Server features a Web-based Configuration Utility, which allows you wish to set up the print server through an Access Point under the infrastructure mode, or... can connect your USB Print Server, the easiest and fastest way to high-performance printers much faster than a file server or a PC acting as a print server can. This compact print server can be used in ...
... further settings for direct communication between PC/Notebook and print server anywhere you to locate USB printer services. The USB Print Server features a Web-based Configuration Utility, which allows you wish to set up the print server through an Access Point under the infrastructure mode, or... can connect your USB Print Server, the easiest and fastest way to high-performance printers much faster than a file server or a PC acting as a print server can. This compact print server can be used in ...
Manual
Page 6
Also, keep the box and packing materials in case you have: ♦ One USB Print Server. ♦ One AC Power Adapter suitable for your local dealer immediately. System Requirements ♦ Operating System: Microsoft Windows 95/98/ME/NT/2000/XP/2003. ...
Also, keep the box and packing materials in case you have: ♦ One USB Print Server. ♦ One AC Power Adapter suitable for your local dealer immediately. System Requirements ♦ Operating System: Microsoft Windows 95/98/ME/NT/2000/XP/2003. ...

Manual
Page 7
... and RARP ♦ Support Web configuration ♦ Provide Flash memory for easy firmware upgrade ♦ Printing Access control and display ♦ E-mail notification for printer error messages ♦ Support E-Mail printing and FTP printing ♦ Ability to save print server configuration into hard drive for easy access and backup without the hassle to reconfigure if...
... and RARP ♦ Support Web configuration ♦ Provide Flash memory for easy firmware upgrade ♦ Printing Access control and display ♦ E-mail notification for printer error messages ♦ Support E-Mail printing and FTP printing ♦ Ability to save print server configuration into hard drive for easy access and backup without the hassle to reconfigure if...
Manual
Page 8
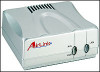
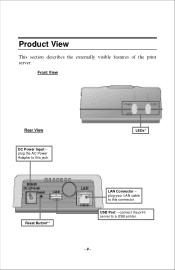
Product View This section describes the externally visible features of the print server. plug your LAN cable to a USB printer. - 8 - connect the print server to this jack. Front View Rear View DC Power Input - plug the AC Power Adapter to this connector. Reset Button** LEDs* LAN Connector - USB Port -
Product View This section describes the externally visible features of the print server. plug your LAN cable to a USB printer. - 8 - connect the print server to this jack. Front View Rear View DC Power Input - plug the AC Power Adapter to this connector. Reset Button** LEDs* LAN Connector - USB Port -
Manual
Page 9
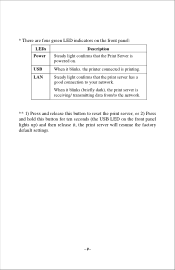
... indicators on the front panel: LEDs Power Description Steady light confirms that the print server has a good connection to your network. LAN Steady light confirms that the Print Server is powered on the front panel lights up) and then release it, the print server will resume the factory default settings. - 9 - or 2) Press and hold this button...
... indicators on the front panel: LEDs Power Description Steady light confirms that the print server has a good connection to your network. LAN Steady light confirms that the Print Server is powered on the front panel lights up) and then release it, the print server will resume the factory default settings. - 9 - or 2) Press and hold this button...

Manual
Page 10
USB Print Server - 10 - 2 HARDWARE INSTALLATION Networking Application The following diagram explains the application of your print server.
USB Print Server - 10 - 2 HARDWARE INSTALLATION Networking Application The following diagram explains the application of your print server.
Manual
Page 11
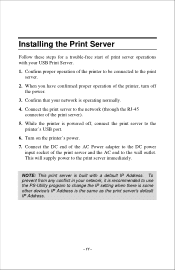
... the printer to be connected to the print server immediately. This will supply power to the print server. 2. NOTE: This print server is the same as the print server's default IP Address. - 11 - Connect the print server to the wall outlet. When you have confirmed proper operation of the printer, turn off , connect the print server to change the IP setting when...
... the printer to be connected to the print server immediately. This will supply power to the print server. 2. NOTE: This print server is the same as the print server's default IP Address. - 11 - Connect the print server to the wall outlet. When you have confirmed proper operation of the printer, turn off , connect the print server to change the IP setting when...

Manual
Page 12
Auto-Run Installation Insert the Installation CD-ROM into your print server with a user-friendly interface that allows you to initiate the Auto-Run program, and the menu screen will appear as below. - 12 - 3 USING THE UTILITIES This chapter describes the software utilities for the print server, including how to set up your computer's CD-ROM drive to set up and administer the print server easily. The PSUtility and PS Wizard are designed with these utility.
Auto-Run Installation Insert the Installation CD-ROM into your print server with a user-friendly interface that allows you to initiate the Auto-Run program, and the menu screen will appear as below. - 12 - 3 USING THE UTILITIES This chapter describes the software utilities for the print server, including how to set up your computer's CD-ROM drive to set up and administer the print server easily. The PSUtility and PS Wizard are designed with these utility.

Manual
Page 13
... installing the utility. • PS Wizard - click to browse the contents of the Installation CD-ROM, click this button and the contents of the USB Print Server. • Install Utility - click to set up the printer configuration easily and quickly. • Browse CD - click to launch the Printer Wizard program, which is...
... installing the utility. • PS Wizard - click to browse the contents of the Installation CD-ROM, click this button and the contents of the USB Print Server. • Install Utility - click to set up the printer configuration easily and quickly. • Browse CD - click to launch the Printer Wizard program, which is...

Manual
Page 14
PS-Utility To avoid the conflict in the welcome screen of your print server (such as the IP address) after finishing the installation. Click Install Utility from the Auto-Run menu screen. Once executed, the Setup program will extract files to change the related settings of InstallShield Wizard. 2. Choose the destination location. If no specific requirement, leave the default setting and click Next >. - 14 - then, click Next > in your network, you can use PS-Utility to launch the InstallShield Wizard; Installing PS-Utility 1.
PS-Utility To avoid the conflict in the welcome screen of your print server (such as the IP address) after finishing the installation. Click Install Utility from the Auto-Run menu screen. Once executed, the Setup program will extract files to change the related settings of InstallShield Wizard. 2. Choose the destination location. If no specific requirement, leave the default setting and click Next >. - 14 - then, click Next > in your network, you can use PS-Utility to launch the InstallShield Wizard; Installing PS-Utility 1.

Manual
Page 15
Using PS-Utility This section describes the operation of PS-Utility. Click Start -> Programs -> PS-Utility, and then click the PS- After installing the utility, the application program for the print server is automatically installed to install the software, and the Progress bar indicates the installation is proceeding. 4. 3. When completed, click Finish. To launch PSUtility: 1. Utility v2.00 item. - 15 - The InstallShield Wizard starts to your computer, and creates a folder in Start\Programs\PS-Utility.
Using PS-Utility This section describes the operation of PS-Utility. Click Start -> Programs -> PS-Utility, and then click the PS- After installing the utility, the application program for the print server is automatically installed to install the software, and the Progress bar indicates the installation is proceeding. 4. 3. When completed, click Finish. To launch PSUtility: 1. Utility v2.00 item. - 15 - The InstallShield Wizard starts to your computer, and creates a folder in Start\Programs\PS-Utility.

Manual
Page 16
Your print server Component Features: 1. Control Buttons - Change IP Address: Click this dialog box, you to search the connected print server within the network. 2. Device List: Display the connected print server within the network. 2. When completed, click OK. - 16 - In this button to bring up the following dialog box, allowing you can select either Manually Assign or DHCP Assign Automatically. The main screen will appear as below, and it starts to change the IP Address.
Your print server Component Features: 1. Control Buttons - Change IP Address: Click this dialog box, you to search the connected print server within the network. 2. Device List: Display the connected print server within the network. 2. When completed, click OK. - 16 - In this button to bring up the following dialog box, allowing you can select either Manually Assign or DHCP Assign Automatically. The main screen will appear as below, and it starts to change the IP Address.

Manual
Page 17
...to update the firmware of PS-Utility. - About: Click this button to bring up a window containing the basic information of the selected print server. - Show Web Setup: Click this button to open your web browser and launch the Configuration Utility. Status Bar: Display the system status.... - 17 - Discover Device: Click this button to search the connected print server again. - Close: Click this button to reload the factory settings of the selected print server in the Device List to exit PS-Utility. 3. - Factory Reset: Click this button to launch ...
...to update the firmware of PS-Utility. - About: Click this button to bring up a window containing the basic information of the selected print server. - Show Web Setup: Click this button to open your web browser and launch the Configuration Utility. Status Bar: Display the system status.... - 17 - Discover Device: Click this button to search the connected print server again. - Close: Click this button to reload the factory settings of the selected print server in the Device List to exit PS-Utility. 3. - Factory Reset: Click this button to launch ...
Manual
Page 18
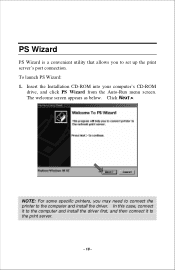
Click Next >. NOTE: For some specific printers, you to set up the print server's port connection. The welcome screen appears as below. Insert the Installation CD-ROM into your computer's CD-ROM drive, and click PS Wizard from the Auto-Run menu screen. In this case, connect it to the computer and install the driver first, and then connect it to the computer and install the driver. PS Wizard PS Wizard is a convenient utility that allows you may need to connect the printer to the print server. - 18 - To launch PS Wizard: 1.
Click Next >. NOTE: For some specific printers, you to set up the print server's port connection. The welcome screen appears as below. Insert the Installation CD-ROM into your computer's CD-ROM drive, and click PS Wizard from the Auto-Run menu screen. In this case, connect it to the computer and install the driver first, and then connect it to the computer and install the driver. PS Wizard PS Wizard is a convenient utility that allows you may need to connect the printer to the print server. - 18 - To launch PS Wizard: 1.

Manual
Page 19
In the following window, select one printer port in the Printer List to set up port connection, and then click Next >. Select one printer in the Print Server List, and click Next >. 2. Your print server name Your printer port name Choose one connected printer within the network. 3. Choose one connected printer port. - 19 -
In the following window, select one printer port in the Printer List to set up port connection, and then click Next >. Select one printer in the Print Server List, and click Next >. 2. Your print server name Your printer port name Choose one connected printer within the network. 3. Choose one connected printer port. - 19 -

Manual
Page 24
... MAC OS X User With MAC OS X, you can use AppleTalk or LPR printers to access the print server's web configuration. After attaching the print server to your network, change the IP Address of the print server is any number between 2 and 200. 2. Check this option. - 24 - In the Network window, select the AppleTalk tab and check...
... MAC OS X User With MAC OS X, you can use AppleTalk or LPR printers to access the print server's web configuration. After attaching the print server to your network, change the IP Address of the print server is any number between 2 and 200. 2. Check this option. - 24 - In the Network window, select the AppleTalk tab and check...
Manual
Page 26
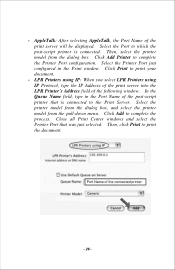
...-script printer is connected to complete the Printer Port configuration. Close all Print Center windows and select the Printer Port that is connected. Port Name of the print server will be displayed. - Click Add to print the document. Select the Printer Port just configured in the Port Name ...you select LPR Printers using IP Protocol, type the IP Address of the print server into the LPR Printer's Address field of the post-script printer that was just selected. Click Add Printer to the Print Server. Select the printer model from the dialog box, and select the printer ...
...-script printer is connected to complete the Printer Port configuration. Close all Print Center windows and select the Printer Port that is connected. Port Name of the print server will be displayed. - Click Add to print the document. Select the Printer Port just configured in the Port Name ...you select LPR Printers using IP Protocol, type the IP Address of the print server into the LPR Printer's Address field of the post-script printer that was just selected. Click Add Printer to the Print Server. Select the printer model from the dialog box, and select the printer ...

Manual
Page 27
...If your Ethernet network, either directly using the EtherTalk transport, or over a proprietary low-speed LocalTalk transport. To set up the print server to be used for network printing to -EtherTalk router. Please confirm that the AppleTalk protocol is divided into the address field of the users who will be using ...can be in your browser. 4. If your AppleTalk network is enabled in . Select the Network tab and scroll to specify which zone the Print Server should contain a single asterisk "*". - 27 - For MAC OS 9 User If you use the AppleTalk network protocol for AppleTalk...
...If your Ethernet network, either directly using the EtherTalk transport, or over a proprietary low-speed LocalTalk transport. To set up the print server to be used for network printing to -EtherTalk router. Please confirm that the AppleTalk protocol is divided into the address field of the users who will be using ...can be in your browser. 4. If your AppleTalk network is enabled in . Select the Network tab and scroll to specify which zone the Print Server should contain a single asterisk "*". - 27 - For MAC OS 9 User If you use the AppleTalk network protocol for AppleTalk...