
Manual
Page 1
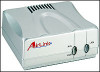
Model # APSUSB201 User's Manual
Model # APSUSB201 User's Manual
Manual
Page 4
...Utilities, helps you to use the software. z Chapter 6, Product Specification. Please note that the illustrations or setting values in this manual are not sure about the respective information, please ask your print server in MAC OS, lets you are FOR YOUR REFERENCE ONLY...z Chapter 5, Web Configuration, completes the configuration using the web browser. z Chapter 4, Printing in MAC OS environment. ABOUT THIS GUIDE This manual provides instructions and illustrations on how to install and use your USB Print Server, including: z Chapter 1, Introduction, provides the general information on...
...Utilities, helps you to use the software. z Chapter 6, Product Specification. Please note that the illustrations or setting values in this manual are not sure about the respective information, please ask your print server in MAC OS, lets you are FOR YOUR REFERENCE ONLY...z Chapter 5, Web Configuration, completes the configuration using the web browser. z Chapter 4, Printing in MAC OS environment. ABOUT THIS GUIDE This manual provides instructions and illustrations on how to install and use your USB Print Server, including: z Chapter 1, Introduction, provides the general information on...

Manual
Page 16
Control Buttons - 2. When completed, click OK. - 16 - Device List: Display the connected print server within the network. In this button to bring up the following dialog box, allowing you can select either Manually Assign or DHCP Assign Automatically. Your print server Component Features: 1. Change IP Address: Click this dialog box, you to search the connected print server within the network. 2. The main screen will appear as below, and it starts to change the IP Address.
Control Buttons - 2. When completed, click OK. - 16 - Device List: Display the connected print server within the network. In this button to bring up the following dialog box, allowing you can select either Manually Assign or DHCP Assign Automatically. Your print server Component Features: 1. Change IP Address: Click this dialog box, you to search the connected print server within the network. 2. The main screen will appear as below, and it starts to change the IP Address.

Manual
Page 30
....168.1.254 (the default IP address) in the Address bar and press [Enter] to enter the Management screen of LAN will be helpful in this manual). Extensive knowledge of the Configuration Utility. Web Configuration Utility First, launch your print server with the print server's IP address in the same segment for...
....168.1.254 (the default IP address) in the Address bar and press [Enter] to enter the Management screen of LAN will be helpful in this manual). Extensive knowledge of the Configuration Utility. Web Configuration Utility First, launch your print server with the print server's IP address in the same segment for...

Manual
Page 37
NOTE: PJL (Print Job Language) has certain job requirements that must be met to your printer's manual. - 37 - For more information, please refer to work correctly. Port Settings In this field, you to select the PJL Printer setting (Yes or No). It also allows you can assign the Port Name for the print server, and the description for the USB port.
NOTE: PJL (Print Job Language) has certain job requirements that must be met to your printer's manual. - 37 - For more information, please refer to work correctly. Port Settings In this field, you to select the PJL Printer setting (Yes or No). It also allows you can assign the Port Name for the print server, and the description for the USB port.

Manual
Page 38
When you choose Manually Assign, you to configure the TCP/IP setting: IP Address, UPnP, and MAC Rendezvous. - Configuration J Network TCP/IP This field contains three options that allow you should enter the related information in the following boxes, including IP Address, Subnet Mask, and Default Gateway. - IP Address: This option allows you to set the IP address manually or automatically. UPnP: This option allows you to enable or disable UPnP mode. - 38 -
When you choose Manually Assign, you to configure the TCP/IP setting: IP Address, UPnP, and MAC Rendezvous. - Configuration J Network TCP/IP This field contains three options that allow you should enter the related information in the following boxes, including IP Address, Subnet Mask, and Default Gateway. - IP Address: This option allows you to set the IP address manually or automatically. UPnP: This option allows you to enable or disable UPnP mode. - 38 -
Quick installation guide
Page 2
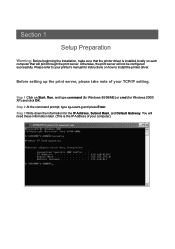
... Address of your TCP/IP setting. Step 3 Write down the information for Windows 2000/ XP) and click OK. Step 1 Click on how to your printer's manual for instructions on Start, Run, and type command (for Windows 95/98/ME) or cmd (for the IP Address, Subnet Mask, and Default Gateway. Before...
... Address of your TCP/IP setting. Step 3 Write down the information for Windows 2000/ XP) and click OK. Step 1 Click on how to your printer's manual for instructions on Start, Run, and type command (for Windows 95/98/ME) or cmd (for the IP Address, Subnet Mask, and Default Gateway. Before...

Quick installation guide
Page 6
... still appears, use a paper clip and hold in Section 1 and make sure the Subnet Mask and Default Gateway match those displayed. If not, enter them manually. Section 4 Running PS Utility Note: If your TCP/IP setting from Section 1 has an IP Address of the print server for ten seconds while it...
... still appears, use a paper clip and hold in Section 1 and make sure the Subnet Mask and Default Gateway match those displayed. If not, enter them manually. Section 4 Running PS Utility Note: If your TCP/IP setting from Section 1 has an IP Address of the print server for ten seconds while it...

Quick installation guide
Page 12
Note: This print server does not support most multi-functional printers (i.e. If your printer is a multi-functional printer it may not work with scanner, fax, copier, etc. For a list of compatible printers, please visit our web site at www.airlinkplus.com For more information on how to use the web configuration or setup for Mac OS, please refer to the User's Manual in the provided CD. functions). printers with this print server. Section 8 Technical Support E-mail: [email protected] Toll Free: 1-888-746-3238 Web Site: www.airlinkplus.com
Note: This print server does not support most multi-functional printers (i.e. If your printer is a multi-functional printer it may not work with scanner, fax, copier, etc. For a list of compatible printers, please visit our web site at www.airlinkplus.com For more information on how to use the web configuration or setup for Mac OS, please refer to the User's Manual in the provided CD. functions). printers with this print server. Section 8 Technical Support E-mail: [email protected] Toll Free: 1-888-746-3238 Web Site: www.airlinkplus.com