
Manual
Page 2
TABLE OF CONTENTS ABOUT THIS GUIDE 4 INTRODUCTION 5 PACKAGE CONTENTS 6 SYSTEM REQUIREMENTS 6 GENERAL FEATURES 7 PRODUCT VIEW 8 HARDWARE INSTALLATION 10 NETWORKING APPLICATION 10 INSTALLING THE PRINT SERVER 11 USING THE UTILITIES 12 AUTO-RUN INSTALLATION 12 PS-UTILITY 14 Installing PS-Utility 14 Using PS-Utility 15 PS WIZARD 18 PRINTING IN MAC OS 21 RENDEZVOUS USES IN MAC OS 10.2 21 SETTING UP APPLE TALK/LPR PRINTING 24 For MAC OS X User 24 For MAC OS 9 User 26 For MAC OS 9 User 27 WEB CONFIGURATION 30 WEB CONFIGURATION UTILITY 30 MANAGEMENT 31 - 2 -
TABLE OF CONTENTS ABOUT THIS GUIDE 4 INTRODUCTION 5 PACKAGE CONTENTS 6 SYSTEM REQUIREMENTS 6 GENERAL FEATURES 7 PRODUCT VIEW 8 HARDWARE INSTALLATION 10 NETWORKING APPLICATION 10 INSTALLING THE PRINT SERVER 11 USING THE UTILITIES 12 AUTO-RUN INSTALLATION 12 PS-UTILITY 14 Installing PS-Utility 14 Using PS-Utility 15 PS WIZARD 18 PRINTING IN MAC OS 21 RENDEZVOUS USES IN MAC OS 10.2 21 SETTING UP APPLE TALK/LPR PRINTING 24 For MAC OS X User 24 For MAC OS 9 User 26 For MAC OS 9 User 27 WEB CONFIGURATION 30 WEB CONFIGURATION UTILITY 30 MANAGEMENT 31 - 2 -
Manual
Page 4
z Chapter 5, Web Configuration, completes the configuration using the web browser. z Chapter 2, Hardware Installation, describes the hardware installation procedure for help. - 4 - z Chapter 3, Using the Utilities, helps you to use the software. z Chapter 4, Printing in MAC OS, lets you ...are FOR YOUR REFERENCE ONLY. z Chapter 6, Product Specification. ABOUT THIS GUIDE This manual provides instructions and illustrations on how to install and use your print server in MAC OS environment. Please note that the illustrations or setting values in this manual are not sure about...
z Chapter 5, Web Configuration, completes the configuration using the web browser. z Chapter 2, Hardware Installation, describes the hardware installation procedure for help. - 4 - z Chapter 3, Using the Utilities, helps you to use the software. z Chapter 4, Printing in MAC OS, lets you ...are FOR YOUR REFERENCE ONLY. z Chapter 6, Product Specification. ABOUT THIS GUIDE This manual provides instructions and illustrations on how to install and use your print server in MAC OS environment. Please note that the illustrations or setting values in this manual are not sure about...
Manual
Page 6
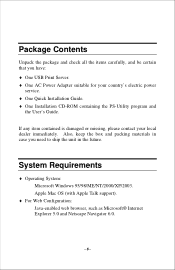
... box and packing materials in the future. If any item contained is damaged or missing, please contact your country's electric power service. ♦ One Quick Installation Guide. ♦ One Installation CD-ROM containing the PS-Utility program and the User's Guide.
... box and packing materials in the future. If any item contained is damaged or missing, please contact your country's electric power service. ♦ One Quick Installation Guide. ♦ One Installation CD-ROM containing the PS-Utility program and the User's Guide.

Manual
Page 10
2 HARDWARE INSTALLATION Networking Application The following diagram explains the application of your print server. USB Print Server - 10 -
2 HARDWARE INSTALLATION Networking Application The following diagram explains the application of your print server. USB Print Server - 10 -
Manual
Page 11
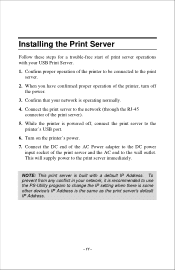
... conflict in your USB Print Server. 1. Connect the DC end of the AC Power adapter to the DC power input socket of the print server). 5. Installing the Print Server Follow these steps for a trouble-free start of the printer to be connected to the print server. 2. Confirm proper operation of print...
... conflict in your USB Print Server. 1. Connect the DC end of the AC Power adapter to the DC power input socket of the print server). 5. Installing the Print Server Follow these steps for a trouble-free start of the printer to be connected to the print server. 2. Confirm proper operation of print...

Manual
Page 12
Auto-Run Installation Insert the Installation CD-ROM into your print server with a user-friendly interface that allows you to initiate the Auto-Run program, and the menu screen will appear as below. - 12 - The PSUtility and PS Wizard are designed with these utility. 3 USING THE UTILITIES This chapter describes the software utilities for the print server, including how to set up your computer's CD-ROM drive to set up and administer the print server easily.
Auto-Run Installation Insert the Installation CD-ROM into your print server with a user-friendly interface that allows you to initiate the Auto-Run program, and the menu screen will appear as below. - 12 - The PSUtility and PS Wizard are designed with these utility. 3 USING THE UTILITIES This chapter describes the software utilities for the print server, including how to set up your computer's CD-ROM drive to set up and administer the print server easily.

Manual
Page 13
click to launch the Printer Wizard program, which is helpful to browse the contents of the Installation CD-ROM, click this button and the contents of the USB Print Server. • Install Utility - if you want to set up the printer configuration easily and quickly. • Browse CD - click to ...the next section for detailed information of the CD will be available for preview. • Exit - Please refer to install PS-Utility. click to close the Auto-Run program. - 13 - click to preview the User's Guide in PDF format for detailed information on...
click to launch the Printer Wizard program, which is helpful to browse the contents of the Installation CD-ROM, click this button and the contents of the USB Print Server. • Install Utility - if you want to set up the printer configuration easily and quickly. • Browse CD - click to ...the next section for detailed information of the CD will be available for preview. • Exit - Please refer to install PS-Utility. click to close the Auto-Run program. - 13 - click to preview the User's Guide in PDF format for detailed information on...

Manual
Page 14
Choose the destination location. Once executed, the Setup program will extract files to change the related settings of InstallShield Wizard. 2. PS-Utility To avoid the conflict in the welcome screen of your network, you can use PS-Utility to launch the InstallShield Wizard; then, click Next > in your print server (such as the IP address) after finishing the installation. If no specific requirement, leave the default setting and click Next >. - 14 - Click Install Utility from the Auto-Run menu screen. Installing PS-Utility 1.
Choose the destination location. Once executed, the Setup program will extract files to change the related settings of InstallShield Wizard. 2. PS-Utility To avoid the conflict in the welcome screen of your network, you can use PS-Utility to launch the InstallShield Wizard; then, click Next > in your print server (such as the IP address) after finishing the installation. If no specific requirement, leave the default setting and click Next >. - 14 - Click Install Utility from the Auto-Run menu screen. Installing PS-Utility 1.

Manual
Page 15
When completed, click Finish. The InstallShield Wizard starts to your computer, and creates a folder in Start\Programs\PS-Utility. Utility v2.00 item. - 15 - Using PS-Utility This section describes the operation of PS-Utility. Click Start -> Programs -> PS-Utility, and then click the PS- 3. To launch PSUtility: 1. After installing the utility, the application program for the print server is automatically installed to install the software, and the Progress bar indicates the installation is proceeding. 4.
When completed, click Finish. The InstallShield Wizard starts to your computer, and creates a folder in Start\Programs\PS-Utility. Utility v2.00 item. - 15 - Using PS-Utility This section describes the operation of PS-Utility. Click Start -> Programs -> PS-Utility, and then click the PS- 3. To launch PSUtility: 1. After installing the utility, the application program for the print server is automatically installed to install the software, and the Progress bar indicates the installation is proceeding. 4.
Manual
Page 18
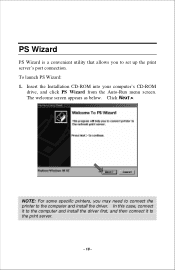
Insert the Installation CD-ROM into your computer's CD-ROM drive, and click PS Wizard from the Auto-Run menu screen. The welcome screen appears as below. In this case, connect it to the computer and install the driver first, and then connect it to set up the print server's port connection. PS Wizard PS Wizard is a convenient utility that allows you may need to connect the printer to the computer and install the driver. To launch PS Wizard: 1. NOTE: For some specific printers, you to the print server. - 18 - Click Next >.
Insert the Installation CD-ROM into your computer's CD-ROM drive, and click PS Wizard from the Auto-Run menu screen. The welcome screen appears as below. In this case, connect it to the computer and install the driver first, and then connect it to set up the print server's port connection. PS Wizard PS Wizard is a convenient utility that allows you may need to connect the printer to the computer and install the driver. To launch PS Wizard: 1. NOTE: For some specific printers, you to the print server. - 18 - Click Next >.

Manual
Page 20
TIP: If you use Windows 2000/XP, the system will help you to complete the port connection automatically. You can start your printing task without any complex configuration. The configuration is completed, click Reboot and then Yes to complete the installation. - 20 - 4. After rebooting, PS Wizard will not restart to restart the system.
TIP: If you use Windows 2000/XP, the system will help you to complete the port connection automatically. You can start your printing task without any complex configuration. The configuration is completed, click Reboot and then Yes to complete the installation. - 20 - 4. After rebooting, PS Wizard will not restart to restart the system.

Manual
Page 21
... your computer to discover Rendezvous-enabled printers on the network will see the new printer automatically appear in MAC OS 10.2 The latest version of installing the printer: - 21 -
... your computer to discover Rendezvous-enabled printers on the network will see the new printer automatically appear in MAC OS 10.2 The latest version of installing the printer: - 21 -

Manual
Page 23
The printer is installed into the system successfully. - 23 - 4. Select the desired printer, and the following pop-up menu displays the printer's manufacturer. Select Generic. 5.
The printer is installed into the system successfully. - 23 - 4. Select the desired printer, and the following pop-up menu displays the printer's manufacturer. Select Generic. 5.
Quick installation guide
Page 2
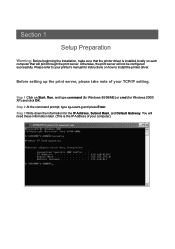
...and click OK. Step 2 At the command prompt, type ipconfig and press Enter. You will need these information later. (This is installed locally on how to your printer's manual for instructions on each computer that the printer driver is the IP Address of your computer). ...Section 1 Setup Preparation Warning: Before beginning the installation, make sure that will print through the print server. Otherwise, the print server will not be configured successfully. Step 1 Click on ...
...and click OK. Step 2 At the command prompt, type ipconfig and press Enter. You will need these information later. (This is installed locally on how to your printer's manual for instructions on each computer that the printer driver is the IP Address of your computer). ...Section 1 Setup Preparation Warning: Before beginning the installation, make sure that will print through the print server. Otherwise, the print server will not be configured successfully. Step 1 Click on ...

Quick installation guide
Page 4
Step 3 Click Next. Step 2 Click on Install Utility. Section 3 Installing Software Step 1 Insert the provided CD and wait for the setup menu to Start, Run, type D:\PS Utility\setup.exe (where D is the letter of your CD drive) and click OK. Note: If the setup menu does not appear automatically after you have inserted the CD, go to appear.
Step 3 Click Next. Step 2 Click on Install Utility. Section 3 Installing Software Step 1 Insert the provided CD and wait for the setup menu to Start, Run, type D:\PS Utility\setup.exe (where D is the letter of your CD drive) and click OK. Note: If the setup menu does not appear automatically after you have inserted the CD, go to appear.

Quick installation guide
Page 9
Note: If the setup menu does not appear automatically after you have inserted the CD, go to Start, Run, type D:\PS Utility\PS Wizard.exe (where D is the letter of your CD drive) and click OK. Step 1 Insert the provided CD and wait for the setup menu to run properly. Section 6 Running PS Wizard Warning: Make sure you have installed the printer driver locally on every computer in your network. Be sure to appear. Step 2 Click on all the computers in your network before running the PS Wizard. Otherwise, the PS Wizard will not run the PS Wizard on PS Wizard.
Note: If the setup menu does not appear automatically after you have inserted the CD, go to Start, Run, type D:\PS Utility\PS Wizard.exe (where D is the letter of your CD drive) and click OK. Step 1 Insert the provided CD and wait for the setup menu to run properly. Section 6 Running PS Wizard Warning: Make sure you have installed the printer driver locally on every computer in your network. Be sure to appear. Step 2 Click on all the computers in your network before running the PS Wizard. Otherwise, the PS Wizard will not run the PS Wizard on PS Wizard.