Manual
Page 6
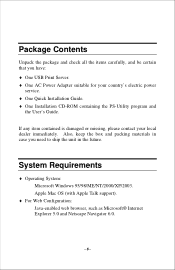
... case you have: ♦ One USB Print Server. ♦ One AC Power Adapter suitable for your local dealer immediately. System Requirements ♦ Operating System: Microsoft Windows 95/98/ME/NT/2000/XP/2003.
... case you have: ♦ One USB Print Server. ♦ One AC Power Adapter suitable for your local dealer immediately. System Requirements ♦ Operating System: Microsoft Windows 95/98/ME/NT/2000/XP/2003.

Manual
Page 7
...possible to set up in a few minutes. ♦ Latest MIB-II (RFC 1213) for SNMP standard management ♦ Offer LPR program for Windows 95/98/Me TCP/IP printing ♦ IP assignment support for DHCP, BOOTP and RARP ♦ Support Web configuration ♦ Provide Flash memory...backup without the hassle to reconfigure if setting is altered ♦ Support IPP for Windows 2000/XP ♦ Support 2nd port for remote configuration and Windows 2000/XP IPP printing ♦ Support UPnP(Universal Plug and Play) for Windows XP/2003 ♦ Support Mac 10.2 "Rendezvous" zero-configuration function - 7...
...possible to set up in a few minutes. ♦ Latest MIB-II (RFC 1213) for SNMP standard management ♦ Offer LPR program for Windows 95/98/Me TCP/IP printing ♦ IP assignment support for DHCP, BOOTP and RARP ♦ Support Web configuration ♦ Provide Flash memory...backup without the hassle to reconfigure if setting is altered ♦ Support IPP for Windows 2000/XP ♦ Support 2nd port for remote configuration and Windows 2000/XP IPP printing ♦ Support UPnP(Universal Plug and Play) for Windows XP/2003 ♦ Support Mac 10.2 "Rendezvous" zero-configuration function - 7...

Manual
Page 17
... the system status. - 17 - Factory Reset: Click this button to search the connected print server again. - Show Web Setup: Click this button to bring up a window containing the basic information of the selected print server. - About: Click this button to reload the factory settings of the selected print server in the...
... the system status. - 17 - Factory Reset: Click this button to search the connected print server again. - Show Web Setup: Click this button to bring up a window containing the basic information of the selected print server. - About: Click this button to reload the factory settings of the selected print server in the...

Manual
Page 19
2. Choose one connected printer port. - 19 - Your print server name Your printer port name Choose one connected printer within the network. 3. In the following window, select one printer port in the Printer List to set up port connection, and then click Next >. Select one printer in the Print Server List, and click Next >.
2. Choose one connected printer port. - 19 - Your print server name Your printer port name Choose one connected printer within the network. 3. In the following window, select one printer port in the Printer List to set up port connection, and then click Next >. Select one printer in the Print Server List, and click Next >.

Manual
Page 20
You can start your printing task without any complex configuration. TIP: If you use Windows 2000/XP, the system will help you to complete the port connection automatically. The configuration is completed, click Reboot and then Yes to complete the installation. - 20 - 4. After rebooting, PS Wizard will not restart to restart the system.
You can start your printing task without any complex configuration. TIP: If you use Windows 2000/XP, the system will help you to complete the port connection automatically. The configuration is completed, click Reboot and then Yes to complete the installation. - 20 - 4. After rebooting, PS Wizard will not restart to restart the system.

Manual
Page 22
Press and hold the Option key, click the Add button. 2. Select Rendezvous from the pop-up menu. 3. When clicking the Rendezvous item, the following window appears to display the connected Rendezvous-enabled printers. Connected printer(s) - 22 - Launch Print Center. 1.
Press and hold the Option key, click the Add button. 2. Select Rendezvous from the pop-up menu. 3. When clicking the Rendezvous item, the following window appears to display the connected Rendezvous-enabled printers. Connected printer(s) - 22 - Launch Print Center. 1.

Manual
Page 24
....168.1.x, where x is 192.168.1.254. The default IP Address of your IP Address to access the print server's web configuration. Open the System Preference window and click Network. Check this option. - 24 - Setting Up Apple Talk/LPR Printing For MAC OS X User With MAC OS X, you can use AppleTalk or... 200. 2. After attaching the print server to print through the print server. Follow the instructions below for setting up the print server: 1. In the Network window, select the AppleTalk tab and check the Make AppleTalk Active option.
....168.1.x, where x is 192.168.1.254. The default IP Address of your IP Address to access the print server's web configuration. Open the System Preference window and click Network. Check this option. - 24 - Setting Up Apple Talk/LPR Printing For MAC OS X User With MAC OS X, you can use AppleTalk or... 200. 2. After attaching the print server to print through the print server. Follow the instructions below for setting up the print server: 1. In the Network window, select the AppleTalk tab and check the Make AppleTalk Active option.
Manual
Page 26
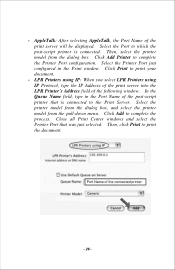
... printer. - 26 - In the Queue Name field, type in the Print window. Then, select the printer model from the pull-down menu. Close all Print Center windows and select the Printer Port that is connected. Port Name of the following window. Click Add Printer to print your document. - Select the printer model from...
... printer. - 26 - In the Queue Name field, type in the Print window. Then, select the printer model from the pull-down menu. Close all Print Center windows and select the Printer Port that is connected. Port Name of the following window. Click Add Printer to print your document. - Select the printer model from...

Manual
Page 28
... print server as your print server may be displayed within the right column. The Printer Ports shown are using. 1. In the left column of Chooser window, select the desired item. Double-click the name of the Printer Port you are examples only. - 28 - To print from MAC OS Client Workstations: The...
... print server as your print server may be displayed within the right column. The Printer Ports shown are using. 1. In the left column of Chooser window, select the desired item. Double-click the name of the Printer Port you are examples only. - 28 - To print from MAC OS Client Workstations: The...

Manual
Page 52
NetWare 5.x (NDPS LPR remote printing); - Operating System Support - Mac OS, AppleTalk. Utilities: PS-Utility, PS Wizard. Flash ROM: 2MB. Windows 95/98/ME, Windows NT, Windows 2000/XP/2003; - Unixware and Linux; - HP-UX Unix, Sun O.S., Solaris, SCO Unix, AIX; - Management Standard: SNMP MIBs: MIB-II (RFC 1213). Operating Temperature: 0°C to 55°C. - 52 - LEDs Power, USB, LAN Environmental and Physical Power Supply: 5VDC. Hardware SDRAM: 8MB. Storage Temperature: -25°C to 50°C.
NetWare 5.x (NDPS LPR remote printing); - Operating System Support - Mac OS, AppleTalk. Utilities: PS-Utility, PS Wizard. Flash ROM: 2MB. Windows 95/98/ME, Windows NT, Windows 2000/XP/2003; - Unixware and Linux; - HP-UX Unix, Sun O.S., Solaris, SCO Unix, AIX; - Management Standard: SNMP MIBs: MIB-II (RFC 1213). Operating Temperature: 0°C to 55°C. - 52 - LEDs Power, USB, LAN Environmental and Physical Power Supply: 5VDC. Hardware SDRAM: 8MB. Storage Temperature: -25°C to 50°C.
Quick installation guide
Page 2
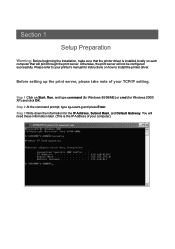
Step 3 Write down the information for Windows 2000/ XP) and click OK. Before setting up the print server, please take note of your computer). Step 2 At the command prompt, type ipconfig and ... the IP Address of your printer's manual for instructions on how to install the printer driver. Step 1 Click on Start, Run, and type command (for Windows 95/98/ME) or cmd (for the IP Address, Subnet Mask, and Default Gateway. Section 1 Setup Preparation Warning: Before beginning the installation, make sure that...
Step 3 Write down the information for Windows 2000/ XP) and click OK. Before setting up the print server, please take note of your computer). Step 2 At the command prompt, type ipconfig and ... the IP Address of your printer's manual for instructions on how to install the printer driver. Step 1 Click on Start, Run, and type command (for Windows 95/98/ME) or cmd (for the IP Address, Subnet Mask, and Default Gateway. Section 1 Setup Preparation Warning: Before beginning the installation, make sure that...

Quick installation guide
Page 7
... same. the Default Gateway from Section 1) is unless another number that number. Step 6 Validity Check: Make sure the last number on the Change IP Address window) 3. Step 7 Click OK. Step 8 Close the PS Utility program. If another network device is already using that is 192.168.0.100, enter the same three...
... same. the Default Gateway from Section 1) is unless another number that number. Step 6 Validity Check: Make sure the last number on the Change IP Address window) 3. Step 7 Click OK. Step 8 Close the PS Utility program. If another network device is already using that is 192.168.0.100, enter the same three...

Quick installation guide
Page 8
..., use the PS Utility. For example, if you get four Reply from messages back from the print server similar to the factory default. Step 2 For Windows 95/98/ME type command and click OK. Step 3 At the command prompt, type ping and the IP Address of the print server to 192....168.0.254, type ping 192.168.0.254 If you can proceed to the next section. For Windows 2000/XP, type cmd and click OK. Section 5 Verifying Network Connection Step 1 Click on .
..., use the PS Utility. For example, if you get four Reply from messages back from the print server similar to the factory default. Step 2 For Windows 95/98/ME type command and click OK. Step 3 At the command prompt, type ping and the IP Address of the print server to 192....168.0.254, type ping 192.168.0.254 If you can proceed to the next section. For Windows 2000/XP, type cmd and click OK. Section 5 Verifying Network Connection Step 1 Click on .
Quick installation guide
Page 11
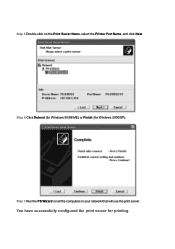
Step 7 Run the PS Wizard on the Print Server Name, select the Printer Port Name, and click Next. Step 6 Click Reboot (for Windows 95/98/ME) or Finish (for printing. You have successfully configured the print server for Windows 2000/XP). Step 5 Double-click on all the computers in your network that will use the print server.
Step 7 Run the PS Wizard on the Print Server Name, select the Printer Port Name, and click Next. Step 6 Click Reboot (for Windows 95/98/ME) or Finish (for printing. You have successfully configured the print server for Windows 2000/XP). Step 5 Double-click on all the computers in your network that will use the print server.