
Manual
Page 14
Installing PS-Utility 1. If no specific requirement, leave the default setting and click Next >. - 14 - Once executed, the Setup program will extract files to change the related settings of InstallShield Wizard. 2. then, click Next > in your print server (such as the IP address) after finishing the installation. Click Install Utility from the Auto-Run menu screen. Choose the destination location. PS-Utility To avoid the conflict in the welcome screen of your network, you can use PS-Utility to launch the InstallShield Wizard;
Installing PS-Utility 1. If no specific requirement, leave the default setting and click Next >. - 14 - Once executed, the Setup program will extract files to change the related settings of InstallShield Wizard. 2. then, click Next > in your print server (such as the IP address) after finishing the installation. Click Install Utility from the Auto-Run menu screen. Choose the destination location. PS-Utility To avoid the conflict in the welcome screen of your network, you can use PS-Utility to launch the InstallShield Wizard;

Manual
Page 17
... button to launch the Configuration Utility. - Close: Click this button to exit PS-Utility. 3. Information Field: Display the basic information of PS-Utility. - Show Web Setup: Click this button to open your web browser and launch the Configuration Utility. Status Bar: Display the system status. - 17 -
... button to launch the Configuration Utility. - Close: Click this button to exit PS-Utility. 3. Information Field: Display the basic information of PS-Utility. - Show Web Setup: Click this button to open your web browser and launch the Configuration Utility. Status Bar: Display the system status. - 17 -

Manual
Page 29
Choose Select PPD. 5. Select the appropriate printer description file for a PostScript Printer Description file. If you have open. - 29 - Click Open. (If your printer is not listed, click Generic to choose Page Setup in any applications you for your computer's default printer. 4. You may need to use a generic printer description.) The selected printer will prompt you have not previously set this printer as the default, your computer will become your printer.
Choose Select PPD. 5. Select the appropriate printer description file for a PostScript Printer Description file. If you have open. - 29 - Click Open. (If your printer is not listed, click Generic to choose Page Setup in any applications you for your computer's default printer. 4. You may need to use a generic printer description.) The selected printer will prompt you have not previously set this printer as the default, your computer will become your printer.
Quick installation guide
Page 2
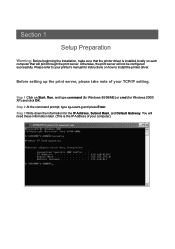
...) and click OK. Otherwise, the print server will not be configured successfully. Step 3 Write down the information for instructions on how to your computer). Section 1 Setup Preparation Warning: Before beginning the installation, make sure that will print through the print server. Step 2 At the command prompt, type ipconfig and press Enter...
...) and click OK. Otherwise, the print server will not be configured successfully. Step 3 Write down the information for instructions on how to your computer). Section 1 Setup Preparation Warning: Before beginning the installation, make sure that will print through the print server. Step 2 At the command prompt, type ipconfig and press Enter...

Quick installation guide
Page 4
Step 2 Click on Install Utility. Note: If the setup menu does not appear automatically after you have inserted the CD, go to appear. Section 3 Installing Software Step 1 Insert the provided CD and wait for the setup menu to Start, Run, type D:\PS Utility\setup.exe (where D is the letter of your CD drive) and click OK. Step 3 Click Next.
Step 2 Click on Install Utility. Note: If the setup menu does not appear automatically after you have inserted the CD, go to appear. Section 3 Installing Software Step 1 Insert the provided CD and wait for the setup menu to Start, Run, type D:\PS Utility\setup.exe (where D is the letter of your CD drive) and click OK. Step 3 Click Next.

Quick installation guide
Page 9
Step 1 Insert the provided CD and wait for the setup menu to Start, Run, type D:\PS Utility\PS Wizard.exe (where D is the letter of your CD drive) and click OK. Step 2 Click on all the computers in your network. Note: If the setup menu does not appear automatically after you have inserted the CD, go to appear. Section 6 Running PS Wizard Warning: Make sure you have installed the printer driver locally on every computer in your network before running the PS Wizard. Be sure to run properly. Otherwise, the PS Wizard will not run the PS Wizard on PS Wizard.
Step 1 Insert the provided CD and wait for the setup menu to Start, Run, type D:\PS Utility\PS Wizard.exe (where D is the letter of your CD drive) and click OK. Step 2 Click on all the computers in your network. Note: If the setup menu does not appear automatically after you have inserted the CD, go to appear. Section 6 Running PS Wizard Warning: Make sure you have installed the printer driver locally on every computer in your network before running the PS Wizard. Be sure to run properly. Otherwise, the PS Wizard will not run the PS Wizard on PS Wizard.

Quick installation guide
Page 12
For a list of compatible printers, please visit our web site at www.airlinkplus.com For more information on how to use the web configuration or setup for Mac OS, please refer to the User's Manual in the provided CD. Note: This print server does not support most multi-functional printers (i.e. functions). If your printer is a multi-functional printer it may not work with scanner, fax, copier, etc. Section 8 Technical Support E-mail: [email protected] Toll Free: 1-888-746-3238 Web Site: www.airlinkplus.com printers with this print server.
For a list of compatible printers, please visit our web site at www.airlinkplus.com For more information on how to use the web configuration or setup for Mac OS, please refer to the User's Manual in the provided CD. Note: This print server does not support most multi-functional printers (i.e. functions). If your printer is a multi-functional printer it may not work with scanner, fax, copier, etc. Section 8 Technical Support E-mail: [email protected] Toll Free: 1-888-746-3238 Web Site: www.airlinkplus.com printers with this print server.