
Manual
Page 2
TABLE OF CONTENTS ABOUT THIS GUIDE 4 INTRODUCTION 5 PACKAGE CONTENTS 6 SYSTEM REQUIREMENTS 6 GENERAL FEATURES 7 PRODUCT VIEW 8 HARDWARE INSTALLATION 10 NETWORKING APPLICATION 10 INSTALLING THE PRINT SERVER 11 USING THE UTILITIES 12 AUTO-RUN INSTALLATION 12 PS-UTILITY 14 Installing PS-Utility 14 Using PS-Utility 15 PS WIZARD 18 PRINTING IN MAC OS 21 RENDEZVOUS USES IN MAC OS 10.2 21 SETTING UP APPLE TALK/LPR PRINTING 24 For MAC OS X User 24 For MAC OS 9 User 26 For MAC OS 9 User 27 WEB CONFIGURATION 30 WEB CONFIGURATION UTILITY 30 MANAGEMENT 31 - 2 -
TABLE OF CONTENTS ABOUT THIS GUIDE 4 INTRODUCTION 5 PACKAGE CONTENTS 6 SYSTEM REQUIREMENTS 6 GENERAL FEATURES 7 PRODUCT VIEW 8 HARDWARE INSTALLATION 10 NETWORKING APPLICATION 10 INSTALLING THE PRINT SERVER 11 USING THE UTILITIES 12 AUTO-RUN INSTALLATION 12 PS-UTILITY 14 Installing PS-Utility 14 Using PS-Utility 15 PS WIZARD 18 PRINTING IN MAC OS 21 RENDEZVOUS USES IN MAC OS 10.2 21 SETTING UP APPLE TALK/LPR PRINTING 24 For MAC OS X User 24 For MAC OS 9 User 26 For MAC OS 9 User 27 WEB CONFIGURATION 30 WEB CONFIGURATION UTILITY 30 MANAGEMENT 31 - 2 -
Manual
Page 3
Management J System 32 Management J Network 33 Management J User 35 CONFIGURATION 36 Configuration J System 36 Configuration J Network 38 Configuration J User 40 Configuration J E-mail 41 Configuration J SNMP 43 TOOLS...44 Tool J Print Test 44 Tool J E-mail 45 Tool J Reset 46 Tool J Factory Reset 47 Tool J Firmware Upgrade 48 Tool J Backup 49 HELP ...50 PRODUCT SPECIFICATIONS 51 Printer Connection 51 Network Connection 51 Network Protocol Support 51 Hardware 52 Operating System Support 52 Management 52 LEDs ...52 Environmental and Physical 52 EMI Compliance 53 - 3 -
Management J System 32 Management J Network 33 Management J User 35 CONFIGURATION 36 Configuration J System 36 Configuration J Network 38 Configuration J User 40 Configuration J E-mail 41 Configuration J SNMP 43 TOOLS...44 Tool J Print Test 44 Tool J E-mail 45 Tool J Reset 46 Tool J Factory Reset 47 Tool J Firmware Upgrade 48 Tool J Backup 49 HELP ...50 PRODUCT SPECIFICATIONS 51 Printer Connection 51 Network Connection 51 Network Protocol Support 51 Hardware 52 Operating System Support 52 Management 52 LEDs ...52 Environmental and Physical 52 EMI Compliance 53 - 3 -
Manual
Page 4
... not sure about the respective information, please ask your system and network. z Chapter 4, Printing in MAC OS, lets you to use the software. z Chapter 5, Web Configuration, completes the configuration using the web browser. The actual settings and values depend on the product. z Chapter 2, Hardware Installation, describes the hardware installation procedure for help. - 4 -
... not sure about the respective information, please ask your system and network. z Chapter 4, Printing in MAC OS, lets you to use the software. z Chapter 5, Web Configuration, completes the configuration using the web browser. The actual settings and values depend on the product. z Chapter 2, Hardware Installation, describes the hardware installation procedure for help. - 4 -
Manual
Page 5
... server or a PC acting as a print server can be used in ad-hoc mode for the print server. - 5 - The USB Print Server features a Web-based Configuration Utility, which allows you wish to complete further settings for direct communication between PC/Notebook and print server anywhere you to set up the print...
... server or a PC acting as a print server can be used in ad-hoc mode for the print server. - 5 - The USB Print Server features a Web-based Configuration Utility, which allows you wish to complete further settings for direct communication between PC/Notebook and print server anywhere you to set up the print...
Manual
Page 6
Also, keep the box and packing materials in the future. Apple Mac OS (with Apple Talk support). ♦ For Web Configuration: Java-enabled web browser, such as Microsoft® Internet Explorer 5.0 and Netscape Navigator 6.0. - 6 - If any item contained is damaged or missing, please contact your country's ...
Also, keep the box and packing materials in the future. Apple Mac OS (with Apple Talk support). ♦ For Web Configuration: Java-enabled web browser, such as Microsoft® Internet Explorer 5.0 and Netscape Navigator 6.0. - 6 - If any item contained is damaged or missing, please contact your country's ...

Manual
Page 7
... Offer LPR program for Windows 95/98/Me TCP/IP printing ♦ IP assignment support for DHCP, BOOTP and RARP ♦ Support Web configuration ♦ Provide Flash memory for easy firmware upgrade ♦ Printing Access control and display ♦ E-mail notification for printer error messages ♦...; Support E-Mail printing and FTP printing ♦ Ability to save print server configuration into hard drive for easy access and backup without the hassle to reconfigure if setting is altered ♦ Support IPP for Windows 2000/...
... Offer LPR program for Windows 95/98/Me TCP/IP printing ♦ IP assignment support for DHCP, BOOTP and RARP ♦ Support Web configuration ♦ Provide Flash memory for easy firmware upgrade ♦ Printing Access control and display ♦ E-mail notification for printer error messages ♦...; Support E-Mail printing and FTP printing ♦ Ability to save print server configuration into hard drive for easy access and backup without the hassle to reconfigure if setting is altered ♦ Support IPP for Windows 2000/...

Manual
Page 13
... for detailed information of the CD will be available for detailed information on installing the utility. • PS Wizard - click to set up the printer configuration easily and quickly. • Browse CD -
... for detailed information of the CD will be available for detailed information on installing the utility. • PS Wizard - click to set up the printer configuration easily and quickly. • Browse CD -

Manual
Page 17
... containing the basic information of the print server. - Factory Reset: Click this button to open your web browser and launch the Configuration Utility. About: Click this button to launch the Configuration Utility. - Information Field: Display the basic information of the selected print server in the Device List to reload the factory settings...
... containing the basic information of the print server. - Factory Reset: Click this button to open your web browser and launch the Configuration Utility. About: Click this button to launch the Configuration Utility. - Information Field: Display the basic information of the selected print server in the Device List to reload the factory settings...

Manual
Page 20
The configuration is completed, click Reboot and then Yes to complete the installation. - 20 - TIP: If you use Windows 2000/XP, the system will help you to complete the port connection automatically. You can start your printing task without any complex configuration. After rebooting, PS Wizard will not restart to restart the system. 4.
The configuration is completed, click Reboot and then Yes to complete the installation. - 20 - TIP: If you use Windows 2000/XP, the system will help you to complete the port connection automatically. You can start your printing task without any complex configuration. After rebooting, PS Wizard will not restart to restart the system. 4.

Manual
Page 21
... automatically discovers the available printers. All you have to do is called Rendezvous. 4 PRINTING IN MAC OS Rendezvous Uses in their Print Center, without any configuration. You can be used throughout Mac OS 10.2 to provide innovative ways to the network and all the users on the network. Rendezvous is a revolutionary...
... automatically discovers the available printers. All you have to do is called Rendezvous. 4 PRINTING IN MAC OS Rendezvous Uses in their Print Center, without any configuration. You can be used throughout Mac OS 10.2 to provide innovative ways to the network and all the users on the network. Rendezvous is a revolutionary...

Manual
Page 24
.... Check this option. - 24 - Follow the instructions below for setting up the print server: 1. After attaching the print server to access the print server's web configuration. The default IP Address of your IP Address to print through the print server. Open the System Preference window and click Network. Setting Up Apple...
.... Check this option. - 24 - Follow the instructions below for setting up the print server: 1. After attaching the print server to access the print server's web configuration. The default IP Address of your IP Address to print through the print server. Open the System Preference window and click Network. Setting Up Apple...
Manual
Page 26
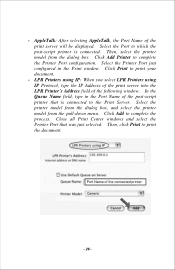
... into the LPR Printer's Address field of the connected printer. - 26 - Then, click Print to complete the Printer Port configuration. Click Add Printer to print the document. Select the Printer Port just configured in the Port Name of the print server will be displayed. Close all Print Center windows and select the...
... into the LPR Printer's Address field of the connected printer. - 26 - Then, click Print to complete the Printer Port configuration. Click Add Printer to print the document. Select the Printer Port just configured in the Port Name of the print server will be displayed. Close all Print Center windows and select the...

Manual
Page 30
... First, launch your print server with the print server's IP address in this manual). Extensive knowledge of the Configuration Utility. TIP: The computer's IP address must correspond with the web browser. Then, type http://192.168.1.254 (the default IP address) in the Address ... press [Enter] to set up your web browser (such as the Internet Explorer 6.0 used in the same segment for the two devices to communicate. 5 WEB CONFIGURATION You can access and manage the USB Print Server through: 1) the enclosed software PS-Utility, and 2) a web browser. the Web...
... First, launch your print server with the print server's IP address in this manual). Extensive knowledge of the Configuration Utility. TIP: The computer's IP address must correspond with the web browser. Then, type http://192.168.1.254 (the default IP address) in the Address ... press [Enter] to set up your web browser (such as the Internet Explorer 6.0 used in the same segment for the two devices to communicate. 5 WEB CONFIGURATION You can access and manage the USB Print Server through: 1) the enclosed software PS-Utility, and 2) a web browser. the Web...

Manual
Page 31
Management The Management Screen of the Configuration Utility The Management screen displays the basic information of the print server, including the following three categories: z System z Network z User - 31 -
Management The Management Screen of the Configuration Utility The Management screen displays the basic information of the print server, including the following three categories: z System z Network z User - 31 -

Manual
Page 34
TCP/IP Printing In this field are configured in this field, you can monitor the status of your printing tasks through Microsoft Network. The items in Configuration > Network > TCP/IP. Microsoft Network Printing In this field, you can monitor the status of TCP/IP, including DHCP/BOOTP, UPnP, and MAC Rendezvous. MAC AppleTalk Printing In this field, you can monitor the status of your printing tasks through TCP/IP. Auto IP This field contains the current settings of your printing tasks through MAC AppleTalk. - 34 -
TCP/IP Printing In this field are configured in this field, you can monitor the status of your printing tasks through Microsoft Network. The items in Configuration > Network > TCP/IP. Microsoft Network Printing In this field, you can monitor the status of TCP/IP, including DHCP/BOOTP, UPnP, and MAC Rendezvous. MAC AppleTalk Printing In this field, you can monitor the status of your printing tasks through TCP/IP. Auto IP This field contains the current settings of your printing tasks through MAC AppleTalk. - 34 -

Manual
Page 36
To set up the password, please enter the password in the New Password box, and then enter the same one again in the Confirm Again box. - 36 - Password: Enter the Administrator password (3-8 characters). Admin Contact (optional): Assign the Admin Contact's name for the print server - Server Name: Assign a name to the print server. - Location (optional): Assign a location for the print server. - Configuration Configuration J System System Device In this field, you can configure the basic information of your print server. -
To set up the password, please enter the password in the New Password box, and then enter the same one again in the Confirm Again box. - 36 - Password: Enter the Administrator password (3-8 characters). Admin Contact (optional): Assign the Admin Contact's name for the print server - Server Name: Assign a name to the print server. - Location (optional): Assign a location for the print server. - Configuration Configuration J System System Device In this field, you can configure the basic information of your print server. -

Manual
Page 38
IP Address: This option allows you should enter the related information in the following boxes, including IP Address, Subnet Mask, and Default Gateway. - When you choose Manually Assign, you to set the IP address manually or automatically. Configuration J Network TCP/IP This field contains three options that allow you to enable or disable UPnP mode. - 38 - UPnP: This option allows you to configure the TCP/IP setting: IP Address, UPnP, and MAC Rendezvous. -
IP Address: This option allows you should enter the related information in the following boxes, including IP Address, Subnet Mask, and Default Gateway. - When you choose Manually Assign, you to set the IP address manually or automatically. Configuration J Network TCP/IP This field contains three options that allow you to enable or disable UPnP mode. - 38 - UPnP: This option allows you to configure the TCP/IP setting: IP Address, UPnP, and MAC Rendezvous. -

Manual
Page 39
In the following options, enter the related configuration, such as the printer type. - MAC Rendezvous: This option allows you to abandon. - 39 - Microsoft Network Enter the name of the Workgroup that you have ...
In the following options, enter the related configuration, such as the printer type. - MAC Rendezvous: This option allows you to abandon. - 39 - Microsoft Network Enter the name of the Workgroup that you have ...

Manual
Page 40
... server or not. TIP: Once you have changed the settings in the User List, you can add/delete the user(s) to abandon. - 40 - Configuration J User Printing Control By configuring the Enable User Printing Control option (Yes or No), the user in the User List is not in each option, click Save to...
... server or not. TIP: Once you have changed the settings in the User List, you can add/delete the user(s) to abandon. - 40 - Configuration J User Printing Control By configuring the Enable User Printing Control option (Yes or No), the user in the User List is not in each option, click Save to...

Manual
Page 41
..., so that is used to input the Account Name and Password. - 41 - If your E-mail in this function, enter the E-mail account in this box. - Configuration J E-mail E-mail Account You can be printed out directly through the printer (ASCII text only). To enable this box.
..., so that is used to input the Account Name and Password. - 41 - If your E-mail in this function, enter the E-mail account in this box. - Configuration J E-mail E-mail Account You can be printed out directly through the printer (ASCII text only). To enable this box.