Manual
Page 6
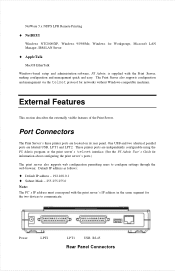
Power LPT2 LPT1 USB RJ-45 Rear Panel Connectors Default IP address as follows: ♦ Default IP address - 192.168.0.1 ♦ Subnet Mask - 255.255.255.0 Note: The PC's IP address must correspond with the Print Server, making configuration and management quick and easy. Port Connectors The ...LAN Server ♦ AppleTalk MacOS EtherTalk Windows-based setup and administration software, PS Admin, is supplied with the print server's IP address in the same segment for the two devices to configure settings through the web browser. The Print Server also supports configuration ...
Power LPT2 LPT1 USB RJ-45 Rear Panel Connectors Default IP address as follows: ♦ Default IP address - 192.168.0.1 ♦ Subnet Mask - 255.255.255.0 Note: The PC's IP address must correspond with the Print Server, making configuration and management quick and easy. Port Connectors The ...LAN Server ♦ AppleTalk MacOS EtherTalk Windows-based setup and administration software, PS Admin, is supplied with the print server's IP address in the same segment for the two devices to configure settings through the web browser. The Print Server also supports configuration ...

Quick installation guide
Page 3
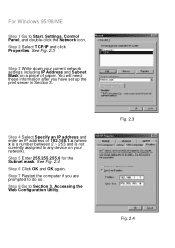
... already using the 192. 168.1.x segment, skip to access the Print Server's Web Configuration Utility. Fig. 2.1 Step 4 Select Use the following IP address and enter an IP address of 192.168. 1.x (where x is a number between 2 ~ 253 and is not currently assigned to Section 3, Accessing the Web Configuration ...Utility. Step 8 Go to any device on a piece of paper. Step 2 Select Internet Protocol (TCP/IP) and click Properties. Fig. 2.2 Section 2 Configuring Client IP Address Note: The default IP address of the Print Server is 192.168.1.254 with a subnet mask of 255.255.255.0 The Print Server...
... already using the 192. 168.1.x segment, skip to access the Print Server's Web Configuration Utility. Fig. 2.1 Step 4 Select Use the following IP address and enter an IP address of 192.168. 1.x (where x is a number between 2 ~ 253 and is not currently assigned to Section 3, Accessing the Web Configuration ...Utility. Step 8 Go to any device on a piece of paper. Step 2 Select Internet Protocol (TCP/IP) and click Properties. Fig. 2.2 Section 2 Configuring Client IP Address Note: The default IP address of the Print Server is 192.168.1.254 with a subnet mask of 255.255.255.0 The Print Server...
Quick installation guide
Page 4
... set up the print server in Section 3. Step 8 Go to do so. See Fig. 2.3 Step 3 Write down your current network settings including IP Address and Subnet Mask on your network). For Windows 95/98/ME Step 1 Go to any device on a piece of 192.168.1.x (where x is...is not currently assigned to Start, Settings, Control Panel, and double-click the Network icon. Step 4 Select Specify an IP address and enter an IP address of paper. Step 2 Select TCP/IP and click Properties. You will need these information after you are prompted to Section 3, Accessing the Web Configuration Utility. ...
... set up the print server in Section 3. Step 8 Go to do so. See Fig. 2.3 Step 3 Write down your current network settings including IP Address and Subnet Mask on your network). For Windows 95/98/ME Step 1 Go to any device on a piece of 192.168.1.x (where x is...is not currently assigned to Start, Settings, Control Panel, and double-click the Network icon. Step 4 Select Specify an IP address and enter an IP address of paper. Step 2 Select TCP/IP and click Properties. You will need these information after you are prompted to Section 3, Accessing the Web Configuration Utility. ...

Quick installation guide
Page 5
Be sure to click Save when you want to use. You may rename the Print Server name and Port names or leave them with the default. Step 4 Write down on Configuration. See Fig. 3.2 Fig. 3.1 Step 3 Click on a piece of the Print Server: 192. 168.1.254 See Fig. 3.1 Step 2 The Welcome screen will appear. See Fig. 3.3 Fig. 3.2 Fig 3.3 Section 3 Accessing the Web Configuration Utility Step 1 Open the web browser and type the default IP address of paper the Port names you are done editing the names.
Be sure to click Save when you want to use. You may rename the Print Server name and Port names or leave them with the default. Step 4 Write down on Configuration. See Fig. 3.2 Fig. 3.1 Step 3 Click on a piece of the Print Server: 192. 168.1.254 See Fig. 3.1 Step 2 The Welcome screen will appear. See Fig. 3.3 Fig. 3.2 Fig 3.3 Section 3 Accessing the Web Configuration Utility Step 1 Open the web browser and type the default IP address of paper the Port names you are done editing the names.
Quick installation guide
Page 6
... Fig. 3.4 Step 6 You can choose to be on TCP/IP Protocol under Configuration. Note: This Installation Guide uses the default IP address as your network, or you can now change the settings back to your computer's IP address in order to access the web configuration utility, you can manually assign... an IP address and subnet mask to allow the Print Server to obtain an IP address automatically by RARP, BOOTP, or DHCP. Step 2 Click Next at...
... Fig. 3.4 Step 6 You can choose to be on TCP/IP Protocol under Configuration. Note: This Installation Guide uses the default IP address as your network, or you can now change the settings back to your computer's IP address in order to access the web configuration utility, you can manually assign... an IP address and subnet mask to allow the Print Server to obtain an IP address automatically by RARP, BOOTP, or DHCP. Step 2 Click Next at...
Quick installation guide
Page 7
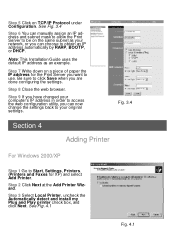
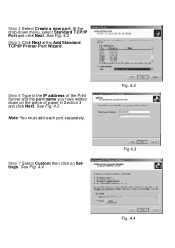
See Fig. 4.3 Note: You must add each port separately. Step 7 Select Custom then click on the piece of the Print Server and the port name you have written down menu, select Standard TCP/IP Port and click Next. At the drop-down on Settings. Step 6 Type in the IP address of paper in Section 3 and click Next. See Fig. 4.2 Step 5 Click Next at the Add Standard TCP/IP Printer Port Wizard. See Fig. 4.4 Fig. 4.2 Fig 4.3 Fig. 4.4 Step 4 Select Create a new port.
See Fig. 4.3 Note: You must add each port separately. Step 7 Select Custom then click on the piece of the Print Server and the port name you have written down menu, select Standard TCP/IP Port and click Next. At the drop-down on Settings. Step 6 Type in the IP address of paper in Section 3 and click Next. See Fig. 4.2 Step 5 Click Next at the Add Standard TCP/IP Printer Port Wizard. See Fig. 4.4 Fig. 4.2 Fig 4.3 Fig. 4.4 Step 4 Select Create a new port.

Quick installation guide
Page 10
Step 19 Browse to do so. Fig. 4.12 Fig. 4.13 Fig. 4.14 See Fig. 4.12 Step 13 The IP address and the port name will be displayed in the port list. Step 17 Select Network Printer and click Next. Insert the Windows 98 CD, and .... See Fig. 4.14 Step 20 Verify the Network path is correct, select if you for the Windows 98 CD-ROM. Step 12 Type in the IP address of the Print Server and the port name you have written down on the piece of your computer is restarted, go to Start, Settings, Printers...
Step 19 Browse to do so. Fig. 4.12 Fig. 4.13 Fig. 4.14 See Fig. 4.12 Step 13 The IP address and the port name will be displayed in the port list. Step 17 Select Network Printer and click Next. Insert the Windows 98 CD, and .... See Fig. 4.14 Step 20 Verify the Network path is correct, select if you for the Windows 98 CD-ROM. Step 12 Type in the IP address of the Print Server and the port name you have written down on the piece of your computer is restarted, go to Start, Settings, Printers...
Quick installation guide
Page 12
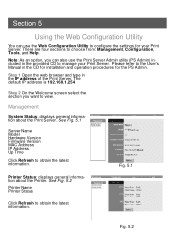
Management System Status: displays general information about the Printer. See Fig. 5.1 Server Name Model Hardware Version Firmware Version MAC Address IP Address Up Time Click Refresh to obtain the latest information. Fig. 5.1 Printer Status: displays general information about the Print Server. Fig. 5.2 ...the CD for installation and operation procedures for your Print Server. Please refer to the User's Manual in the IP address of the Print Server. The default IP address is 192.168.1.254 Step 2 On the Welcome screen select the section you can use the Print Server Admin ...
Management System Status: displays general information about the Printer. See Fig. 5.1 Server Name Model Hardware Version Firmware Version MAC Address IP Address Up Time Click Refresh to obtain the latest information. Fig. 5.1 Printer Status: displays general information about the Print Server. Fig. 5.2 ...the CD for installation and operation procedures for your Print Server. Please refer to the User's Manual in the IP address of the Print Server. The default IP address is 192.168.1.254 Step 2 On the Welcome screen select the section you can use the Print Server Admin ...

Quick installation guide
Page 13
... network. PJL Printer: This feature supports Hewlett-Packard PJL (Printer Job Language) standard for the Print Server. See Fig. 5.4 IP Address: Assign an IP address to update any changes you have made . Location: (optional) Indicate where the Print Server is located. Fig. 5.3 Fig. ...to the Print Server or keep the default. See Fig. 5.3 Server Name: Assign a name to the Print Server, or automatically obtain an IP address by RARP, BOOTP, or DHCP. Speed: Select the printer port speed. Configuration Server Device: Configures the Print Server properties. Admin Contact: (optional...
... network. PJL Printer: This feature supports Hewlett-Packard PJL (Printer Job Language) standard for the Print Server. See Fig. 5.4 IP Address: Assign an IP address to update any changes you have made . Location: (optional) Indicate where the Print Server is located. Fig. 5.3 Fig. ...to the Print Server or keep the default. See Fig. 5.3 Server Name: Assign a name to the Print Server, or automatically obtain an IP address by RARP, BOOTP, or DHCP. Speed: Select the printer port speed. Configuration Server Device: Configures the Print Server properties. Admin Contact: (optional...
Quick installation guide
Page 15
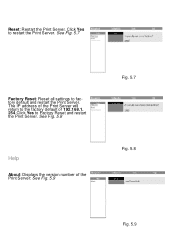
See Fig. 5.8 Help About: Displays the version number of 192.168.1. 254 Click Yes to the factory default of the Print Server: See Fig. 5.9 Fig. 5.7 Fig. 5.8 Fig. 5.9 Click Yes to factory default and restart the Print Server. See Fig. 5.7 Factory Reset: Reset all settings to restart the Print Server. Reset: Restart the Print Server. The IP address of the Print Server will return to Factory Reset and restart the Print Server.
See Fig. 5.8 Help About: Displays the version number of 192.168.1. 254 Click Yes to the factory default of the Print Server: See Fig. 5.9 Fig. 5.7 Fig. 5.8 Fig. 5.9 Click Yes to factory default and restart the Print Server. See Fig. 5.7 Factory Reset: Reset all settings to restart the Print Server. Reset: Restart the Print Server. The IP address of the Print Server will return to Factory Reset and restart the Print Server.