Manual
Page 1
1-Port USB Print Server Hardware User's Guide Rev. 01 (July, 2002) Made In Taiwan RECYCLABLE
1-Port USB Print Server Hardware User's Guide Rev. 01 (July, 2002) Made In Taiwan RECYCLABLE

Manual
Page 2
TABLE OF CONTENTS ABOUT THIS GUIDE 3 INTRODUCTION ...4 PACKAGE CONTENTS 4 GENERAL FEATURES 5 SERVICE FEATURES 5 EXTERNAL FEATURES 7 Front View...7 Rear View...8 INSTALLATION ...10 INSTALLING THE PRINT SERVER 10 POWER-UP AND SELF-TEST 11 LED Test Series 11 Component Test Series 11 PRODUCT SPECIFICATIONS 13 - 2 -
TABLE OF CONTENTS ABOUT THIS GUIDE 3 INTRODUCTION ...4 PACKAGE CONTENTS 4 GENERAL FEATURES 5 SERVICE FEATURES 5 EXTERNAL FEATURES 7 Front View...7 Rear View...8 INSTALLATION ...10 INSTALLING THE PRINT SERVER 10 POWER-UP AND SELF-TEST 11 LED Test Series 11 Component Test Series 11 PRODUCT SPECIFICATIONS 13 - 2 -

Manual
Page 3
The software components, the procedures for installation and setup of its features, detailed installation procedures, and product specification. This 1-Port USB Print Server package also includes important software components and additional user's manuals. 0 ABOUT THIS GUIDE This manual describes the 1-Port USB Print Server, including full descriptions of the software are covered in the PS Admin User's Guide. - 3 -
The software components, the procedures for installation and setup of its features, detailed installation procedures, and product specification. This 1-Port USB Print Server package also includes important software components and additional user's manuals. 0 ABOUT THIS GUIDE This manual describes the 1-Port USB Print Server, including full descriptions of the software are covered in the PS Admin User's Guide. - 3 -

Manual
Page 4
... dealer for assistance. - 4 - 1 1 INTRODUCTION Congratulations on purchasing your 1-Port USB Print Server, the easiest and fastest way to deploy printers on your country's electric power service ♦ One 1-Port USB Print Server Installation CD-ROM ♦ One Quick Installation Guide If any item is . It manages ...the flow of print files from the package. In addition to this Hardware User's Guide, be certain ...
... dealer for assistance. - 4 - 1 1 INTRODUCTION Congratulations on purchasing your 1-Port USB Print Server, the easiest and fastest way to deploy printers on your country's electric power service ♦ One 1-Port USB Print Server Installation CD-ROM ♦ One Quick Installation Guide If any item is . It manages ...the flow of print files from the package. In addition to this Hardware User's Guide, be certain ...

Manual
Page 5
... its connected printers. This provides workload relief to your file servers, and allows the file servers' full capacity to be driven at its full capacity. ♦ Because this print server without increasing the load of another workstation or server. ♦ This print server's USB interface can improve network-printing services of information for attached printer's status ♦ Windows...
... its connected printers. This provides workload relief to your file servers, and allows the file servers' full capacity to be driven at its full capacity. ♦ Because this print server without increasing the load of another workstation or server. ♦ This print server's USB interface can improve network-printing services of information for attached printer's status ♦ Windows...

Manual
Page 6
...management report information will be returned, via Telnet. - 6 - This print server also has a Telnet interface for Workgroups, Microsoft LAN Manager, IBM LAN Server ♦ AppleTalk MacOS EtherTalk Your 1-Port USB Print Server's package includes PS Admin, a Windowsbased setup and administration program, making ...in a Windows environment. If Windows is not available on the station you choose for print server administration, then all configuration and management commands may be issued to this print server, and all major network operating systems and protocols: ♦ TCP/IP UNIX lpr/lpd...
...management report information will be returned, via Telnet. - 6 - This print server also has a Telnet interface for Workgroups, Microsoft LAN Manager, IBM LAN Server ♦ AppleTalk MacOS EtherTalk Your 1-Port USB Print Server's package includes PS Admin, a Windowsbased setup and administration program, making ...in a Windows environment. If Windows is not available on the station you choose for print server administration, then all configuration and management commands may be issued to this print server, and all major network operating systems and protocols: ♦ TCP/IP UNIX lpr/lpd...
Manual
Page 7
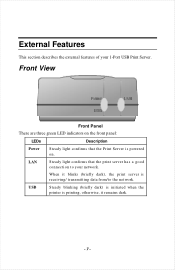
USB Steady blinking (briefly dark) is initiated when the printer is printing, otherwise, it blinks (briefly dark), the print server is powered on the front panel: LEDs Description Power Steady light confirms that the print server has a good connection to the network. When it remains dark. - 7 - Front View Front Panel There are three green LED indicators on . External Features This section describes the external features of your network. LAN Steady light confirms that the Print Server is receiving/ transmitting data from/to your 1-Port USB Print Server.
USB Steady blinking (briefly dark) is initiated when the printer is printing, otherwise, it blinks (briefly dark), the print server is powered on the front panel: LEDs Description Power Steady light confirms that the print server has a good connection to the network. When it remains dark. - 7 - Front View Front Panel There are three green LED indicators on . External Features This section describes the external features of your network. LAN Steady light confirms that the Print Server is receiving/ transmitting data from/to your 1-Port USB Print Server.
Manual
Page 8
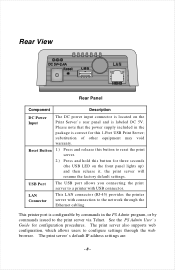
...the package is labeled DC 5V. substitution of other equipment may void warranty. USB Port The USB port allows you connecting the print server to a printer with connection to configure settings through the Ethernet cabling. Rear View Rear Panel Component Description DC Power Input The DC... power input connector is located on the front panel lights up) and then release it, the print server will resume the factory default settings. The print server also supports web configuration, which allows users to the network through the web browser. LAN Connector This LAN ...
...the package is labeled DC 5V. substitution of other equipment may void warranty. USB Port The USB port allows you connecting the print server to a printer with connection to configure settings through the Ethernet cabling. Rear View Rear Panel Component Description DC Power Input The DC... power input connector is located on the front panel lights up) and then release it, the print server will resume the factory default settings. The print server also supports web configuration, which allows users to the network through the web browser. LAN Connector This LAN ...

Manual
Page 9
♦ Default IP address - 192.168.0.1 ♦ Subnet Mask - 255.255.255.0 Please note that the PC's IP address must correspond with the print server's IP address in the same segment for the two devices to communicate. - 9 -
♦ Default IP address - 192.168.0.1 ♦ Subnet Mask - 255.255.255.0 Please note that the PC's IP address must correspond with the print server's IP address in the same segment for the two devices to communicate. - 9 -
Manual
Page 10
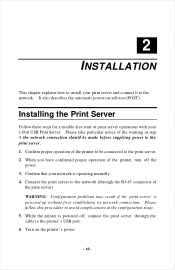
... the printer's USB port. 6. Please follow this procedure to the network. WARNING: Configuration problems may result if the print server is powered off the power. 3. 2 2 INSTALLATION This chapter explains how to install your print server and connect it to avoid complications at the configuration stage. 5. It also describes the automatic power-on the printer...
... the printer's USB port. 6. Please follow this procedure to the network. WARNING: Configuration problems may result if the print server is powered off the power. 3. 2 2 INSTALLATION This chapter explains how to install your print server and connect it to avoid complications at the configuration stage. 5. It also describes the automatic power-on the printer...
Manual
Page 11
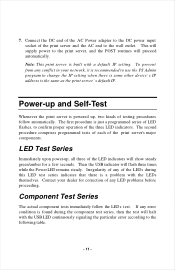
...wall outlet. This will supply power to change the IP setting when there is some other device's IP address is the same as the print server's default IP. To prevent from any of any conflict in your dealer for a few seconds. Irregularity of the LEDs during the component ... the USB indicator will proceed automatically. LED Test Series Immediately upon power-up and Self-Test Whenever the print server is a problem with a default IP setting. 7. Power-up , all three of the print server's major components. Contact your network, it is recommended to use the PS Admin program to the...
...wall outlet. This will supply power to change the IP setting when there is some other device's IP address is the same as the print server's default IP. To prevent from any of any conflict in your dealer for a few seconds. Irregularity of the LEDs during the component ... the USB indicator will proceed automatically. LED Test Series Immediately upon power-up and Self-Test Whenever the print server is a problem with a default IP setting. 7. Power-up , all three of the print server's major components. Contact your network, it is recommended to use the PS Admin program to the...

Manual
Page 12
... Reload Required' error at startup, proceed according to instructions given in the PS Admin User's Guide ("PS Admin Administration" section, under the heading "Upgrading the Print Server's Internal Firmware"). In the event that any of the other listed error conditions is encountered on 1 long - 2 short 1 long - 3 short 1 long - 5 short 1 long - 6 short 1 long...
... Reload Required' error at startup, proceed according to instructions given in the PS Admin User's Guide ("PS Admin Administration" section, under the heading "Upgrading the Print Server's Internal Firmware"). In the event that any of the other listed error conditions is encountered on 1 long - 2 short 1 long - 3 short 1 long - 5 short 1 long - 6 short 1 long...

Quick installation guide
Page 2
... the other end into an electrical outlet. Step 4 Plug one end of the Ethernet cable to the RJ-45 port of the Print Server and attach the other end of the cable to the USB port of the cable to a hub/switch/router. Fig. 1.1 See Fig. 1.1 Step 2 Make sure ...the printer is powered OFF, then connect one end of the USB cable to the Print Server until you have reached Step 4. Step 3 Turn ON the printer. Section 1 Connecting the Print Server to your network Warning: Do not plug the power cord to the USB port of the...
... the other end into an electrical outlet. Step 4 Plug one end of the Ethernet cable to the RJ-45 port of the Print Server and attach the other end of the cable to the USB port of the cable to a hub/switch/router. Fig. 1.1 See Fig. 1.1 Step 2 Make sure ...the printer is powered OFF, then connect one end of the USB cable to the Print Server until you have reached Step 4. Step 3 Turn ON the printer. Section 1 Connecting the Print Server to your network Warning: Do not plug the power cord to the USB port of the...
Quick installation guide
Page 3
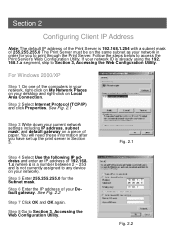
... of paper. Step 5 Enter 255.255.255.0 for you have set up the print server in Section 3. Section 2 Configuring Client IP Address Note: The default IP address of the Print Server is already using the 192. 168.1.x segment, skip to print through the Print Server. Step 2 Select Internet Protocol (TCP/IP) and click Properties. See Fig. 2.1 Step... 2 ~ 253 and is not currently assigned to any device on your network ID is 192.168.1.254 with a subnet mask of 255.255.255.0 The Print Server must be on the same subnet as your network in order for the Subnet mask. Step 8 Go to access the...
... of paper. Step 5 Enter 255.255.255.0 for you have set up the print server in Section 3. Section 2 Configuring Client IP Address Note: The default IP address of the Print Server is already using the 192. 168.1.x segment, skip to print through the Print Server. Step 2 Select Internet Protocol (TCP/IP) and click Properties. See Fig. 2.1 Step... 2 ~ 253 and is not currently assigned to any device on your network ID is 192.168.1.254 with a subnet mask of 255.255.255.0 The Print Server must be on the same subnet as your network in order for the Subnet mask. Step 8 Go to access the...
Quick installation guide
Page 4
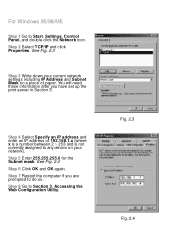
... click Properties. Step 4 Select Specify an IP address and enter an IP address of paper. Step 7 Restart the computer if you have set up the print server in Section 3.
... click Properties. Step 4 Select Specify an IP address and enter an IP address of paper. Step 7 Restart the computer if you have set up the print server in Section 3.

Quick installation guide
Page 5
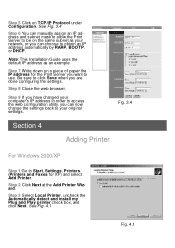
See Fig. 3.3 Fig. 3.2 Fig 3.3 Section 3 Accessing the Web Configuration Utility Step 1 Open the web browser and type the default IP address of paper the Port name you want to click Save when you are done editing the names. Step 4 Write down on Configuration. Be sure to use. You may rename the Print Server name and Port name or leave them with the default. See Fig. 3.2 Fig. 3.1 Step 3 Click on a piece of the Print Server: 192. 168.1.254 See Fig. 3.1 Step 2 The Welcome screen will appear.
See Fig. 3.3 Fig. 3.2 Fig 3.3 Section 3 Accessing the Web Configuration Utility Step 1 Open the web browser and type the default IP address of paper the Port name you want to click Save when you are done editing the names. Step 4 Write down on Configuration. Be sure to use. You may rename the Print Server name and Port name or leave them with the default. See Fig. 3.2 Fig. 3.1 Step 3 Click on a piece of the Print Server: 192. 168.1.254 See Fig. 3.1 Step 2 The Welcome screen will appear.
Quick installation guide
Page 6
... as your original settings. Step 7 Write down on a piece of paper the IP address for the Print Server you want to click Save when you can manually assign an IP address and subnet mask to allow the Print Server to Start, Settings, Printers. (Printers and Faxes for XP) and select Add Printer. Fig. 3.4 Section...
... as your original settings. Step 7 Write down on a piece of paper the IP address for the Print Server you want to click Save when you can manually assign an IP address and subnet mask to allow the Print Server to Start, Settings, Printers. (Printers and Faxes for XP) and select Add Printer. Fig. 3.4 Section...

Quick installation guide
Page 7
At the drop-down on Settings. Step 4 Select Create a new port. See Fig. 4.3 Fig. 4.2 Step 7 Select Custom then click on the piece of the Print Server and the port name you have written down menu, select Standard TCP/IP Port and click Next. See Fig. 4.4 Fig 4.3 Fig. 4.4 See Fig. 4.2 Step 5 Click Next at the Add Standard TCP/IP Printer Port Wizard. Step 6 Type in the IP address of paper in Section 3 and click Next.
At the drop-down on Settings. Step 4 Select Create a new port. See Fig. 4.3 Fig. 4.2 Step 7 Select Custom then click on the piece of the Print Server and the port name you have written down menu, select Standard TCP/IP Port and click Next. See Fig. 4.4 Fig 4.3 Fig. 4.4 See Fig. 4.2 Step 5 Click Next at the Add Standard TCP/IP Printer Port Wizard. Step 6 Type in the IP address of paper in Section 3 and click Next.

Quick installation guide
Page 10
... in D:\Win98 (where D is the letter of your computer is correct, select if you have written down on the piece of the Print Server and the port name you print from MS-DOSbased programs, and click Next. Insert the Windows 98 CD, and type in the port list. Step 19 Browse to the...
... in D:\Win98 (where D is the letter of your computer is correct, select if you have written down on the piece of the Print Server and the port name you print from MS-DOSbased programs, and click Next. Insert the Windows 98 CD, and type in the port list. Step 19 Browse to the...
Quick installation guide
Page 12
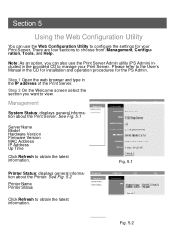
...Configuration, Tools, and Help. Step 2 On the Welcome screen select the section you can use the Print Server Admin utility (PS Admin) included in the provided CD to manage your Print Server. Step 1 Open the web browser and type in the CD for installation and operation procedures for ...obtain the latest information. See Fig. 5.2 Printer Name Printer Status Click Refresh to the User's Manual in the IP address of the Print Server. There are four sections to configure the settings for the PS Admin. Management System Status: displays general information about the Printer. Note:...
...Configuration, Tools, and Help. Step 2 On the Welcome screen select the section you can use the Print Server Admin utility (PS Admin) included in the provided CD to manage your Print Server. Step 1 Open the web browser and type in the CD for installation and operation procedures for ...obtain the latest information. See Fig. 5.2 Printer Name Printer Status Click Refresh to the User's Manual in the IP address of the Print Server. There are four sections to configure the settings for the PS Admin. Management System Status: displays general information about the Printer. Note:...