
User Manual
Page 3
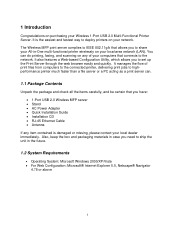
... printer wirelessly on any item contained is the easiest and fastest way to ship the unit in the future. 1.2 System Requirements • Operating System: Microsoft Windows 2000/XP/Vista • For Web Configuration: Microsoft® Internet Explorer 5.5, Netscape® Navigator 4.78 or above 3 It also features a Web-based Configuration Utility, which...
... printer wirelessly on any item contained is the easiest and fastest way to ship the unit in the future. 1.2 System Requirements • Operating System: Microsoft Windows 2000/XP/Vista • For Web Configuration: Microsoft® Internet Explorer 5.5, Netscape® Navigator 4.78 or above 3 It also features a Web-based Configuration Utility, which...
User Manual
Page 5
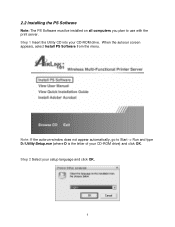
Note: If the autorun window does not appear automatically, go to use with the print server. Step 1 Insert the Utility CD into your setup language and click OK. 5 Step 2 Select your CD-ROM drive. When the autorun screen appears, select Install PS Software from the menu. 2.2 Installing the PS Software Note: The PS Software must be installed on all computers you plan to Start -> Run and type D:\Utility\Setup.exe (where D is the letter of your CD-ROM drive) and click OK.
Note: If the autorun window does not appear automatically, go to use with the print server. Step 1 Insert the Utility CD into your setup language and click OK. 5 Step 2 Select your CD-ROM drive. When the autorun screen appears, select Install PS Software from the menu. 2.2 Installing the PS Software Note: The PS Software must be installed on all computers you plan to Start -> Run and type D:\Utility\Setup.exe (where D is the letter of your CD-ROM drive) and click OK.

User Manual
Page 15
... new hardware is now complete. Step 4 In Printers and Faxes (or Printers) you plan to Start -> Control Panel and double click on Printers and Faxes (Windows Vista Users click on Printers instead of Printers and Faxes). Remember to repeat all steps in the bottom right-hand corner of your screen as... ready to use, go to use with the print server. 15 You will see notices appearing in Section 4 on the copy and click Set as Windows configures the printer. Right click on each of the computers you will see a copy of your printer. Step 2 Click OK at the Link Successfully screen...
... new hardware is now complete. Step 4 In Printers and Faxes (or Printers) you plan to Start -> Control Panel and double click on Printers and Faxes (Windows Vista Users click on Printers instead of Printers and Faxes). Remember to repeat all steps in the bottom right-hand corner of your screen as... ready to use, go to use with the print server. 15 You will see notices appearing in Section 4 on the copy and click Set as Windows configures the printer. Right click on each of the computers you will see a copy of your printer. Step 2 Click OK at the Link Successfully screen...

User Manual
Page 16
... a username and password. To begin managing the MFP Server, simply launch the PS-Link software and click on the Web Setup button. A new web browser window will be accessed and managed in this chapter. Enter admin into the boxes and click OK to be taken to the Web Configuration Utility The...
... a username and password. To begin managing the MFP Server, simply launch the PS-Link software and click on the Web Setup button. A new web browser window will be accessed and managed in this chapter. Enter admin into the boxes and click OK to be taken to the Web Configuration Utility The...

User Manual
Page 35
Specification Printer Port • 1 USB 2.0 Port Wireless Standard • IEEE 802.11g/b Networking • 1 auto-negotiating 10/100 Mbps RJ-45 port Supported Protocols • TCP/IP, SMB, NetBEUI, AppleTalk, BOOTP, SNMP, Telnet, TFTP, FTP, LPD, RARP, DHCP, IPP System Hardware • SDRAM: 8M Byte • Flash ROM: 2M Byte Security • WPA-PSK • WEP 64/128-bit Power • DC 5V, switching type LED • Power, USB, LAN Supported OS • Windows 2000/XP/Vista Warranty • 1- Appendix - Year Limited Warranty 35
Specification Printer Port • 1 USB 2.0 Port Wireless Standard • IEEE 802.11g/b Networking • 1 auto-negotiating 10/100 Mbps RJ-45 port Supported Protocols • TCP/IP, SMB, NetBEUI, AppleTalk, BOOTP, SNMP, Telnet, TFTP, FTP, LPD, RARP, DHCP, IPP System Hardware • SDRAM: 8M Byte • Flash ROM: 2M Byte Security • WPA-PSK • WEP 64/128-bit Power • DC 5V, switching type LED • Power, USB, LAN Supported OS • Windows 2000/XP/Vista Warranty • 1- Appendix - Year Limited Warranty 35

Quick Installation Guide
Page 3
Step 2 Select your CD-ROM drive) and click OK. Note: If the autorun window does not appear automatically, go to Start -> Run and type D:\Utility\Setup.exe (where D is the letter of your setup language and click OK.
Step 2 Select your CD-ROM drive) and click OK. Note: If the autorun window does not appear automatically, go to Start -> Run and type D:\Utility\Setup.exe (where D is the letter of your setup language and click OK.

Quick Installation Guide
Page 13
Right click on Printers instead of Printers and Faxes) Step 6 In Printers and Faxes (or Printers) you will see a copy of your printer. Step 4 Click OK at the Link Successfully screen. Step 5 Once you see a notice that says Your new hardware is installed and ready to use, go to Start -> Control Panel and double click on Printers and Faxes (Vista users: Click on the copy and click Set as Default Printer. You will see notices appearing in the bottom right-hand corner of your screen while Windows configures the printer.
Right click on Printers instead of Printers and Faxes) Step 6 In Printers and Faxes (or Printers) you will see a copy of your printer. Step 4 Click OK at the Link Successfully screen. Step 5 Once you see a notice that says Your new hardware is installed and ready to use, go to Start -> Control Panel and double click on Printers and Faxes (Vista users: Click on the copy and click Set as Default Printer. You will see notices appearing in the bottom right-hand corner of your screen while Windows configures the printer.