

User Manual
Page 8
If not, verify that the LED lights on the IP Camera by connecting one end of the supplied power adapter to the power jack of the Camera and connecting the other end to an electrical outlet. Step 2 Connect one of the LAN ports of the network cable to the IP Camera and connect the other end to one end of the wireless router. Step 3 Power on the Camera are secure and try again. 8 Step 4 Verify that all the connections are lit.
If not, verify that the LED lights on the IP Camera by connecting one end of the supplied power adapter to the power jack of the Camera and connecting the other end to an electrical outlet. Step 2 Connect one of the LAN ports of the network cable to the IP Camera and connect the other end to one end of the wireless router. Step 3 Power on the Camera are secure and try again. 8 Step 4 Verify that all the connections are lit.

User Manual
Page 13
Step 6 Enter admin for your wireless router in the SSID field and click Next. Optionally, you need to Step 10. 13 Step 7 If you can assign a new address here and click Next. Step 8 Enter the SSID of your wireless network, follow the subsequent steps, otherwise skip to change the Camera's IP address because another network device is already using the same address, you have encryption enabled for both the Admin ID and Password field and click Next. If you can change the password by checking on the Change box and entering the new password.
Step 6 Enter admin for your wireless router in the SSID field and click Next. Optionally, you need to Step 10. 13 Step 7 If you can assign a new address here and click Next. Step 8 Enter the SSID of your wireless network, follow the subsequent steps, otherwise skip to change the Camera's IP address because another network device is already using the same address, you have encryption enabled for both the Admin ID and Password field and click Next. If you can change the password by checking on the Change box and entering the new password.

User Manual
Page 14
WPA Step 9b Enter the same WPA Share Key as your wireless router and click Next. Step 10 Verify that all the fields are correct and click Restart to Step 10. Click Next and skip to save the settings and reboot the camera. 14 WEP Step 9a Select the appropriate Key Format and enter the same WEP Code Key as your wireless router.
WPA Step 9b Enter the same WPA Share Key as your wireless router and click Next. Step 10 Verify that all the fields are correct and click Restart to Step 10. Click Next and skip to save the settings and reboot the camera. 14 WEP Step 9a Select the appropriate Key Format and enter the same WEP Code Key as your wireless router.

User Manual
Page 20
Wireless Connection After you have configured the IP Camera from the Setup Wizard, you may unplug the camera's network cable from a wireless computer, open the web browser (Internet Explorer), enter the IP Address of the camera (default is 192.168.1.240) and press Enter. 20 To access the camera from the wireless router and place the Camera at the desired location.
Wireless Connection After you have configured the IP Camera from the Setup Wizard, you may unplug the camera's network cable from a wireless computer, open the web browser (Internet Explorer), enter the IP Address of the camera (default is 192.168.1.240) and press Enter. 20 To access the camera from the wireless router and place the Camera at the desired location.

User Manual
Page 34
... must be the same as your wireless network in order for the camera to access the camera through the wireless connection. SSID: Enter the SSID of your wireless network in order for you to configure the camera's wireless settings such as your wireless network. The SSID must be the... same as SSID and encryption. Wireless Setting This sub-menu allows you ...
... must be the same as your wireless network in order for the camera to access the camera through the wireless connection. SSID: Enter the SSID of your wireless network in order for you to configure the camera's wireless settings such as your wireless network. The SSID must be the... same as SSID and encryption. Wireless Setting This sub-menu allows you ...
User Manual
Page 35
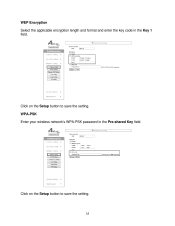
Click on the Setup button to save the setting. 35 Click on the Setup button to save the setting. WEP Encryption Select the applicable encryption length and format and enter the key code in the Pre-shared Key field. WPA-PSK Enter your wireless network's WPA-PSK password in the Key 1 field.
Click on the Setup button to save the setting. 35 Click on the Setup button to save the setting. WEP Encryption Select the applicable encryption length and format and enter the key code in the Pre-shared Key field. WPA-PSK Enter your wireless network's WPA-PSK password in the Key 1 field.

User Manual
Page 84
Pan/Tilt • Pan : +120°~ -180° • Tilt : +45° ~ -5° Wireless Connection Configuration • Connection Mode: Infrastructure, Adhoc • SSID (Network Name) • Wireless Channel • WEP / WPA-PSK (TKIP) Encryption PIR sensor • Sensor distance : 5M ( maximum) • Sensor area : X: ± 15° Y: ± 15° USB Interface &#...
Pan/Tilt • Pan : +120°~ -180° • Tilt : +45° ~ -5° Wireless Connection Configuration • Connection Mode: Infrastructure, Adhoc • SSID (Network Name) • Wireless Channel • WEP / WPA-PSK (TKIP) Encryption PIR sensor • Sensor distance : 5M ( maximum) • Sensor area : X: ± 15° Y: ± 15° USB Interface &#...

User Manual
Page 85
... conditions and environmental factors, including volume of network traffic, building materials and construction, mix of their respective owners. Specifications are the property of wireless products used, radio frequency interference (e.g., cordless telephones and microwaves) as well as network overhead lower actual data throughput rate. All products and trademarks...2006 AirLink101™ 85 Technical Support E-mail: [email protected] Toll Free: 1-888-746-3238 Web Site: www.airlink101.com *Theoretical maximum wireless signal rate based on IEEE standard 802.11g specifications.
... conditions and environmental factors, including volume of network traffic, building materials and construction, mix of their respective owners. Specifications are the property of wireless products used, radio frequency interference (e.g., cordless telephones and microwaves) as well as network overhead lower actual data throughput rate. All products and trademarks...2006 AirLink101™ 85 Technical Support E-mail: [email protected] Toll Free: 1-888-746-3238 Web Site: www.airlink101.com *Theoretical maximum wireless signal rate based on IEEE standard 802.11g specifications.