
User Manual
Page 3
... network device that 's connected to the network to remotely manage the IP Camera. Instructions for proper operation of this manual. Package Contents Before you install and use this product, please read this manual carefully for installing and configuring this product can be found in CPU and Web Configuration Utility, the IP Camera...
... network device that 's connected to the network to remotely manage the IP Camera. Instructions for proper operation of this manual. Package Contents Before you install and use this product, please read this manual carefully for installing and configuring this product can be found in CPU and Web Configuration Utility, the IP Camera...
User Manual
Page 7
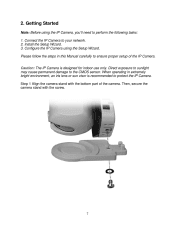
Step 1 Align the camera stand with the screw. 7 Install the Setup Wizard. 3. When operating in this Manual carefully to your network. 2. 2. Connect the IP Camera to ensure proper setup of the camera. Please follow the steps in extremely bright environment, an iris ...
Step 1 Align the camera stand with the screw. 7 Install the Setup Wizard. 3. When operating in this Manual carefully to your network. 2. 2. Connect the IP Camera to ensure proper setup of the camera. Please follow the steps in extremely bright environment, an iris ...
User Manual
Page 15
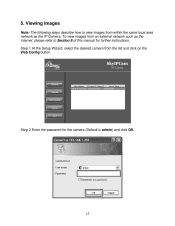
Step 2 Enter the password for further instructions. Step 1 At the Setup Wizard, select the desired camera from within the same local area network as the Internet, please refer to view images from the list and click on the Web Config button. Viewing Images Note: The following steps describe how to Section 8 of this manual for the camera (Default is admin) and click OK. 15 To view images from an external network such as the IP Camera. 5.
Step 2 Enter the password for further instructions. Step 1 At the Setup Wizard, select the desired camera from within the same local area network as the Internet, please refer to view images from the list and click on the Web Config button. Viewing Images Note: The following steps describe how to Section 8 of this manual for the camera (Default is admin) and click OK. 15 To view images from an external network such as the IP Camera. 5.
User Manual
Page 29
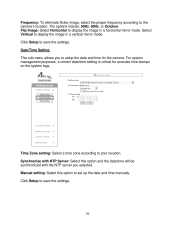
For system management purposes, a correct date/time setting is critical for the camera. Manual setting: Select this option and the date/time will be synchronized with the NTP server you to save the settings. 29 Click Setup to setup ... option to save the settings. Time Zone setting: Select a time zone according to the camera's location. Click Setup to set up the date and time manually.
For system management purposes, a correct date/time setting is critical for the camera. Manual setting: Select this option and the date/time will be synchronized with the NTP server you to save the settings. 29 Click Setup to setup ... option to save the settings. Time Zone setting: Select a time zone according to the camera's location. Click Setup to set up the date and time manually.
User Manual
Page 36
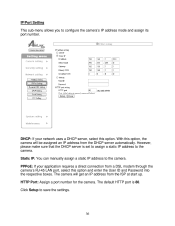
... option, the camera will get an IP address from a DSL modem through the camera's RJ-45 LAN port, select this option. Static IP: You can manually assign a static IP address to save the settings. 36 HTTP Port: Assign a port number for the camera. IP/Port Setting This sub-menu allows you...
... option, the camera will get an IP address from a DSL modem through the camera's RJ-45 LAN port, select this option. Static IP: You can manually assign a static IP address to save the settings. 36 HTTP Port: Assign a port number for the camera. IP/Port Setting This sub-menu allows you...

User Manual
Page 64
Key Lock: The Key Lock button locks all the buttons on the Record button and select Manual Record again. 64 To stop recording, click on the IPView Pro for security purposes. Record: Click on the Power button and select to Exit or ... or Motion Record, the camera will record the videos according to the corresponding settings in System Configuration. Power: Click on the Record button and select Manual Record to record the video immediately to your hard drive. If you have enabled a password login for operating IPView Pro. 9.3.3 Control Panel The Control Panel...
Key Lock: The Key Lock button locks all the buttons on the Record button and select Manual Record again. 64 To stop recording, click on the IPView Pro for security purposes. Record: Click on the Power button and select to Exit or ... or Motion Record, the camera will record the videos according to the corresponding settings in System Configuration. Power: Click on the Record button and select Manual Record to record the video immediately to your hard drive. If you have enabled a password login for operating IPView Pro. 9.3.3 Control Panel The Control Panel...
User Manual
Page 82
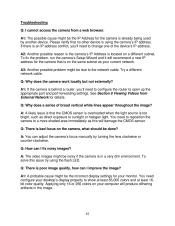
.... A3: Another possible problem might be due to change one of broad vertical white lines appear throughout the image? A: You can adjust the camera's focus manually by another device. A: The video images might be noisy if the camera is located on the same subnet as your monitor. A2: Another possible reason...
.... A3: Another possible problem might be due to change one of broad vertical white lines appear throughout the image? A: You can adjust the camera's focus manually by another device. A: The video images might be noisy if the camera is located on the same subnet as your monitor. A2: Another possible reason...