

User Manual
Page 2
... 18 7.1 Infrastructure Mode ...18 7.2 Ad-Hoc Mode ...22 8. Wireless 26 8.1.4 Management - IPView Pro...46 10.1 Installing IPView Pro...46 10.2 Starting IPView Pro ...48 10.2.1...Upgrade 41 8.3.6 Tools - Viewing Videos from External Networks 43 10. User ...27 8.2.1 Configuration - About...42 9. Date & Time 36 8.2.7 Configuration - E-mail Test...39 8.3.3 Tools - Wireless 30 WEP Encryption ...32 WPA-PSK Encryption ...33 8.2.4 Configuration - E-mail ...38 8.3.1 Tools - Getting Started ...5 3. Network 27 8.1.5 Management - User...35 8.2.6 Configuration - Video ......
... 18 7.1 Infrastructure Mode ...18 7.2 Ad-Hoc Mode ...22 8. Wireless 26 8.1.4 Management - IPView Pro...46 10.1 Installing IPView Pro...46 10.2 Starting IPView Pro ...48 10.2.1...Upgrade 41 8.3.6 Tools - Viewing Videos from External Networks 43 10. User ...27 8.2.1 Configuration - About...42 9. Date & Time 36 8.2.7 Configuration - E-mail Test...39 8.3.3 Tools - Wireless 30 WEP Encryption ...32 WPA-PSK Encryption ...33 8.2.4 Configuration - E-mail ...38 8.3.1 Tools - Getting Started ...5 3. Network 27 8.1.5 Management - User...35 8.2.6 Configuration - Video ......
User Manual
Page 5
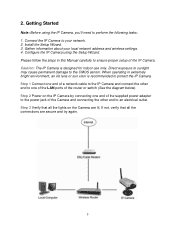
... to perform the following tasks: 1. Getting Started Note: Before using the Setup Wizard. Caution: The IP Camera is recommended to your local network address and wireless settings. 4.
... to perform the following tasks: 1. Getting Started Note: Before using the Setup Wizard. Caution: The IP Camera is recommended to your local network address and wireless settings. 4.

User Manual
Page 8
...appear. Step 3 Write down the following values for the IP Address, Subnet Mask, and Default Gateway. Wireless Encryption Settings The IP Camera needs to use the same wireless settings in order for Windows 2000/XP) and click OK. You may gather these information from the web ...configuration utility of your wireless router. 8 Network ID (SSID) 2. Step 2 At the command prompt, type ipconfig and press Enter. Channel Number 3. Step 4 Write down the information for your wireless settings: 1. 4. Step 1 Click on Start, Run, and type command...
...appear. Step 3 Write down the following values for the IP Address, Subnet Mask, and Default Gateway. Wireless Encryption Settings The IP Camera needs to use the same wireless settings in order for Windows 2000/XP) and click OK. You may gather these information from the web ...configuration utility of your wireless router. 8 Network ID (SSID) 2. Step 2 At the command prompt, type ipconfig and press Enter. Channel Number 3. Step 4 Write down the information for your wireless settings: 1. 4. Step 1 Click on Start, Run, and type command...
User Manual
Page 13
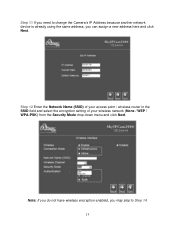
Note: If you do not have wireless encryption enabled, you can assign a new address here and click Next. Step 12 Enter the Network Name (SSID) of your access point / wireless router in the SSID field and select the encryption setting of your wireless network (None / WEP / WPA-PSK) from the Security Mode drop-down menu and click Next. Step 11 If you need to change the Camera's IP Address because another network device is already using the same address, you may skip to Step 14. 13
Note: If you do not have wireless encryption enabled, you can assign a new address here and click Next. Step 12 Enter the Network Name (SSID) of your access point / wireless router in the SSID field and select the encryption setting of your wireless network (None / WEP / WPA-PSK) from the Security Mode drop-down menu and click Next. Step 11 If you need to change the Camera's IP Address because another network device is already using the same address, you may skip to Step 14. 13

User Manual
Page 14
Skip to Step 15. WPA-PSK Step 13b Select the same Key Format (HEX / ASCII) and enter the same Pre-Shared Key (passphrase) as your wireless network and click Next. Skip to Step 15. 14 WEP Step 13a Select the same Encryption Mode (64 Bit / 128 Bit), Key Format (HEX / ASCII), Default Key (Key_1 ~ Key_4), and enter the same WEP keys (passwords) as your wireless network in the appropriate field and click Next.
Skip to Step 15. WPA-PSK Step 13b Select the same Key Format (HEX / ASCII) and enter the same Pre-Shared Key (passphrase) as your wireless network and click Next. Skip to Step 15. 14 WEP Step 13a Select the same Encryption Mode (64 Bit / 128 Bit), Key Format (HEX / ASCII), Default Key (Key_1 ~ Key_4), and enter the same WEP keys (passwords) as your wireless network in the appropriate field and click Next.

User Manual
Page 18
Configuring Wireless Settings 7.1 Infrastructure Mode Note: The following wireless settings before unplugging the network cable from the list and click on System Administration to setup the IP Camera in wireless Infrastructure mode. You should use a wired connection to configure the following instructions describe how to enter the Web Configuration Utility. 18 Use this mode if you are connecting wirelessly through a wireless router / access point. Step 1 At the Setup Wizard, select the desired Camera from the IP Camera. Step 2 Click on the Web Config button. 7.
Configuring Wireless Settings 7.1 Infrastructure Mode Note: The following wireless settings before unplugging the network cable from the list and click on System Administration to setup the IP Camera in wireless Infrastructure mode. You should use a wired connection to configure the following instructions describe how to enter the Web Configuration Utility. 18 Use this mode if you are connecting wirelessly through a wireless router / access point. Step 1 At the Setup Wizard, select the desired Camera from the IP Camera. Step 2 Click on the Web Config button. 7.

User Manual
Page 19
Step 4 Click on Configuration and then Wireless. 19 Step 3 Enter admin for both the User name and Password and click OK.
Step 4 Click on Configuration and then Wireless. 19 Step 3 Enter admin for both the User name and Password and click OK.

User Manual
Page 20
...to apply the new settings. 20 For more information regarding how to Section 8.2.3 Configuration - Step 6 If you have enabled encryption on your wireless router, you will need to set the encryption settings, please refer to set the identical encryption settings on the Camera. If you are ...connecting to a wireless router, verify that the Camera is set to choose your wireless router. Enter the appropriate encryption settings. Wireless. Enter the SSID (Network Name) of your wireless router in the SSID field, or use the Drop-down menu ...
...to apply the new settings. 20 For more information regarding how to Section 8.2.3 Configuration - Step 6 If you have enabled encryption on your wireless router, you will need to set the encryption settings, please refer to set the identical encryption settings on the Camera. If you are ...connecting to a wireless router, verify that the Camera is set to choose your wireless router. Enter the appropriate encryption settings. Wireless. Enter the SSID (Network Name) of your wireless router in the SSID field, or use the Drop-down menu ...

User Manual
Page 21
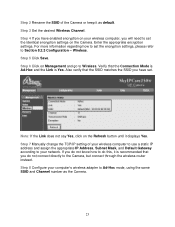
Also verify that the Connection Mode is Infrastructure and the Link is Yes, you may unplug the Camera's network cable from the wireless router and place the Camera at the desired location. 21 Step 8 Click on the Refresh button until it displays Yes. Note: If the Link does not say Yes, click on Management and go to Wireless. Step 9 Once the Link Status is Yes. Verify that the SSID matches the SSID of your wireless router.
Also verify that the Connection Mode is Infrastructure and the Link is Yes, you may unplug the Camera's network cable from the wireless router and place the Camera at the desired location. 21 Step 8 Click on the Refresh button until it displays Yes. Note: If the Link does not say Yes, click on Management and go to Wireless. Step 9 Once the Link Status is Yes. Verify that the SSID matches the SSID of your wireless router.
User Manual
Page 22
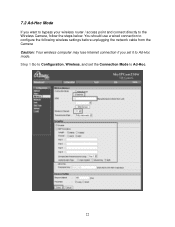
Step 1 Go to Configuration, Wireless, and set it to Ad-Hoc. 22 You should use a wired connection to configure the following wireless settings before unplugging the network cable from the Camera Caution: Your wireless computer may lose Internet connection if you want to bypass your wireless router / access point and connect directly to the Wireless Camera, follow the steps below. 7.2 Ad-Hoc Mode If you set the Connection Mode to Ad-Hoc mode.
Step 1 Go to Configuration, Wireless, and set it to Ad-Hoc. 22 You should use a wired connection to configure the following wireless settings before unplugging the network cable from the Camera Caution: Your wireless computer may lose Internet connection if you want to bypass your wireless router / access point and connect directly to the Wireless Camera, follow the steps below. 7.2 Ad-Hoc Mode If you set the Connection Mode to Ad-Hoc mode.
User Manual
Page 23
...to Section 8.2.3 Configuration - If you do not know how to do not connect directly to your network. Step 2 Rename the SSID of your wireless computer to use a static IP address and assign the appropriate IP Address, Subnet Mask, and Default Gateway according to the Camera, but connect through... the wireless router instead. Step 7 Manually change the TCP/IP setting of the Camera or keep it displays Yes. Enter the appropriate encryption settings. Step ...
...to Section 8.2.3 Configuration - If you do not know how to do not connect directly to your network. Step 2 Rename the SSID of your wireless computer to use a static IP address and assign the appropriate IP Address, Subnet Mask, and Default Gateway according to the Camera, but connect through... the wireless router instead. Step 7 Manually change the TCP/IP setting of the Camera or keep it displays Yes. Enter the appropriate encryption settings. Step ...

User Manual
Page 26
8.1.2 Management - You can click on Refresh to update the page. 8.1.3 Management - Video The Management - You can click on Refresh to update the page. 26 Wireless page displays the Wireless Status of the Camera. Wireless The Management - Video page displays the Video Status of the Camera.
8.1.2 Management - You can click on Refresh to update the page. 8.1.3 Management - Video The Management - You can click on Refresh to update the page. 26 Wireless page displays the Wireless Status of the Camera. Wireless The Management - Video page displays the Video Status of the Camera.

User Manual
Page 30
Wireless page allows you to configure the Wireless Settings of the Camera. 30 8.2.3 Configuration - Wireless The Configuration -
Wireless page allows you to configure the Wireless Settings of the Camera. 30 8.2.3 Configuration - Wireless The Configuration -
User Manual
Page 31
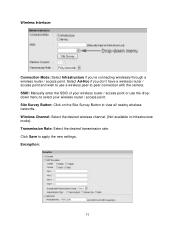
... on the Site Survey Button to select your wireless router / access point. Click Save to apply the new settings. Transmission Rate: Select the desired transmission rate. Wireless Channel: Select the desired wireless channel. (Not available in Infrastructure mode). Select... Ad-Hoc if you 're connecting wirelessly through a wireless router / access point. Wireless Interface: Connection Mode: Select Infrastructure if you don't have a wireless router / access point...
... on the Site Survey Button to select your wireless router / access point. Click Save to apply the new settings. Transmission Rate: Select the desired transmission rate. Wireless Channel: Select the desired wireless channel. (Not available in Infrastructure mode). Select... Ad-Hoc if you 're connecting wirelessly through a wireless router / access point. Wireless Interface: Connection Mode: Select Infrastructure if you don't have a wireless router / access point...

User Manual
Page 32
...: Select either ASCII (all letters and numbers) or HEX (0-9, A-F) Key 1 - 4: Manually assign a passphrase for each key select either Open System or Shared Key as the wireless router / access point in order for each key. For each key. Note: The IP Camera needs to work properly. 32
...: Select either ASCII (all letters and numbers) or HEX (0-9, A-F) Key 1 - 4: Manually assign a passphrase for each key select either Open System or Shared Key as the wireless router / access point in order for each key. For each key. Note: The IP Camera needs to work properly. 32
User Manual
Page 33
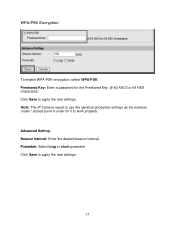
Advanced Setting: Beacon Interval: Enter the desired beacon interval. Click Save to apply the new settings. 33 Click Save to apply the new settings. WPA-PSK Encryption To enable WPA-PSK encryption, select WPA-PSK. Preshared Key: Enter a password for it to use the identical encryption settings as the wireless router / access point in order for the Preshared Key. (8-63 ASCII or 64 HEX characters). Note: The IP Camera needs to work properly. Preamble: Select long or short preamble.
Advanced Setting: Beacon Interval: Enter the desired beacon interval. Click Save to apply the new settings. 33 Click Save to apply the new settings. WPA-PSK Encryption To enable WPA-PSK encryption, select WPA-PSK. Preshared Key: Enter a password for it to use the identical encryption settings as the wireless router / access point in order for the Preshared Key. (8-63 ASCII or 64 HEX characters). Note: The IP Camera needs to work properly. Preamble: Select long or short preamble.

User Manual
Page 84
Technical Support E-mail: [email protected] Toll Free: 1-888-746-3238 Web Site: www.airlink101.com *Theoretical maximum wireless signal rate based on IEEE standard 802.11g specifications. Copyright © 2005 AirLink101. AirLink101, the stylized AirLink101 logo, ... throughput rate. Network conditions and environmental factors, including volume of network traffic, building materials and construction, mix of wireless products used, radio frequency interference (e.g., cordless telephones and microwaves) as well as trademarks and/or service marks are protected under numerous U.S.
Technical Support E-mail: [email protected] Toll Free: 1-888-746-3238 Web Site: www.airlink101.com *Theoretical maximum wireless signal rate based on IEEE standard 802.11g specifications. Copyright © 2005 AirLink101. AirLink101, the stylized AirLink101 logo, ... throughput rate. Network conditions and environmental factors, including volume of network traffic, building materials and construction, mix of wireless products used, radio frequency interference (e.g., cordless telephones and microwaves) as well as trademarks and/or service marks are protected under numerous U.S.

Quick Installation Guide
Page 2
... a network cable to the IP Camera and connect the other end to the User's Manual in this Guide carefully to your local network address and wireless settings. 4. Step 3 Verify that all the lights on the IP Camera by connecting one end of the supplied power adapter to the power jack of...
... a network cable to the IP Camera and connect the other end to the User's Manual in this Guide carefully to your local network address and wireless settings. 4. Step 3 Verify that all the lights on the IP Camera by connecting one end of the supplied power adapter to the power jack of...

Quick Installation Guide
Page 5
...the following values for it to take note of your wireless settings: 1. Step 4 Write down the information for Windows 2000/ XP) and click OK. Wireless Encryption Settings The IP Camera needs to use the same wireless settings in order for your wireless router. Network Name (SSID) 2. Channel Number 3. ... and press Enter. You may gather these information from the web configuration utility of your local network address and wireless settings. Section 3 Gathering Information Note: Before using the Setup Wizard, you'll need to work properly. The command prompt will appear.
...the following values for it to take note of your wireless settings: 1. Step 4 Write down the information for Windows 2000/ XP) and click OK. Wireless Encryption Settings The IP Camera needs to use the same wireless settings in order for your wireless router. Network Name (SSID) 2. Channel Number 3. ... and press Enter. You may gather these information from the web configuration utility of your local network address and wireless settings. Section 3 Gathering Information Note: Before using the Setup Wizard, you'll need to work properly. The command prompt will appear.

Quick Installation Guide
Page 10
Note: If you do not have wireless encryption enabled, you may skip to change the Camera's IP Address because another network device is already using the same address, you need to Step 14. Step 12 Enter the Network Name (SSID) of your access point / wireless router in the SSID field and select the encryption setting of your wireless network (None / WEP / WPA-PSK) from the Security Mode drop-down menu and click Next. Step 11 If you can assign a new address here and click Next.
Note: If you do not have wireless encryption enabled, you may skip to change the Camera's IP Address because another network device is already using the same address, you need to Step 14. Step 12 Enter the Network Name (SSID) of your access point / wireless router in the SSID field and select the encryption setting of your wireless network (None / WEP / WPA-PSK) from the Security Mode drop-down menu and click Next. Step 11 If you can assign a new address here and click Next.