

User Manual
Page 2
... 8.1.5 Management - Video ...29 8.2.3 Configuration - Upload 37 8.2.8 Configuration - Firmware Upgrade 41 8.3.6 Tools - Getting Started ...5 3. Viewing Images ...16 The IP Camera is ready for use now 17 7. System 28 8.2.2 Configuration - Web Configuration Utility ...24 8.1.1 Management - User...35 8.2.6 Configuration - Factory Reset ...40 8.3.5 ...IPView Pro...46 10.1 Installing IPView Pro...46 10.2 Starting IPView Pro ...48 10.2.1 Adding Camera using the Search Method 49 10.2.2 Adding Camera using the Input IP Method 53 10.3 Using IPView Pro ...55 10.3.1 Status Mode Window......
... 8.1.5 Management - Video ...29 8.2.3 Configuration - Upload 37 8.2.8 Configuration - Firmware Upgrade 41 8.3.6 Tools - Getting Started ...5 3. Viewing Images ...16 The IP Camera is ready for use now 17 7. System 28 8.2.2 Configuration - Web Configuration Utility ...24 8.1.1 Management - User...35 8.2.6 Configuration - Factory Reset ...40 8.3.5 ...IPView Pro...46 10.1 Installing IPView Pro...46 10.2 Starting IPView Pro ...48 10.2.1 Adding Camera using the Search Method 49 10.2.2 Adding Camera using the Input IP Method 53 10.3 Using IPView Pro ...55 10.3.1 Status Mode Window......

User Manual
Page 3
Xplug Control ...75 11.1 Installing Xplug Control 75 11.2 Enabling ActiveX...76 Appendix...79 Sending Images via Web Browser 79 Technical Support ...84 3 10.4.1 Camera Configuration...61 10.4.2 Web Configuration...62 10.4.3 Motion Configuration-1 63 10.4.4 Motion Configuration-2 64 10.4.5 Tools ...65 10.4.6 Mail Configuration...66 10.4.7 Proxy Server...67 10.4.8 Recording Configuration 68 10.4.9 Schedule-Recording Configuration 69 10.4.10 Others...71 10.4.11 Log List...72 10.4.12 Account ...73 10.4.13 About...74 11.
Xplug Control ...75 11.1 Installing Xplug Control 75 11.2 Enabling ActiveX...76 Appendix...79 Sending Images via Web Browser 79 Technical Support ...84 3 10.4.1 Camera Configuration...61 10.4.2 Web Configuration...62 10.4.3 Motion Configuration-1 63 10.4.4 Motion Configuration-2 64 10.4.5 Tools ...65 10.4.6 Mail Configuration...66 10.4.7 Proxy Server...67 10.4.8 Recording Configuration 68 10.4.9 Schedule-Recording Configuration 69 10.4.10 Others...71 10.4.11 Log List...72 10.4.12 Account ...73 10.4.13 About...74 11.

User Manual
Page 4
... to the network to ship the unit in this SkyIPCam 250W. The built-in CPU and Web Configuration Utility, the IP Camera is damaged or missing, please contact your local dealer immediately. 1. Instructions for proper operation of the product. Introduction Congratulations on... your package: • SkyIPCam 250W • Camera Stand • AC Power Adapter • Quick Installation Guide • Utility CD If any computer that delivers high quality videos at...
... to the network to ship the unit in this SkyIPCam 250W. The built-in CPU and Web Configuration Utility, the IP Camera is damaged or missing, please contact your local dealer immediately. 1. Instructions for proper operation of the product. Introduction Congratulations on... your package: • SkyIPCam 250W • Camera Stand • AC Power Adapter • Quick Installation Guide • Utility CD If any computer that delivers high quality videos at...
User Manual
Page 5
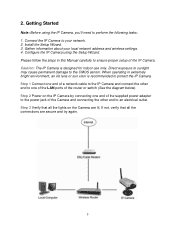
...lit. Please follow the steps in extremely bright environment, an iris lens or sun visor is designed for indoor use only. Step 2 Power on the Camera are secure and try again. 5 When operating in this Manual carefully to the CMOS sensor. Getting Started Note: Before using the Setup Wizard. Step ...3 Verify that all the lights on the IP Camera by connecting one of the LAN ports of the IP Camera. Direct exposure to sunlight may cause permanent damage to ensure proper setup of the router or switch (See the diagram...
...lit. Please follow the steps in extremely bright environment, an iris lens or sun visor is designed for indoor use only. Step 2 Power on the Camera are secure and try again. 5 When operating in this Manual carefully to the CMOS sensor. Getting Started Note: Before using the Setup Wizard. Step ...3 Verify that all the lights on the IP Camera by connecting one of the LAN ports of the IP Camera. Direct exposure to sunlight may cause permanent damage to ensure proper setup of the router or switch (See the diagram...

User Manual
Page 8
... Windows 95/98/ME) or cmd (for the IP Address, Subnet Mask, and Default Gateway. The command prompt will appear. Wireless Encryption Settings The IP Camera needs to work properly. Step 4 Write down the information for Windows 2000/XP) and click OK. 4.
... Windows 95/98/ME) or cmd (for the IP Address, Subnet Mask, and Default Gateway. The command prompt will appear. Wireless Encryption Settings The IP Camera needs to work properly. Step 4 Write down the information for Windows 2000/XP) and click OK. 4.

User Manual
Page 9
Step 2 Select the IP Camera you want to Start > (All) Programs > AirLink101 IP Camera Setup Wizard. Using the Setup Wizard Step 1 Go to configure from the list and click on the Wizard button. 9 5.
Step 2 Select the IP Camera you want to Start > (All) Programs > AirLink101 IP Camera Setup Wizard. Using the Setup Wizard Step 1 Go to configure from the list and click on the Wizard button. 9 5.

User Manual
Page 10
Note: If you do not receive this message, skip to continue. Step 3 If the Camera's default IP Address is 192.168.2.100, change the first three numbers to match your computer's IP Address is on a different subnet, the following message will appear. For example: If your local network address. Step 5 In the IP Address field, change the first three numbers to 192.168.2 as well but leave the last number 240 alone. 10 Click Yes to Step 9. Step 4 Enter admin for both the Admin ID and Password and click OK.
Note: If you do not receive this message, skip to continue. Step 3 If the Camera's default IP Address is 192.168.2.100, change the first three numbers to match your computer's IP Address is on a different subnet, the following message will appear. For example: If your local network address. Step 5 In the IP Address field, change the first three numbers to 192.168.2 as well but leave the last number 240 alone. 10 Click Yes to Step 9. Step 4 Enter admin for both the Admin ID and Password and click OK.

User Manual
Page 11
Step 8 Start the Setup Wizard again and make sure the Current IP Address field displays the new IP Address. Select the Camera and click on the Wizard button. 11 Step 7 After the Camera has restarted, click the Exit button to continue. Click OK to close the Setup Wizard. Step 6 Enter the Subnet Mask and Gateway fields with exactly the same values as you got from running ipconfig.
Step 8 Start the Setup Wizard again and make sure the Current IP Address field displays the new IP Address. Select the Camera and click on the Wizard button. 11 Step 7 After the Camera has restarted, click the Exit button to continue. Click OK to close the Setup Wizard. Step 6 Enter the Subnet Mask and Gateway fields with exactly the same values as you got from running ipconfig.
User Manual
Page 13
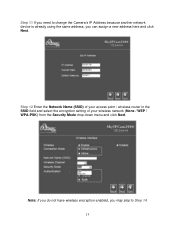
Step 12 Enter the Network Name (SSID) of your access point / wireless router in the SSID field and select the encryption setting of your wireless network (None / WEP / WPA-PSK) from the Security Mode drop-down menu and click Next. Note: If you do not have wireless encryption enabled, you can assign a new address here and click Next. Step 11 If you need to change the Camera's IP Address because another network device is already using the same address, you may skip to Step 14. 13
Step 12 Enter the Network Name (SSID) of your access point / wireless router in the SSID field and select the encryption setting of your wireless network (None / WEP / WPA-PSK) from the Security Mode drop-down menu and click Next. Note: If you do not have wireless encryption enabled, you can assign a new address here and click Next. Step 11 If you need to change the Camera's IP Address because another network device is already using the same address, you may skip to Step 14. 13

User Manual
Page 15
Step 14 Click Next. Step 15 Verify that all the fields are correct and click Restart to save the settings and reboot the Camera. 15
Step 14 Click Next. Step 15 Verify that all the fields are correct and click Restart to save the settings and reboot the Camera. 15

User Manual
Page 16
Step 1 At the Setup Wizard, select the desired camera from within the same local area network as the Internet, please refer to view images from the list and click on the Web Config button. To view images from an external network such as the IP Camera. You can view live video by selecting either the ActiveX Mode (Internet Explorer) or the Java Mode (Internet Explorer and Netscape). 16 Step 2 The default page appears. Viewing Images Note: The following steps describe how to Section 9 of this manual for further instructions. 6.
Step 1 At the Setup Wizard, select the desired camera from within the same local area network as the Internet, please refer to view images from the list and click on the Web Config button. To view images from an external network such as the IP Camera. You can view live video by selecting either the ActiveX Mode (Internet Explorer) or the Java Mode (Internet Explorer and Netscape). 16 Step 2 The default page appears. Viewing Images Note: The following steps describe how to Section 9 of this manual for further instructions. 6.

User Manual
Page 17
Rather, go to http://www.java.com/en/download/manual.jsp and follow the on that web site to focus. Note: ActiveX and/or Java Applet must be installed and enabled on your Web Browser (Internet Explorer or Netscape) before you need to install Java Virtual Machine on your computer, do not follow the instructions on -screen XP instructions. Step 3 Turn the Camera's lens clockwise or counter-clockwise to download and install the required Java software. Step 4 If you can view the live videos. The IP Camera is ready for use now. 17
Rather, go to http://www.java.com/en/download/manual.jsp and follow the on that web site to focus. Note: ActiveX and/or Java Applet must be installed and enabled on your Web Browser (Internet Explorer or Netscape) before you need to install Java Virtual Machine on your computer, do not follow the instructions on -screen XP instructions. Step 3 Turn the Camera's lens clockwise or counter-clockwise to download and install the required Java software. Step 4 If you can view the live videos. The IP Camera is ready for use now. 17

User Manual
Page 18
Step 1 At the Setup Wizard, select the desired Camera from the IP Camera. You should use a wired connection to configure the following instructions describe how to enter the Web Configuration Utility. 18 7. Configuring Wireless Settings 7.1 Infrastructure Mode Note: The following wireless settings before unplugging the network cable from the list and click on System Administration to setup the IP Camera in wireless Infrastructure mode. Step 2 Click on the Web Config button. Use this mode if you are connecting wirelessly through a wireless router / access point.
Step 1 At the Setup Wizard, select the desired Camera from the IP Camera. You should use a wired connection to configure the following instructions describe how to enter the Web Configuration Utility. 18 7. Configuring Wireless Settings 7.1 Infrastructure Mode Note: The following wireless settings before unplugging the network cable from the list and click on System Administration to setup the IP Camera in wireless Infrastructure mode. Step 2 Click on the Web Config button. Use this mode if you are connecting wirelessly through a wireless router / access point.

User Manual
Page 20
Step 6 If you have enabled encryption on your wireless router, you are connecting to a wireless router, verify that the Camera is set to Infrastructure mode. Wireless. For more information regarding how to set the encryption settings, please refer to apply the new settings. ...20 Step 7 Click Save to Section 8.2.3 Configuration - Step 5 If you will need to set the identical encryption settings on the Camera. If you do not see your wireless router, click on the Site Survey button to choose your wireless router. Enter the appropriate encryption settings. Note...
Step 6 If you have enabled encryption on your wireless router, you are connecting to a wireless router, verify that the Camera is set to Infrastructure mode. Wireless. For more information regarding how to set the encryption settings, please refer to apply the new settings. ...20 Step 7 Click Save to Section 8.2.3 Configuration - Step 5 If you will need to set the identical encryption settings on the Camera. If you do not see your wireless router, click on the Site Survey button to choose your wireless router. Enter the appropriate encryption settings. Note...

User Manual
Page 21
Note: If the Link does not say Yes, click on Management and go to Wireless. Step 8 Click on the Refresh button until it displays Yes. Also verify that the Connection Mode is Infrastructure and the Link is Yes, you may unplug the Camera's network cable from the wireless router and place the Camera at the desired location. 21 Step 9 Once the Link Status is Yes. Verify that the SSID matches the SSID of your wireless router.
Note: If the Link does not say Yes, click on Management and go to Wireless. Step 8 Click on the Refresh button until it displays Yes. Also verify that the Connection Mode is Infrastructure and the Link is Yes, you may unplug the Camera's network cable from the wireless router and place the Camera at the desired location. 21 Step 9 Once the Link Status is Yes. Verify that the SSID matches the SSID of your wireless router.
User Manual
Page 22
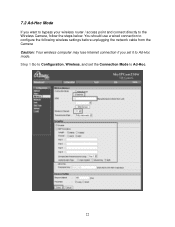
7.2 Ad-Hoc Mode If you set the Connection Mode to the Wireless Camera, follow the steps below. Step 1 Go to Configuration, Wireless, and set it to Ad-Hoc mode. You should use a wired connection to configure the following wireless settings before unplugging the network cable from the Camera Caution: Your wireless computer may lose Internet connection if you want to bypass your wireless router / access point and connect directly to Ad-Hoc. 22
7.2 Ad-Hoc Mode If you set the Connection Mode to the Wireless Camera, follow the steps below. Step 1 Go to Configuration, Wireless, and set it to Ad-Hoc mode. You should use a wired connection to configure the following wireless settings before unplugging the network cable from the Camera Caution: Your wireless computer may lose Internet connection if you want to bypass your wireless router / access point and connect directly to Ad-Hoc. 22
User Manual
Page 23
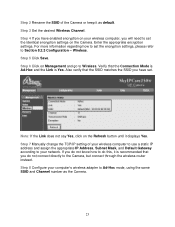
Enter the appropriate encryption settings. Step 6 Click on the Refresh button until it as the Camera. 23 Also verify that you do not know how to do not connect directly to the Camera, but connect through the wireless router instead. If you do this, it is Yes. Step 5 Click Save....Hoc and the Link is recommended that the SSID matches the SSID you have enabled encryption on the Camera. Step 8 Configure your network. Wireless. Step 7 Manually change the TCP/IP setting of the Camera or keep it displays Yes. Step 2 Rename the SSID of your wireless computer to use a ...
Enter the appropriate encryption settings. Step 6 Click on the Refresh button until it as the Camera. 23 Also verify that you do not know how to do not connect directly to the Camera, but connect through the wireless router instead. If you do this, it is Yes. Step 5 Click Save....Hoc and the Link is recommended that the SSID matches the SSID you have enabled encryption on the Camera. Step 8 Configure your network. Wireless. Step 7 Manually change the TCP/IP setting of the Camera or keep it displays Yes. Step 2 Rename the SSID of your wireless computer to use a ...
User Manual
Page 24
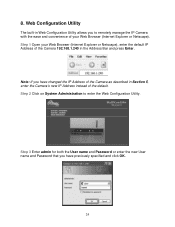
Step 2 Click on System Administration to remotely manage the IP Camera with the ease and convenience of your Web Browser (Internet Explorer or Netscape), enter the default IP Address of the default. Step 3 Enter admin for ... and Password or enter the new User name and Password that you have changed the IP Address of the Camera as described in Section 5, enter the Camera's new IP Address instead of the Camera 192.168.1.240 in Web Configuration Utility allows you have previously specified and click OK. 24 8. Web Configuration Utility...
Step 2 Click on System Administration to remotely manage the IP Camera with the ease and convenience of your Web Browser (Internet Explorer or Netscape), enter the default IP Address of the default. Step 3 Enter admin for ... and Password or enter the new User name and Password that you have changed the IP Address of the Camera as described in Section 5, enter the Camera's new IP Address instead of the Camera 192.168.1.240 in Web Configuration Utility allows you have previously specified and click OK. 24 8. Web Configuration Utility...

User Manual
Page 25
You can click on Refresh to update the page. 25 You can select different pages at the Top Menu Bar, while Sub-menus for each page are available at the left-hand side. 8.1.1 Management - System The Management - System page displays the Device and Ethernet Status of the Camera. The Management page appears by default.
You can click on Refresh to update the page. 25 You can select different pages at the Top Menu Bar, while Sub-menus for each page are available at the left-hand side. 8.1.1 Management - System The Management - System page displays the Device and Ethernet Status of the Camera. The Management page appears by default.

User Manual
Page 26
Wireless The Management - You can click on Refresh to update the page. 8.1.3 Management - 8.1.2 Management - Wireless page displays the Wireless Status of the Camera. Video The Management - You can click on Refresh to update the page. 26 Video page displays the Video Status of the Camera.
Wireless The Management - You can click on Refresh to update the page. 8.1.3 Management - 8.1.2 Management - Wireless page displays the Wireless Status of the Camera. Video The Management - You can click on Refresh to update the page. 26 Video page displays the Video Status of the Camera.