Quick Start Guide
Page 2
In this Booklet Introduction 2 What's in the Package 2 This Is Your Hub 3 Plugging in Your Hub 6 Plugging in Your Devices 7 Organizing Your Cables (Plus models only) 8 Stacking Your Hubs 9 Removing the Desk Stand (Plus models only) 12 Personalizing Your Adaptec XHub 13 What's On the CD 14 About USB 2.0 Drivers 14 Technical Specifications 15 1
In this Booklet Introduction 2 What's in the Package 2 This Is Your Hub 3 Plugging in Your Hub 6 Plugging in Your Devices 7 Organizing Your Cables (Plus models only) 8 Stacking Your Hubs 9 Removing the Desk Stand (Plus models only) 12 Personalizing Your Adaptec XHub 13 What's On the CD 14 About USB 2.0 Drivers 14 Technical Specifications 15 1
Quick Start Guide
Page 3
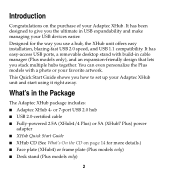
What's in the Package The Adaptec XHub package includes: I Desk stand (Plus models only) 2 or 7-port USB 2.0 hub I USB 2.0-certified cable I Fully-powered 2.5A (XHub4/4 Plus) or 5A (XHub7 Plus) power adapter I XHub Quick Start Guide I XHub CD (See What's On the CD on the purchase of your ...Face plate (XHub4) or frame plate (Plus models only) I Adaptec XHub 4- Introduction Congratulations on page 14 for the way you the ultimate in cable manager (Plus models only), and an expansion-friendly design that lets you how to give you use a hub, the XHub unit offers easy installation, ...
What's in the Package The Adaptec XHub package includes: I Desk stand (Plus models only) 2 or 7-port USB 2.0 hub I USB 2.0-certified cable I Fully-powered 2.5A (XHub4/4 Plus) or 5A (XHub7 Plus) power adapter I XHub Quick Start Guide I XHub CD (See What's On the CD on the purchase of your ...Face plate (XHub4) or frame plate (Plus models only) I Adaptec XHub 4- Introduction Congratulations on page 14 for the way you the ultimate in cable manager (Plus models only), and an expansion-friendly design that lets you how to give you use a hub, the XHub unit offers easy installation, ...

Quick Start Guide
Page 4
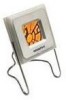
This Is Your Hub XHub4 Plus and XHub7 Plus Models Clear photo cover Picture Frame plate Latch Ports Desk stand LEDs (inside top of hub) Serial number Stacking connector Cable management loop Silicone foot Ports Plus Model (XHub7 Plus shown here) 3 Stacking tab
This Is Your Hub XHub4 Plus and XHub7 Plus Models Clear photo cover Picture Frame plate Latch Ports Desk stand LEDs (inside top of hub) Serial number Stacking connector Cable management loop Silicone foot Ports Plus Model (XHub7 Plus shown here) 3 Stacking tab

Quick Start Guide
Page 6
Port Details USB 2.0 uplink port USB 2.0 device ports (7) Power port Port numbers 1 2 3 4 5 6 7 XHub7 Plus Port Details USB 2.0 uplink port USB 2.0 device ports (4) Power port 4 Port numbers 1 2 3 4 XHub4 / XHub4 Plus Port Details More information about your XHub is in Technical Specifications on page 15. 5
Port Details USB 2.0 uplink port USB 2.0 device ports (7) Power port Port numbers 1 2 3 4 5 6 7 XHub7 Plus Port Details USB 2.0 uplink port USB 2.0 device ports (4) Power port 4 Port numbers 1 2 3 4 XHub4 / XHub4 Plus Port Details More information about your XHub is in Technical Specifications on page 15. 5
Quick Start Guide
Page 9
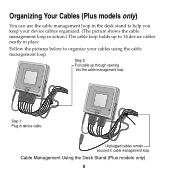
Step 2: Pull cable up to organize your device cables organized. (The picture shows the cable management loop in action.) The cable loop holds up through opening into the cable management loop. . Step 1: Plug in cable management loop. Organizing Your Cables (Plus models only) You can use the cable management loop in the desk stand to help you keep your cables using the cable management loop. Cable Management Using the Desk Stand (Plus models only) 8 Follow the pictures below to 14 device cables neatly in place. Unplugged cables remain secured in device cable.
Step 2: Pull cable up to organize your device cables organized. (The picture shows the cable management loop in action.) The cable loop holds up through opening into the cable management loop. . Step 1: Plug in cable management loop. Organizing Your Cables (Plus models only) You can use the cable management loop in the desk stand to help you keep your cables using the cable management loop. Cable Management Using the Desk Stand (Plus models only) 8 Follow the pictures below to 14 device cables neatly in place. Unplugged cables remain secured in device cable.

Quick Start Guide
Page 12
...3 Connect a power adapter to each hub. (See Plugging in the diagram below. The maximum number of hubs on a daisy-chain will then be visible on page 6.) 4 Connect your hubs without joining them (not pictured), remove the face plates from all but the top hub, and then just pile one side of... 2.0 cable, following the connection suggestions in Your Hub on the other side. the LEDs will vary if you use USB port 1, 3, or 5, especially when stacking more than two hubs. XHub4/XHub4 Plus Use any USB port to connect to another XHub XHub7 Plus For maximum performance, use a combination of XHub4s...
...3 Connect a power adapter to each hub. (See Plugging in the diagram below. The maximum number of hubs on a daisy-chain will then be visible on page 6.) 4 Connect your hubs without joining them (not pictured), remove the face plates from all but the top hub, and then just pile one side of... 2.0 cable, following the connection suggestions in Your Hub on the other side. the LEDs will vary if you use USB port 1, 3, or 5, especially when stacking more than two hubs. XHub4/XHub4 Plus Use any USB port to connect to another XHub XHub7 Plus For maximum performance, use a combination of XHub4s...
Quick Start Guide
Page 13
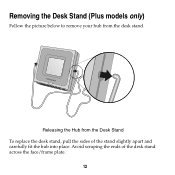
Avoid scraping the ends of the stand slightly apart and carefully fit the hub into place. Releasing the Hub from the desk stand. Removing the Desk Stand (Plus models only) Follow the picture below to remove your hub from the Desk Stand To replace the desk stand, pull the sides of the desk stand across the face/frame plate. 12
Avoid scraping the ends of the stand slightly apart and carefully fit the hub into place. Releasing the Hub from the desk stand. Removing the Desk Stand (Plus models only) Follow the picture below to remove your hub from the Desk Stand To replace the desk stand, pull the sides of the desk stand across the face/frame plate. 12
Quick Start Guide
Page 14
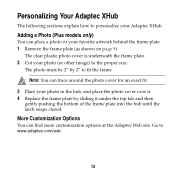
... The following sections explain how to the proper size. The photo must be 2" by sliding it . 4 Replace the frame plate by 2" to www.adaptec.com/usb. 13 Go to fit the frame. More Customization Options You can trace around the photo cover for an exact fit. 3 Place your favorite ...artwork behind the frame plate. 1 Remove the frame plate (as shown on page 9). Adding a Photo (Plus models only) You can place a photo or your photo in the hub, and place the photo cover over it under the top tab and then gently pushing the bottom of the frame...
... The following sections explain how to the proper size. The photo must be 2" by sliding it . 4 Replace the frame plate by 2" to www.adaptec.com/usb. 13 Go to fit the frame. More Customization Options You can trace around the photo cover for an exact fit. 3 Place your favorite ...artwork behind the frame plate. 1 Remove the frame plate (as shown on page 9). Adding a Photo (Plus models only) You can place a photo or your photo in the hub, and place the photo cover over it under the top tab and then gently pushing the bottom of the frame...
Quick Start Guide
Page 16
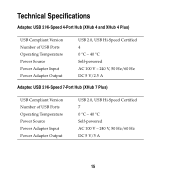
Technical Specifications Adaptec USB 2 Hi-Speed 4-Port Hub (XHub 4 and XHub 4 Plus) USB Compliant Version Number of USB Ports Operating Temperature Power Source Power Adapter Input Power Adapter Output USB 2.0, USB Hi-Speed Certified 4 0 °C - 40 °C Self-powered AC 100 V - 240 V, 50 Hz/60 Hz DC 5 V/2.5 A Adaptec USB 2 Hi-Speed 7-Port Hub (XHub 7 Plus) USB Compliant Version Number of USB Ports Operating Temperature Power Source Power Adapter Input Power Adapter Output USB 2.0, USB Hi-Speed Certified 7 0 °C - 40 °C Self-powered AC 100 V - 240 V, 50 Hz/60 Hz DC 5 V/5 A 15
Technical Specifications Adaptec USB 2 Hi-Speed 4-Port Hub (XHub 4 and XHub 4 Plus) USB Compliant Version Number of USB Ports Operating Temperature Power Source Power Adapter Input Power Adapter Output USB 2.0, USB Hi-Speed Certified 4 0 °C - 40 °C Self-powered AC 100 V - 240 V, 50 Hz/60 Hz DC 5 V/2.5 A Adaptec USB 2 Hi-Speed 7-Port Hub (XHub 7 Plus) USB Compliant Version Number of USB Ports Operating Temperature Power Source Power Adapter Input Power Adapter Output USB 2.0, USB Hi-Speed Certified 7 0 °C - 40 °C Self-powered AC 100 V - 240 V, 50 Hz/60 Hz DC 5 V/5 A 15