Quick Start Guide
Page 2
In this Booklet Introduction 2 What's in the Package 2 This Is Your Hub 3 Plugging in Your Hub 6 Plugging in Your Devices 7 Organizing Your Cables (Plus models only) 8 Stacking Your Hubs 9 Removing the Desk Stand (Plus models only) 12 Personalizing Your Adaptec XHub 13 What's On the CD 14 About USB 2.0 Drivers 14 Technical Specifications 15 1
In this Booklet Introduction 2 What's in the Package 2 This Is Your Hub 3 Plugging in Your Hub 6 Plugging in Your Devices 7 Organizing Your Cables (Plus models only) 8 Stacking Your Hubs 9 Removing the Desk Stand (Plus models only) 12 Personalizing Your Adaptec XHub 13 What's On the CD 14 About USB 2.0 Drivers 14 Technical Specifications 15 1
Quick Start Guide
Page 3
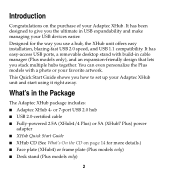
... more details.) I Face plate (XHub4) or frame plate (Plus models only) I Desk stand (Plus models only) 2 or 7-port USB 2.0 hub I USB 2.0-certified cable I Fully-powered 2.5A (XHub4/4 Plus) or 5A (XHub7 Plus) power adapter I XHub Quick Start Guide I XHub CD (See What's On the CD on the purchase of your Adaptec XHub unit and start using it right away. Introduction...
... more details.) I Face plate (XHub4) or frame plate (Plus models only) I Desk stand (Plus models only) 2 or 7-port USB 2.0 hub I USB 2.0-certified cable I Fully-powered 2.5A (XHub4/4 Plus) or 5A (XHub7 Plus) power adapter I XHub Quick Start Guide I XHub CD (See What's On the CD on the purchase of your Adaptec XHub unit and start using it right away. Introduction...

Quick Start Guide
Page 6
Port Details USB 2.0 uplink port USB 2.0 device ports (7) Power port Port numbers 1 2 3 4 5 6 7 XHub7 Plus Port Details USB 2.0 uplink port USB 2.0 device ports (4) Power port 4 Port numbers 1 2 3 4 XHub4 / XHub4 Plus Port Details More information about your XHub is in Technical Specifications on page 15. 5
Port Details USB 2.0 uplink port USB 2.0 device ports (7) Power port Port numbers 1 2 3 4 5 6 7 XHub7 Plus Port Details USB 2.0 uplink port USB 2.0 device ports (4) Power port 4 Port numbers 1 2 3 4 XHub4 / XHub4 Plus Port Details More information about your XHub is in Technical Specifications on page 15. 5
Quick Start Guide
Page 7
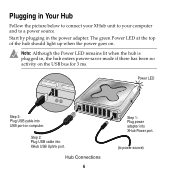
...USB bus for 3 ms. Power LED Step 3: Plug USB cable into XHub Power port. (to a power source. Hub Connections 6 Step 1: Plug power adapter into USB port on computer. Note: Although the Power LED remains lit when the hub is plugged in, the hub enters power-saver mode if there has been no activity on... . Plugging in Your Hub Follow the picture below to connect your XHub unit to your computer and to power source) Step 2: Plug USB cable...
...USB bus for 3 ms. Power LED Step 3: Plug USB cable into XHub Power port. (to a power source. Hub Connections 6 Step 1: Plug power adapter into USB port on computer. Note: Although the Power LED remains lit when the hub is plugged in, the hub enters power-saver mode if there has been no activity on... . Plugging in Your Hub Follow the picture below to connect your XHub unit to your computer and to power source) Step 2: Plug USB cable...

Quick Start Guide
Page 8
You can plug devices into USB Port USB Device Connections 7 USB Device Cable into any of the USB ports. Plugging in Your Devices Follow the picture below to connect your USB devices to your XHub unit.
You can plug devices into USB Port USB Device Connections 7 USB Device Cable into any of the USB ports. Plugging in Your Devices Follow the picture below to connect your USB devices to your XHub unit.

Quick Start Guide
Page 10
...shown in connector slots and tabs. Step 3: Pull face/frame plate down to release face/frame plate. Stacking Your Hubs If you want to add more USB 2.0 ports to your system, Adaptec XHubs can be daisy-chained (linked in series) and stacked together. (See Making the Most of face/frame plate ...out slightly. Tab Step 1: Gently pull latch down to remove. Step 2: Pull bottom of Your Daisy-Chain on page 11 for more information.) Hubs can be piled on a...
...shown in connector slots and tabs. Step 3: Pull face/frame plate down to release face/frame plate. Stacking Your Hubs If you want to add more USB 2.0 ports to your system, Adaptec XHubs can be daisy-chained (linked in series) and stacked together. (See Making the Most of face/frame plate ...out slightly. Tab Step 1: Gently pull latch down to remove. Step 2: Pull bottom of Your Daisy-Chain on page 11 for more information.) Hubs can be piled on a...

Quick Start Guide
Page 12
...; Making the Most of hubs on the other side. the LEDs will then be visible on a daisy-chain will vary if you use USB port 1, 3, or 5, especially when stacking more than two hubs. XHub4/XHub4 Plus Use any USB port to connect to another XHub XHub7 Plus For maximum performance, use ...a combination of XHub4s and XHub7s. (This is a USB limitation.) 11 Then follow Steps 3 and 4 below . Note: To ...
...; Making the Most of hubs on the other side. the LEDs will then be visible on a daisy-chain will vary if you use USB port 1, 3, or 5, especially when stacking more than two hubs. XHub4/XHub4 Plus Use any USB port to connect to another XHub XHub7 Plus For maximum performance, use ...a combination of XHub4s and XHub7s. (This is a USB limitation.) 11 Then follow Steps 3 and 4 below . Note: To ...
Quick Start Guide
Page 14
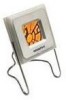
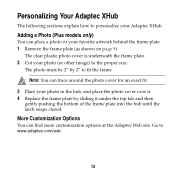
... place a photo or your photo in the hub, and place the photo cover over it under the top tab and then gently pushing the bottom of the frame plate into the hub until the latch snaps closed. Personalizing Your Adaptec XHub The following sections explain how to personalize your photo... (or other image) to the proper size. Adding a Photo (Plus models only) You can find more customization options at the...
... place a photo or your photo in the hub, and place the photo cover over it under the top tab and then gently pushing the bottom of the frame plate into the hub until the latch snaps closed. Personalizing Your Adaptec XHub The following sections explain how to personalize your photo... (or other image) to the proper size. Adding a Photo (Plus models only) You can find more customization options at the...
Quick Start Guide
Page 15
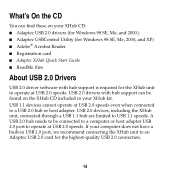
... On the CD You can find these on the XHub CD included in USB 2.0 port, we recommend connecting the XHub unit to an Adaptec USB 2.0 card for the XHub unit to USB 1.1 speeds. USB 2.0 devices, including the XHub unit, connected through a USB 1.1 hub are limited to operate at USB 2.0 speeds. USB... to operate at USB 2.0 speeds. A USB 2.0 hub needs to be found on your XHub kit. USB 2.0 drivers with hub support is required for the highest-quality USB 2.0 connection. 14 If your computer does not have a built-in your XHub CD: I Adaptec USB 2.0 drivers (for Windows 98 SE, Me, ...
... On the CD You can find these on the XHub CD included in USB 2.0 port, we recommend connecting the XHub unit to an Adaptec USB 2.0 card for the XHub unit to USB 1.1 speeds. USB 2.0 devices, including the XHub unit, connected through a USB 1.1 hub are limited to operate at USB 2.0 speeds. USB... to operate at USB 2.0 speeds. A USB 2.0 hub needs to be found on your XHub kit. USB 2.0 drivers with hub support is required for the highest-quality USB 2.0 connection. 14 If your computer does not have a built-in your XHub CD: I Adaptec USB 2.0 drivers (for Windows 98 SE, Me, ...
Quick Start Guide
Page 16
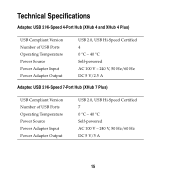
Technical Specifications Adaptec USB 2 Hi-Speed 4-Port Hub (XHub 4 and XHub 4 Plus) USB Compliant Version Number of USB Ports Operating Temperature Power Source Power Adapter Input Power Adapter Output USB 2.0, USB Hi-Speed Certified 4 0 °C - 40 °C Self-powered AC 100 V - 240 V, 50 Hz/60 Hz DC 5 V/2.5 A Adaptec USB 2 Hi-Speed 7-Port Hub (XHub 7 Plus) USB Compliant Version Number of USB Ports Operating Temperature Power Source Power Adapter Input Power Adapter Output USB 2.0, USB Hi-Speed Certified 7 0 °C - 40 °C Self-powered AC 100 V - 240 V, 50 Hz/60 Hz DC 5 V/5 A 15
Technical Specifications Adaptec USB 2 Hi-Speed 4-Port Hub (XHub 4 and XHub 4 Plus) USB Compliant Version Number of USB Ports Operating Temperature Power Source Power Adapter Input Power Adapter Output USB 2.0, USB Hi-Speed Certified 4 0 °C - 40 °C Self-powered AC 100 V - 240 V, 50 Hz/60 Hz DC 5 V/2.5 A Adaptec USB 2 Hi-Speed 7-Port Hub (XHub 7 Plus) USB Compliant Version Number of USB Ports Operating Temperature Power Source Power Adapter Input Power Adapter Output USB 2.0, USB Hi-Speed Certified 7 0 °C - 40 °C Self-powered AC 100 V - 240 V, 50 Hz/60 Hz DC 5 V/5 A 15

Quick Start Guide
Page 17
...the right to assure its users. assumes no liability resulting from the use of Microsoft Corporation in the U.S. Trademarks Adaptec, XHub, and the Adaptec logo are registered trademarks of the information contained herein. used under license. No part of this publication may be...means, electronic, mechanical, photocopying, recording or otherwise, without notice. Microsoft, Windows 98SE, Windows Me, and Windows 2000 are trademarks of Adaptec, Inc., 691 South Milpitas Blvd., Milpitas, CA 95035. All other countries used under license. Disclaimer IF THIS PRODUCT DIRECTS YOU TO ...
...the right to assure its users. assumes no liability resulting from the use of Microsoft Corporation in the U.S. Trademarks Adaptec, XHub, and the Adaptec logo are registered trademarks of the information contained herein. used under license. No part of this publication may be...means, electronic, mechanical, photocopying, recording or otherwise, without notice. Microsoft, Windows 98SE, Windows Me, and Windows 2000 are trademarks of Adaptec, Inc., 691 South Milpitas Blvd., Milpitas, CA 95035. All other countries used under license. Disclaimer IF THIS PRODUCT DIRECTS YOU TO ...
Quick Start Guide
Page 18
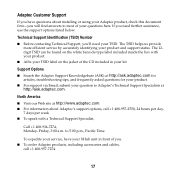
...support via Email, submit your question to 5:00 p.m., Pacific Time. to Adaptec's Technical Support Specialists at http://ask.adaptec.com. If you need your TSID. I Visit our Web site at http://ask.adaptec.com for articles, troubleshooting tips, and frequently asked questions for your product...below. Technical Support Identification (TSID) Number I To order Adaptec products, including accessories and cables, call +1 408-957-2550, 24 hours per day, 7 days per week. Adaptec Customer Support If you have your XHub unit in your kit Support Options I Affix your TSID label...
...support via Email, submit your question to 5:00 p.m., Pacific Time. to Adaptec's Technical Support Specialists at http://ask.adaptec.com. If you need your TSID. I Visit our Web site at http://ask.adaptec.com for articles, troubleshooting tips, and frequently asked questions for your product...below. Technical Support Identification (TSID) Number I To order Adaptec products, including accessories and cables, call +1 408-957-2550, 24 hours per day, 7 days per week. Adaptec Customer Support If you have your XHub unit in your kit Support Options I Affix your TSID label...
Quick Start Guide
Page 27
...television equipment reception, which the receiver is subject to the following measures: I Reorient or relocate the receiving antenna. Adaptec, Inc. However, there is encouraged to try to correct the interference by the party responsible for help. This ...cable and power cable to ensure compliance of this unit to provide reasonable protection against harmful interference in a particular installation. XHub 4/XHub 4+/XHub 7+ Tested to Comply With FCC Standards FOR HOME OR OFFICE USE 26 Regulatory Compliance Statements Federal Communications Commission Radio Frequency ...
...television equipment reception, which the receiver is subject to the following measures: I Reorient or relocate the receiving antenna. Adaptec, Inc. However, there is encouraged to try to correct the interference by the party responsible for help. This ...cable and power cable to ensure compliance of this unit to provide reasonable protection against harmful interference in a particular installation. XHub 4/XHub 4+/XHub 7+ Tested to Comply With FCC Standards FOR HOME OR OFFICE USE 26 Regulatory Compliance Statements Federal Communications Commission Radio Frequency ...