

User Guide
Page 1
STORAGE MANAGEMENT SOFTWARE USER'S GUIDE ADAPTEC ATA RAID 2400A ADAPTEC SCSI RAID 2100S/3200S/3210S/3400S/3410S
STORAGE MANAGEMENT SOFTWARE USER'S GUIDE ADAPTEC ATA RAID 2400A ADAPTEC SCSI RAID 2100S/3200S/3210S/3400S/3410S
User Guide
Page 7
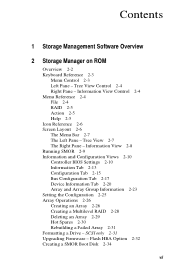
Tree View Control 2-4 Right Pane - Contents 1 Storage Management Software Overview 2 Storage Manager on ROM Overview 2-2 Keyboard Reference 2-3 Menu Control 2-3 Left Pane - Tree View 2-7 The Right Pane - Information View Control 2-4 Menu Reference 2-4 File 2-4 RAID 2-5 Action 2-5 Help 2-5 Icon Reference 2-6 Screen Layout 2-6 The Menu Bar 2-7 The Left Pane - Information View 2-8 Running SMOR 2-9 Information and Configuration Views 2-10 Controller BIOS Settings 2-10 Information Tab...
Tree View Control 2-4 Right Pane - Contents 1 Storage Management Software Overview 2 Storage Manager on ROM Overview 2-2 Keyboard Reference 2-3 Menu Control 2-3 Left Pane - Tree View 2-7 The Right Pane - Information View Control 2-4 Menu Reference 2-4 File 2-4 RAID 2-5 Action 2-5 Help 2-5 Icon Reference 2-6 Screen Layout 2-6 The Menu Bar 2-7 The Left Pane - Information View 2-8 Running SMOR 2-9 Information and Configuration Views 2-10 Controller BIOS Settings 2-10 Information Tab...

User Guide
Page 8
... - Adaptec 3200S/ 3210S/3400S/3410S Only 3-26 Configure Host Bus Adapter Window 3-27 Flash Configuration Window 3-29 Device Information Window 3-31 Device Configuration Window 3-33 Saving the Subsystem Configuration 3-34 Events 3-35 Event Log 3-35 Event Broadcaster 3-37 Event Messaging by Pager - Contents 3 Storage Manager Introduction 3-2 System Requirements 3-3 Installing Storage Manager 3-4 Running Storage Manager 3-5 Using Storage Manager Locally 3-6 Using Storage Manager Remotely...
... - Adaptec 3200S/ 3210S/3400S/3410S Only 3-26 Configure Host Bus Adapter Window 3-27 Flash Configuration Window 3-29 Device Information Window 3-31 Device Configuration Window 3-33 Saving the Subsystem Configuration 3-34 Events 3-35 Event Log 3-35 Event Broadcaster 3-37 Event Messaging by Pager - Contents 3 Storage Manager Introduction 3-2 System Requirements 3-3 Installing Storage Manager 3-4 Running Storage Manager 3-5 Using Storage Manager Locally 3-6 Using Storage Manager Remotely...
User Guide
Page 10
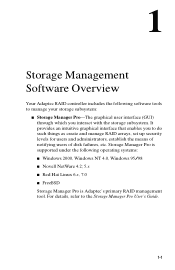
1 Storage Management Software Overview Your Adaptec RAID controller includes the following operating systems: s Windows 2000, Windows NT 4.0, Windows 95/98 s Novell NetWare 4.2; 5.x s Red Hat Linux 6.x, 7.0 s FreeBSD Storage Manager Pro is Adaptec's primary RAID management tool. For details, refer to do such things as create and manage RAID arrays, set up security levels for users and administrators, establish the means of notifying users of...
1 Storage Management Software Overview Your Adaptec RAID controller includes the following operating systems: s Windows 2000, Windows NT 4.0, Windows 95/98 s Novell NetWare 4.2; 5.x s Red Hat Linux 6.x, 7.0 s FreeBSD Storage Manager Pro is Adaptec's primary RAID management tool. For details, refer to do such things as create and manage RAID arrays, set up security levels for users and administrators, establish the means of notifying users of...

User Guide
Page 11
... of the controller's BIOS code. Storage Management Software Overview s Storage Manager-Older storage management software that provides the same basic functionality as Storage Manager Pro but has the advantage of the additional operating systems, or if you require the use either tool as the primary RAID management utility. Use Storage Manager if you require a feature that is part of Storage Manager Pro over Storage Manager is not...
... of the controller's BIOS code. Storage Management Software Overview s Storage Manager-Older storage management software that provides the same basic functionality as Storage Manager Pro but has the advantage of the additional operating systems, or if you require the use either tool as the primary RAID management utility. Use Storage Manager if you require a feature that is part of Storage Manager Pro over Storage Manager is not...

User Guide
Page 12
2 Storage Manager on ROM In this Chapter ➤ Overview ➤ Keyboard Reference ➤ Menu Reference ➤ Icon Reference ➤ Screen Layout ➤ Running SMOR ➤ Information and Configuration Views ➤ Setting the Configuration ➤ Array Operations ➤ Formatting a Drive - SCSI only ➤ Upgrading Firmware - Flash HBA Option ➤ Creating a SMOR Boot Disk 2-2 2-3 2-4 2-6 2-6 2-9 2-10 2-25 2-26 2-31 2-32 2-34 2-1
2 Storage Manager on ROM In this Chapter ➤ Overview ➤ Keyboard Reference ➤ Menu Reference ➤ Icon Reference ➤ Screen Layout ➤ Running SMOR ➤ Information and Configuration Views ➤ Setting the Configuration ➤ Array Operations ➤ Formatting a Drive - SCSI only ➤ Upgrading Firmware - Flash HBA Option ➤ Creating a SMOR Boot Disk 2-2 2-3 2-4 2-6 2-6 2-9 2-10 2-25 2-26 2-31 2-32 2-34 2-1
User Guide
Page 13
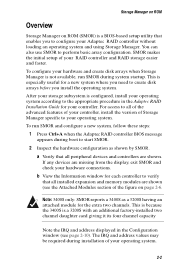
... to create disk arrays before you need to start SMOR. 2 Inspect the hardware configuration as a 3200S having an attached module for your Adaptec RAID controller without loading an operating system and using Storage Manager. For access to your storage subsystem is a 3200S with an additional factory-installed two channel daughter card giving it its four channel capacity Note...
... to create disk arrays before you need to start SMOR. 2 Inspect the hardware configuration as a 3200S having an attached module for your Adaptec RAID controller without loading an operating system and using Storage Manager. For access to your storage subsystem is a 3200S with an additional factory-installed two channel daughter card giving it its four channel capacity Note...

User Guide
Page 14
... can view the Array Group Information window for additional information. Initiate an action. The array groups are as follows: Menu Control Alt + (Menu Highlight) Enter Up/Down Arrows Esc Select the corresponding menu or menu item. Keyboard Reference The navigation keys...RAID performance is at this process may take several hours. Array groups can be created before the operating system is complete. Return to monitor the progress of the build operation, you are finished with data protected; See Array Groups on the system while the build operation continues. Storage Manager...
... can view the Array Group Information window for additional information. Initiate an action. The array groups are as follows: Menu Control Alt + (Menu Highlight) Enter Up/Down Arrows Esc Select the corresponding menu or menu item. Keyboard Reference The navigation keys...RAID performance is at this process may take several hours. Array groups can be created before the operating system is complete. Return to monitor the progress of the build operation, you are finished with data protected; See Array Groups on the system while the build operation continues. Storage Manager...

User Guide
Page 15
...elements within the Information View. Move to the Tree View. File Read System Config Set System Config Exit Rescan the system. Information View Control Alt + (Tab Highlight) Tab Shift-Tab Space Up/Down Arrows Esc Select and go to the right pane, Information View. Expand ...changes are lost. Move to it. Some items may not be preceded by a minus sign. Quit SMOR. 2-4 Left Pane - Tree View Control Storage Manager on the device selected. The element must be available depending on ROM Up/Down Arrows Left/Right Arrows + - Move to the corresponding tab ...
...elements within the Information View. Move to the Tree View. File Read System Config Set System Config Exit Rescan the system. Information View Control Alt + (Tab Highlight) Tab Shift-Tab Space Up/Down Arrows Esc Select and go to the right pane, Information View. Expand ...changes are lost. Move to it. Some items may not be preceded by a minus sign. Quit SMOR. 2-4 Left Pane - Tree View Control Storage Manager on the device selected. The element must be available depending on ROM Up/Down Arrows Left/Right Arrows + - Move to the corresponding tab ...

User Guide
Page 16
Delete the currently selected array. Update the firmware, controller BIOS, or SMOR image in controller ROM. Make a bootable disk that runs SMOR. RAID Storage Manager on the controller. Stop building or rebuilding an array. Delete Rebuild Stop Build Create a new array. Note: Do not format a SCSI drive unless formatting is recommended by the operating system. Display version information...
Delete the currently selected array. Update the firmware, controller BIOS, or SMOR image in controller ROM. Make a bootable disk that runs SMOR. RAID Storage Manager on the controller. Stop building or rebuilding an array. Delete Rebuild Stop Build Create a new array. Note: Do not format a SCSI drive unless formatting is recommended by the operating system. Display version information...

User Guide
Page 17
Screen Layout 2-6 Menu Bar Information & Configuration Tab Pages Tree View Figure 2-1. The screen, shown in the Tree View: HPT370 HPT370 Controller · Hard drive CD Array Tape Other Device Screen Layout The SMOR interface works like the Windows Explorer treestructured interface. Storage Manager on ROM Icon Reference SMOR uses the following icons in Figure 2-1, is divided into three major components: a menu bar across the top of the screen and two display panes below the menu bar.
Screen Layout 2-6 Menu Bar Information & Configuration Tab Pages Tree View Figure 2-1. The screen, shown in the Tree View: HPT370 HPT370 Controller · Hard drive CD Array Tape Other Device Screen Layout The SMOR interface works like the Windows Explorer treestructured interface. Storage Manager on ROM Icon Reference SMOR uses the following icons in Figure 2-1, is divided into three major components: a menu bar across the top of the screen and two display panes below the menu bar.

User Guide
Page 18
... or configure. The Left Pane - Tree View The Tree View, displayed in the Information View (display pane on the right side). Storage Manager on the File menu, press Alt+F to open the File menu, then press R to select Read System Config. By moving the highlight... This view displays a tree structure that represents the organization of the tree, hiding the devices associated with that portion of the storage subsystem, including controllers, storage devices, and arrays detected by a minus sign, press Enter or the minus key to expand the tree, showing the devices associated...
... or configure. The Left Pane - Tree View The Tree View, displayed in the Information View (display pane on the right side). Storage Manager on the File menu, press Alt+F to open the File menu, then press R to select Read System Config. By moving the highlight... This view displays a tree structure that represents the organization of the tree, hiding the devices associated with that portion of the storage subsystem, including controllers, storage devices, and arrays detected by a minus sign, press Enter or the minus key to expand the tree, showing the devices associated...

User Guide
Page 19
...information displayed in the Tree View. 2-8 Checkboxes are toggled by using the Spacebar. For example, to change an item depends on the type of controller, device, or array selected in the Information View varies depending on changing between the items with the item. See Keyboard Reference on page 2-3 ...items can also press the Tab key when in black. Note: The items and settings shown in the tree. Storage Manager on the tab. Information View To the right of control associated with the Tab or Shift+Tab keys. When there are shown in the Tree View to the currently ...
...information displayed in the Tree View. 2-8 Checkboxes are toggled by using the Spacebar. For example, to change an item depends on the type of controller, device, or array selected in the Information View varies depending on changing between the items with the item. See Keyboard Reference on page 2-3 ...items can also press the Tab key when in black. Note: The items and settings shown in the tree. Storage Manager on the tab. Information View To the right of control associated with the Tab or Shift+Tab keys. When there are shown in the Tree View to the currently ...

User Guide
Page 20
...device ID assigned to that appear during the boot sequence. SMOR Welcome Window The letters that device. 2-9 Figure 2-2. Storage Manager on ROM Running SMOR Start SMOR by pressing Ctrl+A when the RAID controller BIOS message appears on the screen during the initial device scan process are C D E H T 0, 1, ...5 CD Hard drive SAF-TE, intelligent RAID enclosure, or processor device Hot spare drives Tape device Physical arrays ...
...device ID assigned to that appear during the boot sequence. SMOR Welcome Window The letters that device. 2-9 Figure 2-2. Storage Manager on ROM Running SMOR Start SMOR by pressing Ctrl+A when the RAID controller BIOS message appears on the screen during the initial device scan process are C D E H T 0, 1, ...5 CD Hard drive SAF-TE, intelligent RAID enclosure, or processor device Hot spare drives Tape device Physical arrays ...

User Guide
Page 21
... s: [ ] EBDA Rel ocation [ 3 ] Enable Extended In t13 D e fa u l t Figure 2-4. Configuration Window - Storage Manager on ROM Information and Configuration Views When you highlight an item within the Tree View, the corresponding Information View is displayed. Configuration Window - Figure 2-3. SCSI 2-10 Controller BIOS Settings The controller displays the default Information View when SMOR starts, as shown in...
... s: [ ] EBDA Rel ocation [ 3 ] Enable Extended In t13 D e fa u l t Figure 2-4. Configuration Window - Storage Manager on ROM Information and Configuration Views When you highlight an item within the Tree View, the corresponding Information View is displayed. Configuration Window - Figure 2-3. SCSI 2-10 Controller BIOS Settings The controller displays the default Information View when SMOR starts, as shown in...
User Guide
Page 22
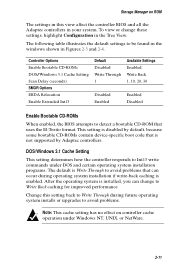
...settings, highlight Configuration in Figures 2-3 and 2-4. Storage Manager on controller cache operation under Windows NT, UNIX, or NetWare. 2-11 This setting is disabled by Adaptec controllers. Change this view affect the controller BIOS and all the Adaptec controllers in your system. DOS/Windows 3.1 Cache ...Setting This setting determines how the controller responds to Int13 write commands under DOS and ...
...settings, highlight Configuration in Figures 2-3 and 2-4. Storage Manager on controller cache operation under Windows NT, UNIX, or NetWare. 2-11 This setting is disabled by Adaptec controllers. Change this view affect the controller BIOS and all the Adaptec controllers in your system. DOS/Windows 3.1 Cache ...Setting This setting determines how the controller responds to Int13 write commands under DOS and ...

User Guide
Page 23
...enables extended Logical Block Addressing (LBA) for hard drives. If devices are not displayed in a host system with other adapters that RAID controllers handle Extended BIOS Data Area (EBDA) relocation. EBDA Relocation This setting determines the way that follow standard EBDA relocation rules. You can ...this option to help avoid conflicts with other adapter cards if the controller is installed in the Tree View after power on , bus reset, and scan or they do not respond correctly. Storage Manager on ROM Scan Delay (SCSI only) Some devices require a time interval between power on ,...
...enables extended Logical Block Addressing (LBA) for hard drives. If devices are not displayed in a host system with other adapters that RAID controllers handle Extended BIOS Data Area (EBDA) relocation. EBDA Relocation This setting determines the way that follow standard EBDA relocation rules. You can ...this option to help avoid conflicts with other adapter cards if the controller is installed in the Tree View after power on , bus reset, and scan or they do not respond correctly. Storage Manager on ROM Scan Delay (SCSI only) Some devices require a time interval between power on ,...

User Guide
Page 24
Storage Manager on ROM Information Tab To view or change the configuration of the controller, highlight the controller in Figures 2-5 and 2-6. Figure 2-5. C ac he : 2100S 17-000105 D P T1 . 0 48MB S C S IB us : Width: B us s e s : T r an s ...Bank 0: 64MBECCMemory Module Revision: 320B FWType: 2100 ECC: Yes Figure 2-6. ATA File RAID Action Help C o n f i g u ra t i o n Local + #0 2100S (0,8) SEAGATE (0,9) SEAGATE (0,10) SEAGATE (0,11) SEAGATE (0,12) SEAGATE (0,13) SEAGATE (0,14) SEAGATE + (0,0,9,0) RAID-1 + (0,0,12,0) RAID-5 Inf ormation Co n f i g u r a t i o n M ...
Storage Manager on ROM Information Tab To view or change the configuration of the controller, highlight the controller in Figures 2-5 and 2-6. Figure 2-5. C ac he : 2100S 17-000105 D P T1 . 0 48MB S C S IB us : Width: B us s e s : T r an s ...Bank 0: 64MBECCMemory Module Revision: 320B FWType: 2100 ECC: Yes Figure 2-6. ATA File RAID Action Help C o n f i g u ra t i o n Local + #0 2100S (0,8) SEAGATE (0,9) SEAGATE (0,10) SEAGATE (0,11) SEAGATE (0,12) SEAGATE (0,13) SEAGATE (0,14) SEAGATE + (0,0,9,0) RAID-1 + (0,0,12,0) RAID-5 Inf ormation Co n f i g u r a t i o n M ...
User Guide
Page 25
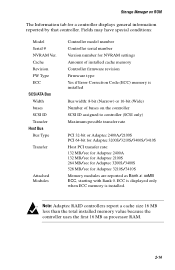
Note: Adaptec RAID controllers report a cache size 16 MB less than the total installed memory value because the controller uses the first 16 MB as Bank x: xxMB ECC, starting with Bank 0. Storage Manager on the controller SCSI ID assigned to controller (SCSI only) Maximum possible transfer rate PCI 32-bit or Adaptec 2400A/2100S PCI 64-bit for Adaptec 3200S/3210S/3400S/3410S Host...
Note: Adaptec RAID controllers report a cache size 16 MB less than the total installed memory value because the controller uses the first 16 MB as Bank x: xxMB ECC, starting with Bank 0. Storage Manager on the controller SCSI ID assigned to controller (SCSI only) Maximum possible transfer rate PCI 32-bit or Adaptec 2400A/2100S PCI 64-bit for Adaptec 3200S/3210S/3400S/3410S Host...

User Guide
Page 26
Configuration Tab - Configuration Tab - Storage Manager on ROM Configuration Tab The Configuration tab for a controller displays internal settings for that controller, as shown in Figures 2-7 and 2-8. Figure 2-7. ATA File RAID Action Help C o n f i g u ra t i o n Local + #0 2100S + (1,1,9,0) RAID-1 + (1,1,12,0) RAID-5 I nf ormation Configuration Mem Address: IRQ: 11 ( ) Edge D8000000 ( ) L evel D e fa u l t [ 3 ] PCI MWI Enable [ ] B oot Enable [ ] Cluster Server Enable Figure 2-8. SCSI 2-15
Configuration Tab - Configuration Tab - Storage Manager on ROM Configuration Tab The Configuration tab for a controller displays internal settings for that controller, as shown in Figures 2-7 and 2-8. Figure 2-7. ATA File RAID Action Help C o n f i g u ra t i o n Local + #0 2100S + (1,1,9,0) RAID-1 + (1,1,12,0) RAID-5 I nf ormation Configuration Mem Address: IRQ: 11 ( ) Edge D8000000 ( ) L evel D e fa u l t [ 3 ] PCI MWI Enable [ ] B oot Enable [ ] Cluster Server Enable Figure 2-8. SCSI 2-15