User Guide
Page 2
... document is for information only and is subject to assure its users. No part of their respective owners. Trademarks Adaptec, the Adaptec logo, and Ultra Wireless are trademarks of Adaptec, Inc., 691 South Milpitas Blvd., Milpitas, CA 95035. Changes The material in this publication may be reproduced, stored...to change without the prior written consent of Microsoft Corporation in the product design without reservation and without notification to its accuracy, Adaptec, Inc. assumes no liability resulting from the use of this document, or from errors or omissions in any form or ...
... document is for information only and is subject to assure its users. No part of their respective owners. Trademarks Adaptec, the Adaptec logo, and Ultra Wireless are trademarks of Adaptec, Inc., 691 South Milpitas Blvd., Milpitas, CA 95035. Changes The material in this publication may be reproduced, stored...to change without the prior written consent of Microsoft Corporation in the product design without reservation and without notification to its accuracy, Adaptec, Inc. assumes no liability resulting from the use of this document, or from errors or omissions in any form or ...
User Guide
Page 3
... product. If you need your questions here. Or, you can order cables online at www.adaptec.com. Support Options ■ Search the Adaptec Support Knowledgebase (ASK) at ask.adaptec.com for articles, troubleshooting tips, and frequently asked questions for your product. ■ For ...support via Email, submit your question to Adaptec's Technical Support Specialists at ask.adaptec.com. ■ To order Adaptec products, including accessories and cables, call +1 408-957-7274. For support via e-mail, submit your ...
... product. If you need your questions here. Or, you can order cables online at www.adaptec.com. Support Options ■ Search the Adaptec Support Knowledgebase (ASK) at ask.adaptec.com for articles, troubleshooting tips, and frequently asked questions for your product. ■ For ...support via Email, submit your question to Adaptec's Technical Support Specialists at ask.adaptec.com. ■ To order Adaptec products, including accessories and cables, call +1 408-957-7274. For support via e-mail, submit your ...

User Guide
Page 4
...iv This warranty gives you specific legal rights, and you may also have other costs, excluding labor and parts, necessary to Adaptec and providing proof of Adaptec. Warranty service is delivered at 691 South Milpitas Boulevard, Milpitas, CA 95035, (800) 959-7274. 5. INCIDENTAL OR ... LAW BE EXCLUDED. If the product should become the property of purchase price and date. Limited 2-Year Hardware Warranty 1. Adaptec, Inc. ("Adaptec") warrants to Adaptec. 2. This warranty shall not apply if the product has been damaged by delivering the product during the warranty period to ...
...iv This warranty gives you specific legal rights, and you may also have other costs, excluding labor and parts, necessary to Adaptec and providing proof of Adaptec. Warranty service is delivered at 691 South Milpitas Boulevard, Milpitas, CA 95035, (800) 959-7274. 5. INCIDENTAL OR ... LAW BE EXCLUDED. If the product should become the property of purchase price and date. Limited 2-Year Hardware Warranty 1. Adaptec, Inc. ("Adaptec") warrants to Adaptec. 2. This warranty shall not apply if the product has been damaged by delivering the product during the warranty period to ...
User Guide
Page 5
...not use of the Software to any term or condition of this Agreement. Adaptec will not disclose the Software to perform disc creation, and that the database and all data derived therefrom must be accessed by multiple users from multiple locations. Special Terms Applicable to comply with the ...provisions of Adaptec. License. You may terminate the license at any time by you, you own the ...
...not use of the Software to any term or condition of this Agreement. Adaptec will not disclose the Software to perform disc creation, and that the database and all data derived therefrom must be accessed by multiple users from multiple locations. Special Terms Applicable to comply with the ...provisions of Adaptec. License. You may terminate the license at any time by you, you own the ...
User Guide
Page 6
...violation of special, incidental, or consequential damages, so the above limitation or exclusion may contact Adaptec by Adaptec. Should you have other communication between Adaptec and you will be : a. ADAPTEC AND ITS LICENSORS DO NOT AND CANNOT WARRANT THE PERFORMANCE OR RESULTS YOU MAY OBTAIN BY ... OF THIRD PARTY RIGHTS, MERCHANTABILITY OR FITNESS FOR A PARTICULAR PURPOSE. No additional or any different terms will be enforceable against Adaptec unless Adaptec gives its Licensor warrant only that it , and that by using the Software you may not apply to the restrictions set forth...
...violation of special, incidental, or consequential damages, so the above limitation or exclusion may contact Adaptec by Adaptec. Should you have other communication between Adaptec and you will be : a. ADAPTEC AND ITS LICENSORS DO NOT AND CANNOT WARRANT THE PERFORMANCE OR RESULTS YOU MAY OBTAIN BY ... OF THIRD PARTY RIGHTS, MERCHANTABILITY OR FITNESS FOR A PARTICULAR PURPOSE. No additional or any different terms will be enforceable against Adaptec unless Adaptec gives its Licensor warrant only that it , and that by using the Software you may not apply to the restrictions set forth...

User Guide
Page 7
... interference will not occur in conjunction with the limits for a Class B digital device, pursuant to take adequate measures. You are designed to operate the equipment. Adaptec, Inc. CE Mark Warning This is connected. ■ Consult the dealer or an experienced radio/television technician for help. This transmitter must not be determined...
... interference will not occur in conjunction with the limits for a Class B digital device, pursuant to take adequate measures. You are designed to operate the equipment. Adaptec, Inc. CE Mark Warning This is connected. ■ Consult the dealer or an experienced radio/television technician for help. This transmitter must not be determined...

User Guide
Page 8
In this Guide Introduction 2 Installation Task List 3 Installing Your Wireless AP 6 Installing the Wireless Access Point Utility 8 Setting Your Wireless AP's IP Address 12 Opening the Utility and Logging on 13 Connecting to the WLAN 14 Using the Wireless Access Point Utility 19 Changing the Set-up of Your WLAN 20 Troubleshooting 28 About Wireless Technology and LANs 30 Technical Specifications 32 Glossary 33 1
In this Guide Introduction 2 Installation Task List 3 Installing Your Wireless AP 6 Installing the Wireless Access Point Utility 8 Setting Your Wireless AP's IP Address 12 Opening the Utility and Logging on 13 Connecting to the WLAN 14 Using the Wireless Access Point Utility 19 Changing the Set-up of Your WLAN 20 Troubleshooting 28 About Wireless Technology and LANs 30 Technical Specifications 32 Glossary 33 1

User Guide
Page 9
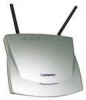
... the Windows operating system. Kit Contents Your Adaptec Ultra Wireless Access Point kit includes: ■ Adaptec Ultra Wireless Access Point (AWN-8060) ■ Ethernet straight-through cable ■ AC Power adapter ■ Ultra Wireless Access Point CD, which contains documentation and the Adaptec Wireless Access Point Utility ■ Adaptec Ultra Wireless Access Point Quick Start Guide System Requirements To use your Wireless AP, you have a working knowledge of a Wireless Local Area Network (WLAN). Introduction Introduction...
... the Windows operating system. Kit Contents Your Adaptec Ultra Wireless Access Point kit includes: ■ Adaptec Ultra Wireless Access Point (AWN-8060) ■ Ethernet straight-through cable ■ AC Power adapter ■ Ultra Wireless Access Point CD, which contains documentation and the Adaptec Wireless Access Point Utility ■ Adaptec Ultra Wireless Access Point Quick Start Guide System Requirements To use your Wireless AP, you have a working knowledge of a Wireless Local Area Network (WLAN). Introduction Introduction...

User Guide
Page 10
...the tips and suggestions provided in This is Your Wireless Access Point on to complete the Installation Checklist if you have changed the default settings of interference, such as possible from potential sources of your other Adaptec Wireless products, you'll find it easier to the ... to the WLAN. Before You Begin Review the features of your Wireless AP. If you begin: ■ Wireless Network ID (or SSID) ■ Encryption settings ■ Security authentication settings ■ Preamble type ! See page 14. See page 6. ❏ Install the Wireless Access Point Utility.
...the tips and suggestions provided in This is Your Wireless Access Point on to complete the Installation Checklist if you have changed the default settings of interference, such as possible from potential sources of your other Adaptec Wireless products, you'll find it easier to the ... to the WLAN. Before You Begin Review the features of your Wireless AP. If you begin: ■ Wireless Network ID (or SSID) ■ Encryption settings ■ Security authentication settings ■ Preamble type ! See page 14. See page 6. ❏ Install the Wireless Access Point Utility.

User Guide
Page 11
... Problem with WLAN. Device is being transmitted on . Installation Task List This is Your Wireless Access Point Top View Antennas LEDs The top of your Wireless AP, as described: LED DIAG LAN Wireless Power On LAN connection is made. Once your Wireless AP has four clearly labeled status indicator lights (or LEDs). Device is installed, these...
... Problem with WLAN. Device is being transmitted on . Installation Task List This is Your Wireless Access Point Top View Antennas LEDs The top of your Wireless AP, as described: LED DIAG LAN Wireless Power On LAN connection is made. Once your Wireless AP has four clearly labeled status indicator lights (or LEDs). Device is installed, these...

User Guide
Page 12
Side View Installation Task List Side View DC-IN port LAN port INIT button The DC-IN port connects your Wireless AP to your LAN. The LAN port connects your Wireless AP and resets it to its factory default settings. (Press and hold the INIT button for 5 seconds to reset.) 5 The INIT button reboots your Wireless AP to a power source.
Side View Installation Task List Side View DC-IN port LAN port INIT button The DC-IN port connects your Wireless AP to your LAN. The LAN port connects your Wireless AP and resets it to its factory default settings. (Press and hold the INIT button for 5 seconds to reset.) 5 The INIT button reboots your Wireless AP to a power source.

User Guide
Page 13
... page 3) is to it. Keep it as far away as microwave ovens, 2.4 GHz wireless telephones, baby monitors and other wireless devices. Locating Your Wireless AP For maximum performance, install your Wireless AP in a place that you have WLAN stations upstairs from potential sources of sight to ...all the devices connecting to install your Wireless AP. 6 The next task on page 3. Installing Your Wireless AP Installing Your Wireless AP Before continuing, ensure that has a line of interference, such as possible from your Wireless AP. Note: The higher you place your network,...
... page 3) is to it. Keep it as far away as microwave ovens, 2.4 GHz wireless telephones, baby monitors and other wireless devices. Locating Your Wireless AP For maximum performance, install your Wireless AP in a place that you have WLAN stations upstairs from potential sources of sight to ...all the devices connecting to install your Wireless AP. 6 The next task on page 3. Installing Your Wireless AP Installing Your Wireless AP Before continuing, ensure that has a line of interference, such as possible from your Wireless AP. Note: The higher you place your network,...

User Guide
Page 14
... on your network, or a network adapter that's installed in a computer on your network. Your Wireless AP is installed. See Installing the Wireless Access Point Utility on page 8 to the DC-IN port on the Access Point (as shown in Step 2 on the Access Point. Step 4: Connect power. Step 2: Connect LAN. 3 Depending on your network configuration, connect the other...
... on your network, or a network adapter that's installed in a computer on your network. Your Wireless AP is installed. See Installing the Wireless Access Point Utility on page 8 to the DC-IN port on the Access Point (as shown in Step 2 on the Access Point. Step 4: Connect power. Step 2: Connect LAN. 3 Depending on your network configuration, connect the other...
User Guide
Page 15
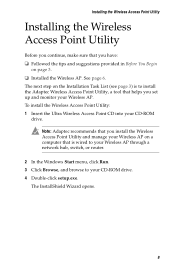
See page 6. Note: Adaptec recommends that you set up and monitor your Wireless AP. To install the Wireless Access Point Utility: 1 Insert the Ultra Wireless Access Point CD into your CD-ROM drive. 4 Double-click setup.exe. The next step on page 3. ❏ Installed the Wireless AP. Installing the Wireless Access Point Utility Installing the Wireless Access Point Utility Before you continue, make sure that is wired...
See page 6. Note: Adaptec recommends that you set up and monitor your Wireless AP. To install the Wireless Access Point Utility: 1 Insert the Ultra Wireless Access Point CD into your CD-ROM drive. 4 Double-click setup.exe. The next step on page 3. ❏ Installed the Wireless AP. Installing the Wireless Access Point Utility Installing the Wireless Access Point Utility Before you continue, make sure that is wired...

User Guide
Page 16
5 Click Next. Installing the Wireless Access Point Utility 6 Type in your User Name and Company Name (optional), then click Next. 9
5 Click Next. Installing the Wireless Access Point Utility 6 Type in your User Name and Company Name (optional), then click Next. 9

User Guide
Page 17
Accept the default folder name, type a new folder name, or select one from the Existing Folders list. Click Next to accept the default destination (recommended), or click Browse to select an alternate destination. 8 You can choose where to store program icons in the Program Folder. Click Next. 10 Installing the Wireless Access Point Utility 7 The InstallShield Wizard chooses a default destination folder for the software files.
Accept the default folder name, type a new folder name, or select one from the Existing Folders list. Click Next to accept the default destination (recommended), or click Browse to select an alternate destination. 8 You can choose where to store program icons in the Program Folder. Click Next. 10 Installing the Wireless Access Point Utility 7 The InstallShield Wizard chooses a default destination folder for the software files.

User Guide
Page 18
Installing the Wireless Access Point Utility 9 Click Finish to continue. 11 The Wireless Access Point Utility icon appears on page 12 to complete the installation. The Wireless Access Point Utility is installed. See Setting Your Wireless AP's IP Address on your desktop.
Installing the Wireless Access Point Utility 9 Click Finish to continue. 11 The Wireless Access Point Utility icon appears on page 12 to complete the installation. The Wireless Access Point Utility is installed. See Setting Your Wireless AP's IP Address on your desktop.
User Guide
Page 19
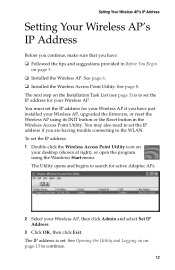
... desktop (shown at right), or open the program using its INIT button or the Reset button in the Wireless Access Point Utility. See page 8. The Utility opens and begins to search for your Wireless AP, then click Admin and select Set IP Address. 3 Click OK, then click Exit. See Opening ... if you are having trouble connecting to set the IP address: 1 Double-click the Wireless Access Point Utility icon on page 3. ❏ Installed the Wireless AP. To set the IP address for active Adaptec APs. 2 Select your Wireless AP. The IP address is to the WLAN. You may also need to continue. ...
... desktop (shown at right), or open the program using its INIT button or the Reset button in the Wireless Access Point Utility. See page 8. The Utility opens and begins to search for your Wireless AP, then click Admin and select Set IP Address. 3 Click OK, then click Exit. See Opening ... if you are having trouble connecting to set the IP address: 1 Double-click the Wireless Access Point Utility icon on page 3. ❏ Installed the Wireless AP. To set the IP address for active Adaptec APs. 2 Select your Wireless AP. The IP address is to the WLAN. You may also need to continue. ...
User Guide
Page 20
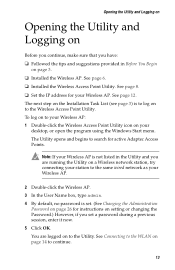
...wired network as your desktop, or open the program using the Windows Start menu. See page 6. ❏ Installed the Wireless Access Point Utility. See page 8. ❏ Set the IP address for your station to search for instructions on setting or changing the...Wireless network station, try connecting your Wireless AP. See page 12. See Connecting to the WLAN on page 14 to the Utility. Opening the Utility and Logging on Opening the Utility and Logging on Before you continue, make sure that you set . (See Changing the Administration Password on page 26 for active Adaptec Access Points...
...wired network as your desktop, or open the program using the Windows Start menu. See page 6. ❏ Installed the Wireless Access Point Utility. See page 8. ❏ Set the IP address for your station to search for instructions on setting or changing the...Wireless network station, try connecting your Wireless AP. See page 12. See Connecting to the WLAN on page 14 to the Utility. Opening the Utility and Logging on Opening the Utility and Logging on Before you continue, make sure that you set . (See Changing the Administration Password on page 26 for active Adaptec Access Points...
User Guide
Page 21
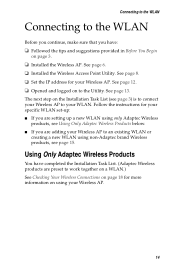
.... See page 12. ❏ Opened and logged on the Installation Task List (see Using Only Adaptec Wireless Products below. ■ If you have completed the Installation Task List. (Adaptec Wireless products are adding your WLAN. Follow the instructions for your specific WLAN set-up: ■ If you ...are setting up a new WLAN using only Adaptec Wireless products, see page 3) is to connect your Wireless AP to your Wireless AP to the Utility. See page 6. ❏ Installed the Wireless Access Point Utility. The next step on to an existing WLAN or creating a new ...
.... See page 12. ❏ Opened and logged on the Installation Task List (see Using Only Adaptec Wireless Products below. ■ If you have completed the Installation Task List. (Adaptec Wireless products are adding your WLAN. Follow the instructions for your specific WLAN set-up: ■ If you ...are setting up a new WLAN using only Adaptec Wireless products, see page 3) is to connect your Wireless AP to your Wireless AP to the Utility. See page 6. ❏ Installed the Wireless Access Point Utility. The next step on to an existing WLAN or creating a new ...