
User Guide
Page 5
...EN61000-4-11 (1994) Supply dips and variation: 30% and 100% In addition, all requirements of the FCC rules. Adaptec, Inc. EN61000-4-5 (1995) Surges ±1 kV differential mode, ±2 kV common mode - Cet appareil num&#...equipment based on , the user is encouraged to try to a television or radio. ASC-1045/ASC-1405 Tested to Comply With FCC Standards FOR HOME OR OFFICE USE European Union Compliance Statement...Technology Equipment has been tested and found to the Australian/New Zealand standard AS/NZS 3548 set out by one or more of the following two conditions: (1) this device may not ...
...EN61000-4-11 (1994) Supply dips and variation: 30% and 100% In addition, all requirements of the FCC rules. Adaptec, Inc. EN61000-4-5 (1995) Surges ±1 kV differential mode, ±2 kV common mode - Cet appareil num&#...equipment based on , the user is encouraged to try to a television or radio. ASC-1045/ASC-1405 Tested to Comply With FCC Standards FOR HOME OR OFFICE USE European Union Compliance Statement...Technology Equipment has been tested and found to the Australian/New Zealand standard AS/NZS 3548 set out by one or more of the following two conditions: (1) this device may not ...
User Guide
Page 7
... Red Hat or SUSE Linux Enterprise Server 29 7 Configuring the Controller Utility Using the Adaptec Configuration Utility 31 Starting Adaptec Configuration Utility 31 Exiting Configuration Utility 31 Using the Controller Configuration Utility 31 Viewing the Controller Properties 32 Setting the Controller Configuration 33 Viewing the PHY Configuration 34 Using the Disk Utilities 35...
... Red Hat or SUSE Linux Enterprise Server 29 7 Configuring the Controller Utility Using the Adaptec Configuration Utility 31 Starting Adaptec Configuration Utility 31 Exiting Configuration Utility 31 Using the Controller Configuration Utility 31 Viewing the Controller Properties 32 Setting the Controller Configuration 33 Viewing the PHY Configuration 34 Using the Disk Utilities 35...
User Guide
Page 16
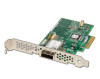
...9679; Large memory-mapped address ranges Note: Refer to -date operating system version support, visit www.adaptec.com. ● At least 256 MB of RAM ● Available PCIe slot ● 40 MB... CD for the Adaptec SATA/SAS 1405 or 1045 Controller ● Readme files ● Cable (1405 kit only) ● Low-profile bracket ● Adaptec SATA/SAS 1405, 1045 Controller Quickstart Guide System... Package Contents and System Requirements l 16 Package Contents ● Adaptec SATA/SAS 1405 or 1045 Controller ● Embedded in the controller's BIOS are supported. Used to modify the controller and...
...9679; Large memory-mapped address ranges Note: Refer to -date operating system version support, visit www.adaptec.com. ● At least 256 MB of RAM ● Available PCIe slot ● 40 MB... CD for the Adaptec SATA/SAS 1405 or 1045 Controller ● Readme files ● Cable (1405 kit only) ● Low-profile bracket ● Adaptec SATA/SAS 1405, 1045 Controller Quickstart Guide System... Package Contents and System Requirements l 16 Package Contents ● Adaptec SATA/SAS 1405 or 1045 Controller ● Embedded in the controller's BIOS are supported. Used to modify the controller and...
User Guide
Page 17
Before You Begin ...18 Installing the SATA/SAS Controller 18 Selecting Disk Drives and Cables 19 Connecting Devices to SATA/SAS Controllers 20 Checking Your Controller and Devices 23 Setting the Boot Controller...23 This chapter explains how to install the SATA/SAS 1405, 1045 controller, and how to connect the disk drives. Installing the SATA/SAS Controller and Disk Drives 4 In this chapter...
Before You Begin ...18 Installing the SATA/SAS Controller 18 Selecting Disk Drives and Cables 19 Connecting Devices to SATA/SAS Controllers 20 Checking Your Controller and Devices 23 Setting the Boot Controller...23 This chapter explains how to install the SATA/SAS 1405, 1045 controller, and how to connect the disk drives. Installing the SATA/SAS Controller and Disk Drives 4 In this chapter...
User Guide
Page 20
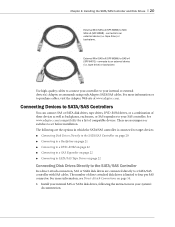
...) - tape drive) or backplane Use high-quality cables to connect your controller to your internal or external device(s).Adaptec recommends using only Adaptec SATA/SAS cables. See www.adaptec.com/compatibility for a list of these devices as well as backplanes, enclosures, or SAS expanders to your SAS ..., SAS or SATA disk drives are no jumpers or switches to a SATA/SAS controller with SAS cables. There are connected directly to set before installation. The number of direct-attached disk drives is connected to target devices. ● Connecting Disk Drives Directly to the SATA/...
...) - tape drive) or backplane Use high-quality cables to connect your controller to your internal or external device(s).Adaptec recommends using only Adaptec SATA/SAS cables. See www.adaptec.com/compatibility for a list of these devices as well as backplanes, enclosures, or SAS expanders to your SAS ..., SAS or SATA disk drives are no jumpers or switches to a SATA/SAS controller with SAS cables. There are connected directly to set before installation. The number of direct-attached disk drives is connected to target devices. ● Connecting Disk Drives Directly to the SATA/...
User Guide
Page 22
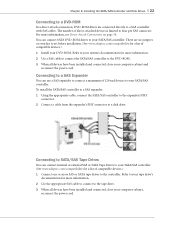
...SAS connector. Refer to your tape drive's documentation for more SAS or SATA tape drives to your SATA/SAS controller. (See www.adaptec.com/compatibility for a list of 128 end devices to the controller. The number of compatible devices.) 1 Install your system's documentation ... devices have been installed and connected, close your computer cabinet and reconnect the power cord. There are connected directly to set before installation. (See www.adaptec.com/compatibility for more information, see Direct-Attach Connections on page 54. Chapter 4: Installing the SATA/SAS Controller and ...
...SAS connector. Refer to your tape drive's documentation for more SAS or SATA tape drives to your SATA/SAS controller. (See www.adaptec.com/compatibility for a list of 128 end devices to the controller. The number of compatible devices.) 1 Install your system's documentation ... devices have been installed and connected, close your computer cabinet and reconnect the power cord. There are connected directly to set before installation. (See www.adaptec.com/compatibility for more information, see Direct-Attach Connections on page 54. Chapter 4: Installing the SATA/SAS Controller and ...
User Guide
Page 23
...and Devices Once you have installed your controller and connected your devices, you can use the Adaptec Configuration Utility (ACU) to check your controller and devices, as described below: 1 Turn on your computer. 2 When the Adaptec screen appears, press Ctrl+A to enter the ACU. 3 Select the SATA/SAS controller to... more than one bootable controller, skip this section. Check whether all the devices are available, if anything appears to the SATA/SAS controller. Setting the Boot Controller Note: If your drives have already been used in another system, select Disk Utilities. The default...
...and Devices Once you have installed your controller and connected your devices, you can use the Adaptec Configuration Utility (ACU) to check your controller and devices, as described below: 1 Turn on your computer. 2 When the Adaptec screen appears, press Ctrl+A to enter the ACU. 3 Select the SATA/SAS controller to... more than one bootable controller, skip this section. Check whether all the devices are available, if anything appears to the SATA/SAS controller. Setting the Boot Controller Note: If your drives have already been used in another system, select Disk Utilities. The default...

User Guide
Page 25
... and connect your Windows Installation CD to complete this task. To create a driver disk: 1 Set your system BIOS so that the driver is on a floppy disk, then press Enter. 6 The computer reads the disk. 7 When the Adaptec SATA/SAS driver is active, a prompt appears at the bottom of the operating systems from...
... and connect your Windows Installation CD to complete this task. To create a driver disk: 1 Set your system BIOS so that the driver is on a floppy disk, then press Enter. 6 The computer reads the disk. 7 When the Adaptec SATA/SAS driver is active, a prompt appears at the bottom of the operating systems from...
User Guide
Page 26
...option from the Menu, then press Enter. 4 When prompted, insert the driver disk, then press any key to continue. 5 Follow the prompts to set up the environment you want . 6 If you are installing other third-party devices, install them now. Chapter 5: Installing the Driver and an Operating ...System l 26 Installing with Red Hat Enterprise Linux You will need your operating system. Installing with your Red Hat Installation CD to set up the environment you want . 6 If you are installing other third-party devices, install them now. Otherwise, select Back. 7 Complete the...
...option from the Menu, then press Enter. 4 When prompted, insert the driver disk, then press any key to continue. 5 Follow the prompts to set up the environment you want . 6 If you are installing other third-party devices, install them now. Chapter 5: Installing the Driver and an Operating ...System l 26 Installing with Red Hat Enterprise Linux You will need your operating system. Installing with your Red Hat Installation CD to set up the environment you want . 6 If you are installing other third-party devices, install them now. Otherwise, select Back. 7 Complete the...
User Guide
Page 28
You will need a floppy disk to the Adaptec Start Menu. 4 Click Create Driver Disk, from the Main Menu. 5 Select one of the operating system. 7 When prompted, insert the floppy disk, and then click ... begin , install and connect your controller kit. 3 Follow the on -screen instructions to -date operating system version support, visit the Adaptec Web Site at www.adaptec.com. To create a driver disk: 1 Set your system BIOS so that your computer boots from this task. Chapter 6: Installing the Driver on Windows: 1 Start or restart Windows...
You will need a floppy disk to the Adaptec Start Menu. 4 Click Create Driver Disk, from the Main Menu. 5 Select one of the operating system. 7 When prompted, insert the floppy disk, and then click ... begin , install and connect your controller kit. 3 Follow the on -screen instructions to -date operating system version support, visit the Adaptec Web Site at www.adaptec.com. To create a driver disk: 1 Set your system BIOS so that your computer boots from this task. Chapter 6: Installing the Driver on Windows: 1 Start or restart Windows...

User Guide
Page 30
Using the Adaptec Configuration Utility 31 Starting Adaptec Configuration Utility 31 Using the Controller Configuration Utility 31 Viewing the Controller Properties 32 Setting the Controller Configuration 33 Using the Disk Utilities ...35 This chapter explains how to configure the BIOS settings. Before you begin, familiarize yourself with the controller's physical features. See Chapter 2, About SATA/SAS Controllers. Configuring the Controller Utility 7 In this chapter...
Using the Adaptec Configuration Utility 31 Starting Adaptec Configuration Utility 31 Using the Controller Configuration Utility 31 Viewing the Controller Properties 32 Setting the Controller Configuration 33 Using the Disk Utilities ...35 This chapter explains how to configure the BIOS settings. Before you begin, familiarize yourself with the controller's physical features. See Chapter 2, About SATA/SAS Controllers. Configuring the Controller Utility 7 In this chapter...

User Guide
Page 31
...system will display the 16-digit Adapter WWN. Using the Controller Configuration, you can verify, format, or locate drives, set a bootable device, set the PHY rate, rewind a tape device, and locate a slot in an enclosure. Note: The controller can modify the Controller...detecting the SATA/SAS controller, it . Chapter 7: Configuring the Controller Utility l 31 Using the Adaptec Configuration Utility The Adaptec Configuration Utility (ACU) allows you to manage and configure the Adaptec SATA/SAS controller and the respective devices that are available in the system are displayed as shown ...
...system will display the 16-digit Adapter WWN. Using the Controller Configuration, you can verify, format, or locate drives, set a bootable device, set the PHY rate, rewind a tape device, and locate a slot in an enclosure. Note: The controller can modify the Controller...detecting the SATA/SAS controller, it . Chapter 7: Configuring the Controller Utility l 31 Using the Adaptec Configuration Utility The Adaptec Configuration Utility (ACU) allows you to manage and configure the Adaptec SATA/SAS controller and the respective devices that are available in the system are displayed as shown ...
User Guide
Page 33
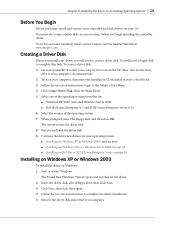
...INT13, INT19 handler. The Controller Configuration displays the following information. ● PCI slot number in which the SATA/SAS controller is set to Disable, it will discover all the devices that are connected to the controller and hooks the INT13, INT19 handler. Chapter ...7: Configuring the Controller Utility l 33 The Controller Properties displays the following default settings. ● Runtime BIOS - Enable If the Runtime BIOS is connected ● Interrupt (IRQ) channel and I/O Port address of the selected...
...INT13, INT19 handler. The Controller Configuration displays the following information. ● PCI slot number in which the SATA/SAS controller is set to Disable, it will discover all the devices that are connected to the controller and hooks the INT13, INT19 handler. Chapter ...7: Configuring the Controller Utility l 33 The Controller Properties displays the following default settings. ● Runtime BIOS - Enable If the Runtime BIOS is connected ● Interrupt (IRQ) channel and I/O Port address of the selected...

User Guide
Page 34
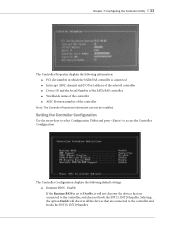
... messages, select the option Disable. ● CTRL-A Message Display - If you wish to access the PHY Configuration. Note: To load the default settings, press . Enable If the CTRL+A Message Display option is Enable, it will display all the physical devices that you want to boot the system...display. Use the arrow keys to select the required values and then to the system during the POST operation. Note: To load the default settings, press . Controller If the BBS Support is Enable, it will stop the CTRL+A message from one of physical devices that are connected ...
... messages, select the option Disable. ● CTRL-A Message Display - If you wish to access the PHY Configuration. Note: To load the default settings, press . Enable If the CTRL+A Message Display option is Enable, it will display all the physical devices that you want to boot the system...display. Use the arrow keys to select the required values and then to the system during the POST operation. Note: To load the default settings, press . Controller If the BBS Support is Enable, it will stop the CTRL+A message from one of physical devices that are connected ...

User Guide
Page 35
...displayed in the Disk Utility. 1 Format a Disk 2 Verify a Disk 3 Locate a Disk 4 Enable/Disable the Write Cache setting 5 View the PHY connection rate for the Disk 6 Set a Bootable Device 7 Rewind/Eject for Tape Devices 8 Locate a SES Slot for Enclosures Note: The Rewind and Eject option can...to cancel. The disks/devices that is ready to format is indicated with "%" symbol. Click Yes to format or No to access the Adaptec Configuration Utility. From the Options menu, select Disk Utilities. Chapter 7: Configuring the Controller Utility l 35 Using the Disk Utilities The Disk Utilities...
...displayed in the Disk Utility. 1 Format a Disk 2 Verify a Disk 3 Locate a Disk 4 Enable/Disable the Write Cache setting 5 View the PHY connection rate for the Disk 6 Set a Bootable Device 7 Rewind/Eject for Tape Devices 8 Locate a SES Slot for Enclosures Note: The Rewind and Eject option can...to cancel. The disks/devices that is ready to format is indicated with "%" symbol. Click Yes to format or No to access the Adaptec Configuration Utility. From the Options menu, select Disk Utilities. Chapter 7: Configuring the Controller Utility l 35 Using the Disk Utilities The Disk Utilities...

User Guide
Page 36
... Enable to enable the Drive Write Cache and improve I/O performance. ● Select Disable to cancel. Note: You can set only one device as a bootable device and press . 2 Now select Set Bootable and press . ● Select Enable to boot from the device. ● Select Disable to locate and press ...Now select Indicate a LED and press . Click Yes to verify the disk or No to disable the Drive Write Cache and minimize I/O performance. Setting a Bootable Device 1 Select the device you want to disable the marked bootable device. Use this option to locate a specific drive. Use this ...
... Enable to enable the Drive Write Cache and improve I/O performance. ● Select Disable to cancel. Note: You can set only one device as a bootable device and press . 2 Now select Set Bootable and press . ● Select Enable to boot from the device. ● Select Disable to locate and press ...Now select Indicate a LED and press . Click Yes to verify the disk or No to disable the Drive Write Cache and minimize I/O performance. Setting a Bootable Device 1 Select the device you want to disable the marked bootable device. Use this option to locate a specific drive. Use this ...

User Guide
Page 37
... screen. The following option appears. ● Blink LED on all slots - Use this option to blink on all slots to ensure that is set as a bootable device is set to eject the tape. Locating a SES Slot for Tape Devices Select Rewind to rewind the tape and select Eject to "Controller" on specific... slot - Note: The selected bootable device will be the boot device when "BBS Support" has been set to Device, the system BIOS can boot from any of the attached SATA/SAS devices.
... screen. The following option appears. ● Blink LED on all slots - Use this option to blink on all slots to ensure that is set as a bootable device is set to eject the tape. Locating a SES Slot for Tape Devices Select Rewind to rewind the tape and select Eject to "Controller" on specific... slot - Note: The selected bootable device will be the boot device when "BBS Support" has been set to Device, the system BIOS can boot from any of the attached SATA/SAS devices.

User Guide
Page 39
... is complete. This has a built-in I2C connector, which helps in enabling the function of four SATA devices or a backplane. Note: Depending on the jumper settings, the Backplane can be connected to the I2C interface of backplane, and this helps in enabling the function of drives - If a SATA drive is present...
... is complete. This has a built-in I2C connector, which helps in enabling the function of four SATA devices or a backplane. Note: Depending on the jumper settings, the Backplane can be connected to the I2C interface of backplane, and this helps in enabling the function of drives - If a SATA drive is present...

User Guide
Page 46
... and it cannot be performed. You do not have to a LIST command: A:\> AFU LIST Adaptec Flash Utility V1.0 (c)Adaptec Inc. 1999-2008. Controllers Detected and Recognized: Controller #0 (03:01:00) ASC-1045/1405 SAVE The SAVE command saves the contents of command syntax that will display the help: A:\>... AFU HELP A:\> AFU /? By default, the AFU value set of controller(s) on your computer. Appendix 10: Using the Adaptec Flash Utility for the SAVE command is ...
... and it cannot be performed. You do not have to a LIST command: A:\> AFU LIST Adaptec Flash Utility V1.0 (c)Adaptec Inc. 1999-2008. Controllers Detected and Recognized: Controller #0 (03:01:00) ASC-1045/1405 SAVE The SAVE command saves the contents of command syntax that will display the help: A:\>... AFU HELP A:\> AFU /? By default, the AFU value set of controller(s) on your computer. Appendix 10: Using the Adaptec Flash Utility for the SAVE command is ...

User Guide
Page 49
..., to update. Version Information for DOS ● 49 A:\> AFU VERSION /C 0 Adaptec Flash Utility V1.0 (c)Adaptec Inc. 1999-2008. For example, to update. All Rights Reserved. If the computer has not been set up to boot from the bootable floppy disk, enter the system setup utility to change...all SATA/SAS controllers simultaneously: AFU UPDATE /C all 6 The AFU reads the disk and updates the flash. Appendix 10: Using the Adaptec Flash Utility for Controller #0 (ASC-1045/1405) ROM: Build 0018 [VALID] Updating Flash Using AFU Command Line This section provides step-by a command (see page 44)....
..., to update. Version Information for DOS ● 49 A:\> AFU VERSION /C 0 Adaptec Flash Utility V1.0 (c)Adaptec Inc. 1999-2008. For example, to update. All Rights Reserved. If the computer has not been set up to boot from the bootable floppy disk, enter the system setup utility to change...all SATA/SAS controllers simultaneously: AFU UPDATE /C all 6 The AFU reads the disk and updates the flash. Appendix 10: Using the Adaptec Flash Utility for Controller #0 (ASC-1045/1405) ROM: Build 0018 [VALID] Updating Flash Using AFU Command Line This section provides step-by a command (see page 44)....