User Manual
Page 3
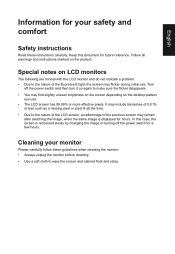
... instructions Read these guidelines when cleaning the monitor: • Always unplug the monitor before cleaning. • Use a soft cloth to the nature of the previous screen may remain after switching the image, when the same image is recovered slowly by changing the image or turning off the power switch and then turn it on again to the nature of the LCD screen, an afterimage of the fluorescent light, the screen...
... instructions Read these guidelines when cleaning the monitor: • Always unplug the monitor before cleaning. • Use a soft cloth to the nature of the previous screen may remain after switching the image, when the same image is recovered slowly by changing the image or turning off the power switch and then turn it on again to the nature of the LCD screen, an afterimage of the fluorescent light, the screen...
User Manual
Page 4
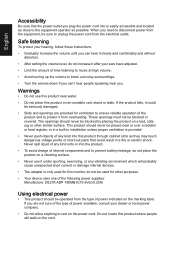
... be blocked or covered. The openings should never be blocked by placing the product on a bed, sofa, rug or other purposes. • Your device uses one of the following power supplies: Manufacture: DELTA:ADP-180MB K(19.5Vdc/9.23A) Using electrical power • This...touch dangerous voltage points or short-out parts that the power outlet you plug the power cord into the product. • To avoid dmage of power available, consult your hearing, follow these instructions. • Gradually increase the volume until you need to disconnect power from overheating. Warnings • Do not use...
... be blocked or covered. The openings should never be blocked by placing the product on a bed, sofa, rug or other purposes. • Your device uses one of the following power supplies: Manufacture: DELTA:ADP-180MB K(19.5Vdc/9.23A) Using electrical power • This...touch dangerous voltage points or short-out parts that the power outlet you plug the power cord into the product. • To avoid dmage of power available, consult your hearing, follow these instructions. • Gradually increase the volume until you need to disconnect power from overheating. Warnings • Do not use...
User Manual
Page 5
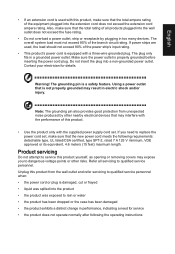
... exceed the extension cord ampere rating. Note: The grounding pin also provides good protection from the wall outlet and refer servicing to qualified service personnel. English • If an extension cord is used , the load should not exceed 80% of the power strip's input rating. • This product's power cord is equipped with the supplied power supply cord set , make sure that the new power cord meets the following the operating instructions
... exceed the extension cord ampere rating. Note: The grounding pin also provides good protection from the wall outlet and refer servicing to qualified service personnel. English • If an extension cord is used , the load should not exceed 80% of the power strip's input rating. • This product's power cord is equipped with the supplied power supply cord set , make sure that the new power cord meets the following the operating instructions

User Manual
Page 6
... to turn off your device in any area with a potentially explosive atmosphere are covered by a qualified technician to restore the product to environmental protection and views recycling, in progress. chemical plants; Keep them ...Acer are in the form of salvaging and disposal of used equipment, as grain, dust or metal powders. For more information and help when recycling, please go to reduce the environmental impact of our other controls may contain small parts. Switch off your vehicle engine. Areas with a potentially explosive atmosphere and obey all signs and instructions...
... to turn off your device in any area with a potentially explosive atmosphere are covered by a qualified technician to restore the product to environmental protection and views recycling, in progress. chemical plants; Keep them ...Acer are in the form of salvaging and disposal of used equipment, as grain, dust or metal powders. For more information and help when recycling, please go to reduce the environmental impact of our other controls may contain small parts. Switch off your vehicle engine. Areas with a potentially explosive atmosphere and obey all signs and instructions...

User Manual
Page 7
... tips for comfortable use . Users are also at risk of physical injury after prolonged use Computer users may appear in one fixed posture • avoid slouching forward and/or leaning backward • stand up and walk around regularly to computer use . Incorrect computer usage may occasionally misfire or appear as black or red dots. English LCD pixel statement The LCD unit is produced...
... tips for comfortable use . Users are also at risk of physical injury after prolonged use Computer users may appear in one fixed posture • avoid slouching forward and/or leaning backward • stand up and walk around regularly to computer use . Incorrect computer usage may occasionally misfire or appear as black or red dots. English LCD pixel statement The LCD unit is produced...

User Manual
Page 8
... using drapes, shades or blinds • using a task light • changing the display's viewing angle • using a glare-reduction filter • using a display visor, such as a piece of time. Display • Keep your display clean. • Keep your head at a higher level than the top edge of the display so your eyes point downward when looking at the middle of the display. • Adjust the display brightness and/or contrast...
... using drapes, shades or blinds • using a task light • changing the display's viewing angle • using a glare-reduction filter • using a display visor, such as a piece of time. Display • Keep your display clean. • Keep your head at a higher level than the top edge of the display so your eyes point downward when looking at the middle of the display. • Adjust the display brightness and/or contrast...

User Manual
Page 11
... Developing good work habits viii Declaration of Conformity ix Federal Communications Commission Declaration of Conformity x Unpacking 1 Attaching the base (for selected models) 2 Screen position adjustment 3 Connecting the adapter and AC Power cord 3 Power saving Display Data Channel (DDC) Connector pin assignment 4 19-pin color display signal cable 4 20-pin color display signal cable 4 Standard timing table 7 Installation 9 Users controls 10 Panel controls 10 Using the Shortcut Menu 11 The Function page 12 Troubleshooting 18 HDMI/DP/DP ALT Mode (Optional...
... Developing good work habits viii Declaration of Conformity ix Federal Communications Commission Declaration of Conformity x Unpacking 1 Attaching the base (for selected models) 2 Screen position adjustment 3 Connecting the adapter and AC Power cord 3 Power saving Display Data Channel (DDC) Connector pin assignment 4 19-pin color display signal cable 4 20-pin color display signal cable 4 Standard timing table 7 Installation 9 Users controls 10 Panel controls 10 Using the Shortcut Menu 11 The Function page 12 Troubleshooting 18 HDMI/DP/DP ALT Mode (Optional...

User Manual
Page 13
English SCREEN POSITION ADJUSTMENT In oder to optimize the best viewing position, you can adjust the height/tilt of the monitor. • Height Adjustment After pressing the top of the monitor then you can 35 degrees of recline be offered for an example of elevation. 5° 35° Only at the highest point can adjust the height of the monitor. 1 2 130mm • Tilt Please see the illustration below for the angle of the tilt range.
English SCREEN POSITION ADJUSTMENT In oder to optimize the best viewing position, you can adjust the height/tilt of the monitor. • Height Adjustment After pressing the top of the monitor then you can 35 degrees of recline be offered for an example of elevation. 5° 35° Only at the highest point can adjust the height of the monitor. 1 2 130mm • Tilt Please see the illustration below for the angle of the tilt range.

User Manual
Page 14
... from the display controller, as indicated by the control signal from Active OFF state back to ON state is activated. No user-adjustment is required. • Plug one end of H05VV-F cord and plug rated 10 A/250 V. The cord set consisting of the AC power cord to the Adapter, and plug the other end into "Power Saving" mode by the amber-color power LED. English Connecting the adapter and AC Power cord • Check first to make sure that...
... from the display controller, as indicated by the control signal from Active OFF state back to ON state is activated. No user-adjustment is required. • Plug one end of H05VV-F cord and plug rated 10 A/250 V. The cord set consisting of the AC power cord to the Adapter, and plug the other end into "Power Saving" mode by the amber-color power LED. English Connecting the adapter and AC Power cord • Check first to make sure that...

User Manual
Page 15
... 2+ 9 ML_Lane 211 GND 13 KONFIG1 15 AUX CH+ 17 AUX CH19 Return PIN No. English Display Data Channel (DDC) To make installation easier, so long as your system supports the DDC protocol, the monitor is a communication protocol through which the monitor automatically informs the host system about its capabilities; The monitor supports the DDC2B standard. 20-pin color display signal cable PIN No.
... 2+ 9 ML_Lane 211 GND 13 KONFIG1 15 AUX CH+ 17 AUX CH19 Return PIN No. English Display Data Channel (DDC) To make installation easier, so long as your system supports the DDC protocol, the monitor is a communication protocol through which the monitor automatically informs the host system about its capabilities; The monitor supports the DDC2B standard. 20-pin color display signal cable PIN No.
User Manual
Page 18
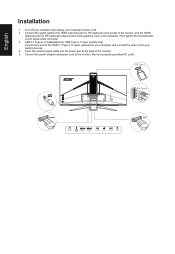
... power cord to the monitor, then to your computer's power cord. 2. USB Type C USB Type A DP Connect the signal cable to the HDMI (optional) and /or DP (optional) input socket of the monitor, and the HDMI (optional) and /or DP (optional) output socket of the monitor. 5. Then tighten the thumbscrews on the computer. Insert the monitor power cable into the power port at the back of the graphics card on the signal cable connector. 3. Turn...
... power cord to the monitor, then to your computer's power cord. 2. USB Type C USB Type A DP Connect the signal cable to the HDMI (optional) and /or DP (optional) input socket of the monitor, and the HDMI (optional) and /or DP (optional) output socket of the monitor. 5. Then tighten the thumbscrews on the computer. Insert the monitor power cable into the power port at the back of the graphics card on the signal cable connector. 3. Turn...
User Manual
Page 19
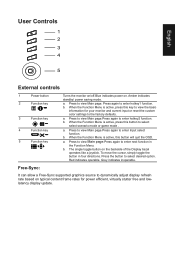
... Menu is active, this key to view the basic information for power efficient, virtually stutter free and lowlatency display update. The single toggle button on typical content frame rates for your monitor and current input or reset the custom color settings to select desired option. a. Press the button to the factory defaults. b. English User Controls 1 2 3 4 5 External controls 1 Power button 2 Function key / 3 Function key / 4 Function key /X 5 Function key / Turns the monitor on/off.Blue indicates power on. a. Red...
... Menu is active, this key to view the basic information for power efficient, virtually stutter free and lowlatency display update. The single toggle button on typical content frame rates for your monitor and current input or reset the custom color settings to select desired option. a. Press the button to the factory defaults. b. English User Controls 1 2 3 4 5 External controls 1 Power button 2 Function key / 3 Function key / 4 Function key /X 5 Function key / Turns the monitor on/off.Blue indicates power on. a. Red...
User Manual
Page 20
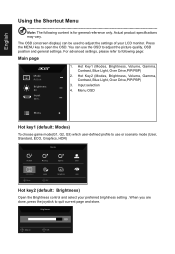
The OSD (onscreen display) can use or scenario mode (User, Standard, ECO, Graphics, HDR) Modes Action Racing Sports User Standard ECO Graphics HDR Move OK Hot key2 (default: Brightness) Open the Brightness control and select your LCD monitor. You can be used to adjust the picture quality, OSD position and general settings. Input selection 4. Actual product specifications may vary. Press the MENU key to quit current page and store. Hot Key2 (Modes, Brightness, Volume, Gamma, Contrast, Blue Light, Over Drive...
The OSD (onscreen display) can use or scenario mode (User, Standard, ECO, Graphics, HDR) Modes Action Racing Sports User Standard ECO Graphics HDR Move OK Hot key2 (default: Brightness) Open the Brightness control and select your LCD monitor. You can be used to adjust the picture quality, OSD position and general settings. Input selection 4. Actual product specifications may vary. Press the MENU key to quit current page and store. Hot Key2 (Modes, Brightness, Volume, Gamma, Contrast, Blue Light, Over Drive...

User Manual
Page 21
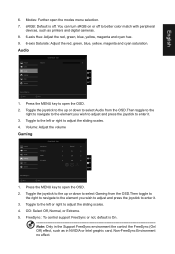
... the brightness without changing lighter shades. 8. User Brightness Contrast Black Boost Blue Light ACM HDR Super Sharpness Enter 80 50 9 Off Off Off X Off 1. Contrast: Adjust the contrast from 0 to exit current page and store. Blue Light: Filters out blue light to 100 Note: Sets the degree of difference between light and dark shades. 6. Input Input HDMI 1(2.0) Auto Source Off Move Enter The Function page Open the Function page to open the OSD. 2. Press the MENU...
... the brightness without changing lighter shades. 8. User Brightness Contrast Black Boost Blue Light ACM HDR Super Sharpness Enter 80 50 9 Off Off Off X Off 1. Contrast: Adjust the contrast from 0 to exit current page and store. Blue Light: Filters out blue light to 100 Note: Sets the degree of difference between light and dark shades. 6. Input Input HDMI 1(2.0) Auto Source Off Move Enter The Function page Open the Function page to open the OSD. 2. Press the MENU...

User Manual
Page 22
... be automatically set to Auto will not jump to make images sharper and clearer. Color Picture Color Audio Gaming OSD System Save setting to open the OSD. 2. Move Enter 1. You can simulate high-resolution images by boosting the pixel density of the original source to "User" Mode. 11. Super Sharpness technology can choose Cool, Normal, Warm, Bluelight or User. Color temperature: Default is 2.2 (standard value for Windows). 5. Move Picture Color Audio Gaming OSD System Game Mode - Gamma mode allows...
... be automatically set to Auto will not jump to make images sharper and clearer. Color Picture Color Audio Gaming OSD System Save setting to open the OSD. 2. Move Enter 1. You can simulate high-resolution images by boosting the pixel density of the original source to "User" Mode. 11. Super Sharpness technology can choose Cool, Normal, Warm, Bluelight or User. Color temperature: Default is 2.2 (standard value for Windows). 5. Move Picture Color Audio Gaming OSD System Game Mode - Gamma mode allows...
User Manual
Page 23
..., such as printers and digital cameras. 8. 6-axis Hue: Adjust the red, green, blue, yellow, magenta and cyan hue. 9. 6-axis Saturate: Adjust the red, green, blue, yellow, magenta and cyan saturation. Toggle to the left or right to enter it . 3. English 6. Modes: Further open the OSD. 2. sRGB: Default is On Note: Only in NVIDIA or Intel graphic card, Non-FreeSync Environment no effect. User Volume 0 X Save setting to open the modes menu selection. 7.
..., such as printers and digital cameras. 8. 6-axis Hue: Adjust the red, green, blue, yellow, magenta and cyan hue. 9. 6-axis Saturate: Adjust the red, green, blue, yellow, magenta and cyan saturation. Toggle to the left or right to enter it . 3. English 6. Modes: Further open the OSD. 2. sRGB: Default is On Note: Only in NVIDIA or Intel graphic card, Non-FreeSync Environment no effect. User Volume 0 X Save setting to open the modes menu selection. 7.
User Manual
Page 24
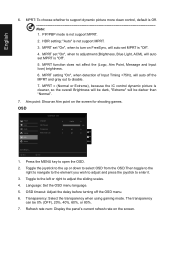
MPRT set "On", when to adjustment (Brightness, Blue Light, ACM), will auto set MPRT is "Off". 5. MPRT set "On", when to turn on FreeSync, will auto set MPRT is Off Note: 1. MPRT function does not affect the (Logo, Aim Point, Message and Input Icon) brightness. 6. PIP/PBP mode is not support MPRT. 3. HDR setting: "Auto" is not support MPRT. 2. MPRT setting "On", when detection of Input Timing MPRT: To choose whether to support dynamic picture more clean control, default is "Off". 4. English 6.
MPRT set "On", when to adjustment (Brightness, Blue Light, ACM), will auto set MPRT is "Off". 5. MPRT set "On", when to turn on FreeSync, will auto set MPRT is Off Note: 1. MPRT function does not affect the (Logo, Aim Point, Message and Input Icon) brightness. 6. PIP/PBP mode is not support MPRT. 3. HDR setting: "Auto" is not support MPRT. 2. MPRT setting "On", when detection of Input Timing MPRT: To choose whether to support dynamic picture more clean control, default is "Off". 4. English 6.
User Manual
Page 25
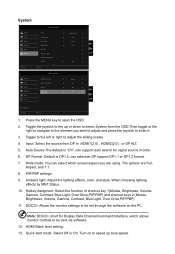
... the software on to enter it. 3. PIP/PBP settings 9. Quick start mode: Select Off or On. Auto Source:The default is DP1.2, can select which allows monitor controls to select System from DP In ,HDMI1(2.0) , HDMI2(2.0) , or DP ALT. 5. Ambient light: Adjust the lighting effects, color, and style. Turn on the PC. Standard Picture Color Audio Gaming OSD System Input Auto Source DP Format Wide Mode PIP/PBP Ambient Light Hot Key Assignment DDC/CI HDMI...
... the software on to enter it. 3. PIP/PBP settings 9. Quick start mode: Select Off or On. Auto Source:The default is DP1.2, can select which allows monitor controls to select System from DP In ,HDMI1(2.0) , HDMI2(2.0) , or DP ALT. 5. Ambient light: Adjust the lighting effects, color, and style. Turn on the PC. Standard Picture Color Audio Gaming OSD System Input Auto Source DP Format Wide Mode PIP/PBP Ambient Light Hot Key Assignment DDC/CI HDMI...
User Manual
Page 26
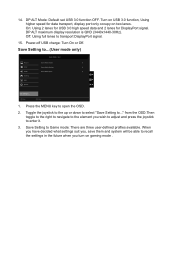
14. Power-off USB charge: Turn On or Off. User Picture Game Mode Action Color Game Mode Racting Audio Game Mode Sport Gaming OSD System X Save setting to transport DisplayPort signal. 15. DP ALT Mode: Default set USB 3.0 function OFF. Off: Using full lanes to ... from the OSD.Then toggle to the right to navigate to enter it. 3. DP ALT maximum display resolution is QHD (3440x1440-30Hz). Toggle the joystick to the up...
14. Power-off USB charge: Turn On or Off. User Picture Game Mode Action Color Game Mode Racting Audio Game Mode Sport Gaming OSD System X Save setting to transport DisplayPort signal. 15. DP ALT Mode: Default set USB 3.0 function OFF. Off: Using full lanes to ... from the OSD.Then toggle to the right to navigate to enter it. 3. DP ALT maximum display resolution is QHD (3440x1440-30Hz). Toggle the joystick to the up...
User Manual
Page 27
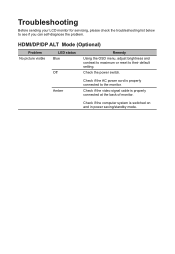
HDMI/DP/DP ALT Mode (Optional) Problem No picture visible LED status Blue Off Remedy Using the OSD menu, adjust brightness and contrast to maximum or reset to the monitor. Amber Check if the AC power cord is properly connected to their default setting. Troubleshooting Before sending your LCD monitor for servicing, please check the troubleshooting list below to see if you can self-diagnose the problem. Check the power switch. Check if the video signal cable is switched on and in power saving/standby mode. Check if the computer...
HDMI/DP/DP ALT Mode (Optional) Problem No picture visible LED status Blue Off Remedy Using the OSD menu, adjust brightness and contrast to maximum or reset to the monitor. Amber Check if the AC power cord is properly connected to their default setting. Troubleshooting Before sending your LCD monitor for servicing, please check the troubleshooting list below to see if you can self-diagnose the problem. Check the power switch. Check if the video signal cable is switched on and in power saving/standby mode. Check if the computer...


