
User Manual
Page 3
... effective pixels. Keep this case, the screen is recovered slowly by changing the image or turning off the power switch and then turn it on again to make sure the flicker disappears. • You may include blemishes of 0.01% or less such as a missing pixel or pixel lit all warnings and instructions marked on LCD monitors The following are normal with the LCD monitor and do not indicate a problem...
... effective pixels. Keep this case, the screen is recovered slowly by changing the image or turning off the power switch and then turn it on again to make sure the flicker disappears. • You may include blemishes of 0.01% or less such as a missing pixel or pixel lit all warnings and instructions marked on LCD monitors The following are normal with the LCD monitor and do not indicate a problem...

User Manual
Page 4
...-out parts that the power outlet you need to disconnect power from the equipment, be sure to unplug the power cord from overheating. If you can hear it clearly and comfortably and without distortion. • After setting the volume level, do not place the product on a vibrating surface. • Never use this product near you. When you plug the power cord into...
...-out parts that the power outlet you need to disconnect power from the equipment, be sure to unplug the power cord from overheating. If you can hear it clearly and comfortably and without distortion. • After setting the volume level, do not place the product on a vibrating surface. • Never use this product near you. When you plug the power cord into...
User Manual
Page 5
... yourself, as opening or removing covers may result in performance, indicating a need to service this product. • Use the product only with the performance of the branch circuit rating. Make sure the power outlet is a safety feature. Warning! Unplug this product from unexpected noise produced by plugging in a grounded power outlet. The grounding pin is properly grounded before inserting the power cord plug. Note...
... yourself, as opening or removing covers may result in performance, indicating a need to service this product. • Use the product only with the performance of the branch circuit rating. Make sure the power outlet is a safety feature. Warning! Unplug this product from unexpected noise produced by plugging in a grounded power outlet. The grounding pin is properly grounded before inserting the power cord plug. Note...

User Manual
Page 6
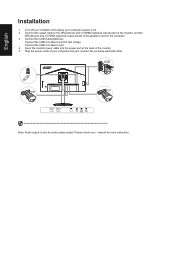
...best working procedures to this electronic device into the trash when discarding. For more information and help when recycling, please go to reduce the environmental impact of other products. English Note: Adjust only those controls that are covered by a qualified technician to restore the product to turn...www.acer-group.com/public/Sustainability/ sustainability01.htm IT Equipment Recycling Information Acer is strongly committed to environmental protection and views recycling, in damage and will often require extensive work by the operating instructions, since improper adjustment of...
...best working procedures to this electronic device into the trash when discarding. For more information and help when recycling, please go to reduce the environmental impact of other products. English Note: Adjust only those controls that are covered by a qualified technician to restore the product to turn...www.acer-group.com/public/Sustainability/ sustainability01.htm IT Equipment Recycling Information Acer is strongly committed to environmental protection and views recycling, in damage and will often require extensive work by the operating instructions, since improper adjustment of...

User Manual
Page 7
... working conditions, personal health and other recurring or persistent discomfort and/or pain related to remove the strain on the recorded image and does not constitute a malfunction. Incorrect computer usage may occasionally misfire or appear as black or red dots. Tips and information for power management: • Activate display's Sleep mode within 5 minutes of physical injury after prolonged use Computer users...
... working conditions, personal health and other recurring or persistent discomfort and/or pain related to remove the strain on the recorded image and does not constitute a malfunction. Incorrect computer usage may occasionally misfire or appear as black or red dots. Tips and information for power management: • Activate display's Sleep mode within 5 minutes of physical injury after prolonged use Computer users...

User Manual
Page 11
... of your vision 8 Developing good work habits 8 Federal Communications Commission Declaration of Conformity 10 Unpacking 12 SCREEN POSITION ADJUSTMENT 13 Connecting the adapter and AC Power cord 14 Power saving 14 Display Data Channel (DDC) 15 19-pin color display signal cable* 15 20-pin color display signal cable 15 Standard timing table 16 Installation 17 User Controls 18 External controls 18 Using the Shortcut Menu 19 The Function page 20 Troubleshooting 28 HDMI /DP Mode (Optional) 28
... of your vision 8 Developing good work habits 8 Federal Communications Commission Declaration of Conformity 10 Unpacking 12 SCREEN POSITION ADJUSTMENT 13 Connecting the adapter and AC Power cord 14 Power saving 14 Display Data Channel (DDC) 15 19-pin color display signal cable* 15 20-pin color display signal cable 15 Standard timing table 16 Installation 17 User Controls 18 External controls 18 Using the Shortcut Menu 19 The Function page 20 Troubleshooting 28 HDMI /DP Mode (Optional) 28

User Manual
Page 12
LCD monitor Quick start guide AC Power cord HDMI Cable (Optional) LCD Monitor NITRO XF2 series-XF272 DP Cable (Optional) USB cable (Optional) English Unpacking Please check that the following items are present when you unpack the box, and save the packing materials in case you need to ship or transport the monitor in the future.
LCD monitor Quick start guide AC Power cord HDMI Cable (Optional) LCD Monitor NITRO XF2 series-XF272 DP Cable (Optional) USB cable (Optional) English Unpacking Please check that the following items are present when you unpack the box, and save the packing materials in case you need to ship or transport the monitor in the future.

User Manual
Page 13
... example of the tilt range. use a cloth to optimize the best viewing position, you can adjust the height of the monitor. 1 2 120mm • Tilt Please see the illustration below for the angle of the monitor. • Attaching the Base Note: Remove the monitor and monitor base from its packaging.Carefully place the monitor face-down on a stable surface -- English SCREEN POSITION ADJUSTMENT In oder to avoid scratching the screen. 1 3 2 • Height Adjustment After pressing the...
... example of the tilt range. use a cloth to optimize the best viewing position, you can adjust the height of the monitor. 1 2 120mm • Tilt Please see the illustration below for the angle of the monitor. • Attaching the Base Note: Remove the monitor and monitor base from its packaging.Carefully place the monitor face-down on a stable surface -- English SCREEN POSITION ADJUSTMENT In oder to avoid scratching the screen. 1 3 2 • Height Adjustment After pressing the...

User Manual
Page 15
...-F cord and plug rated 10 A/250 V. English Connecting the adapter and AC Power cord • Check first to make sure that allows operation in which the equipment will be installed. State ON Power Saving Mode LED Light Blue Amber The power saving states will be kept until a control signal has been detected or the keyboard or mouse is around 3 seconds. The cord set consisting of the AC power cord to ON state is activated. Power saving The monitor...
...-F cord and plug rated 10 A/250 V. English Connecting the adapter and AC Power cord • Check first to make sure that allows operation in which the equipment will be installed. State ON Power Saving Mode LED Light Blue Amber The power saving states will be kept until a control signal has been detected or the keyboard or mouse is around 3 seconds. The cord set consisting of the AC power cord to ON state is activated. Power saving The monitor...

User Manual
Page 16
... Ground 19 Hot Plug Detect PIN No. Description 2 TMDS Data2 Shield 4 TMDS Data1+ 6 TMDS Data18 TMDS Data0 Shield 10 TMDS Clock+ 12 TMDS Clock14 Reserved (N.C. for example, supported resolutions and corresponding timing. on device) 16 SDA 18 +5V Power The monitor supports the DDC2B standard. 19-pin color display signal cable* PIN No. English Display Data Channel (DDC) To make installation easier, so long...
... Ground 19 Hot Plug Detect PIN No. Description 2 TMDS Data2 Shield 4 TMDS Data1+ 6 TMDS Data18 TMDS Data0 Shield 10 TMDS Clock+ 12 TMDS Clock14 Reserved (N.C. for example, supported resolutions and corresponding timing. on device) 16 SDA 18 +5V Power The monitor supports the DDC2B standard. 19-pin color display signal cable* PIN No. English Display Data Channel (DDC) To make installation easier, so long...
User Manual
Page 18
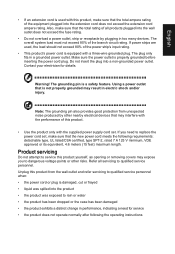
... your computer and your computer's power cord. 2. Plug the power cords of the graphics card on the computer. 3. Connect the USB 3.0 cable to port for fast charge. Please check user manual for audio output model. USB HDMI 1(2.0) HDMI 2(2.0) DP Note: Audio output is only for more instruction. Connect the USB Cable(Optional) Connect the USB 3.0 cable to port. 4. English Installation 1. Turn off your computer and unplug your monitor into the power port at the back of the monitor. 5. Insert the monitor power cable into a nearby electrical outlet.
... your computer and your computer's power cord. 2. Plug the power cords of the graphics card on the computer. 3. Connect the USB 3.0 cable to port for fast charge. Please check user manual for audio output model. USB HDMI 1(2.0) HDMI 2(2.0) DP Note: Audio output is only for more instruction. Connect the USB Cable(Optional) Connect the USB 3.0 cable to port. 4. English Installation 1. Turn off your computer and unplug your monitor into the power port at the back of the monitor. 5. Insert the monitor power cable into a nearby electrical outlet.
User Manual
Page 19
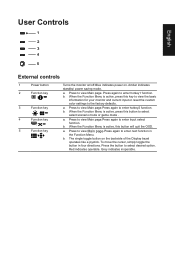
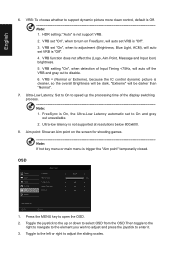
English User Controls 1 2 3 4 5 External controls 1 Power button 2 Function key / 3 Function key / 4 Function key /X 5 Function key / Turns the monitor on/off.Blue indicates power on the backside of the Display bezel operates like a joystick. Amber indicates standby/ power saving mode. b. b. Press to view Main page.Press again to the factory defaults. When the Function Menu is active, this button will quit the OSD. Press to view Main page.Press again to enter hotkey1...
English User Controls 1 2 3 4 5 External controls 1 Power button 2 Function key / 3 Function key / 4 Function key /X 5 Function key / Turns the monitor on/off.Blue indicates power on the backside of the Display bezel operates like a joystick. Amber indicates standby/ power saving mode. b. b. Press to view Main page.Press again to the factory defaults. When the Function Menu is active, this button will quit the OSD. Press to view Main page.Press again to enter hotkey1...
User Manual
Page 20
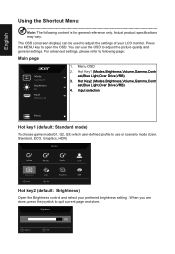
... can be used to adjust the picture quality and general settings. When you are done, press the joystick to open the OSD. Menu OSD 2. Input selection Menu Hot key1 (default: Standard mode) To choose game mode(G1, G2, G3) which user-defined profile to use the OSD to adjust the settings of your preferred brightness setting . Hot Key1 (Modes,Brightness,Volume,Gamma,Contr ast,Blue Light,Over Drive,VRB) 3. Brightness 80 Adjust OK Actual product specifications may vary...
... can be used to adjust the picture quality and general settings. When you are done, press the joystick to open the OSD. Menu OSD 2. Input selection Menu Hot key1 (default: Standard mode) To choose game mode(G1, G2, G3) which user-defined profile to use the OSD to adjust the settings of your preferred brightness setting . Hot Key1 (Modes,Brightness,Volume,Gamma,Contr ast,Blue Light,Over Drive,VRB) 3. Brightness 80 Adjust OK Actual product specifications may vary...
User Manual
Page 21
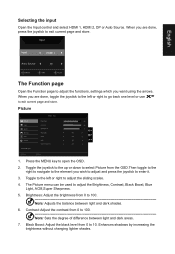
...; Off X Off 1. Selecting the input Open the Input control and select HDMI 1, HDMI 2, DP or Auto Source. Move Mode - Toggle to the left or right to go back one level or use X to adjust the sliding scales. 4. Black Boost: Adjust the black level from 0 to 10. Brightness: Adjust the brightness from 0 to 100 Note: Adjusts the balance between light and dark areas. 7. Picture Picture Color Audio Gaming OSD System Save Settings to enter it. 3. Toggle the...
...; Off X Off 1. Selecting the input Open the Input control and select HDMI 1, HDMI 2, DP or Auto Source. Move Mode - Toggle to the left or right to go back one level or use X to adjust the sliding scales. 4. Black Boost: Adjust the black level from 0 to 10. Brightness: Adjust the brightness from 0 to 100 Note: Adjusts the balance between light and dark areas. 7. Picture Picture Color Audio Gaming OSD System Save Settings to enter it. 3. Toggle the...

User Manual
Page 22
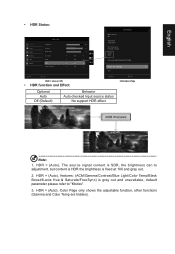
... make images sharper and clearer. ACM: Turn ACM on or off Note: Set to "On", will be based on the current screen to ... Super Sharpness: Turn the Super Sharpness On or Off. HDR function • Hot Key of Mode: Mode Standard Brightness 80 Input HDMI(2.0) Modes Action Racing Sports User Menu Standard ECO Graphics HDR Move OK • Main Menu of TÜV Rheinland's "Low Blue Light Content" standard. 9. Brightness Contrast Black...
... make images sharper and clearer. ACM: Turn ACM on or off Note: Set to "On", will be based on the current screen to ... Super Sharpness: Turn the Super Sharpness On or Off. HDR function • Hot Key of Mode: Mode Standard Brightness 80 Input HDMI(2.0) Modes Action Racing Sports User Menu Standard ECO Graphics HDR Move OK • Main Menu of TÜV Rheinland's "Low Blue Light Content" standard. 9. Brightness Contrast Black...
User Manual
Page 23
...). English • HDR Status: Picture Color Audio Gaming OSD System Mode - HDR Brightness Contrast Black Boost Blue Light ACM HDR Super Sharpness 80 50 9 Off Off Auto X Off Main Source DP Resolution 1920x1080 H/V Frequency H:66KHz V:60Hz Mode HDR Information S/N: MN53035032682018TPV888 Reset ALL Settings Exit Move Enter Move HDR = (Auto or Off) • HDR function and Effect: Optional Auto Off (Default) Behavior Auto checked input source status No support HDR effect Exit Information Page Note: 1. HDR = (Auto), The source signal...
...). English • HDR Status: Picture Color Audio Gaming OSD System Mode - HDR Brightness Contrast Black Boost Blue Light ACM HDR Super Sharpness 80 50 9 Off Off Auto X Off Main Source DP Resolution 1920x1080 H/V Frequency H:66KHz V:60Hz Mode HDR Information S/N: MN53035032682018TPV888 Reset ALL Settings Exit Move Enter Move HDR = (Auto or Off) • HDR function and Effect: Optional Auto Off (Default) Behavior Auto checked input source status No support HDR effect Exit Information Page Note: 1. HDR = (Auto), The source signal...
User Manual
Page 26
VRB function does not affect the (Logo, Aim Point, Message and Input Icon) brightness. 5. VRB set "On", when to turn on FreeSync, will auto set VRB is "Off". 4. VRB set "On", when to support dynamic picture more clean control, default is not support VRB. 2. VRB: To choose whether to adjustment (Brightness, Blue Light, ACM), will auto set VRB is "Off". 3. VRB setting "On", when detection of Input Timing HDR setting: "Auto" is Off Note: 1. English 6.
VRB function does not affect the (Logo, Aim Point, Message and Input Icon) brightness. 5. VRB set "On", when to turn on FreeSync, will auto set VRB is "Off". 4. VRB set "On", when to support dynamic picture more clean control, default is not support VRB. 2. VRB: To choose whether to adjustment (Brightness, Blue Light, ACM), will auto set VRB is "Off". 3. VRB setting "On", when detection of Input Timing HDR setting: "Auto" is Off Note: 1. English 6.

User Manual
Page 27
...; The "OSD Locked" message will be 0% (OFF), 20%, 40%, 60%, or 80%. 7. OSD Lock:To choose OSD lock on the screen Note: If FreeSync set "On" you can be changed from blue light to orange light. • Press any Key screen to prompt "OSD Locked" message. Refresh rate num: Display the panel's current refresh rate on /off the OSD menu. 6. The transparency can see the V Frequency to blue light. Transparency: Select the transparency when using gaming mode. Language: Set the OSD menu language. 5. English 4.
...; The "OSD Locked" message will be 0% (OFF), 20%, 40%, 60%, or 80%. 7. OSD Lock:To choose OSD lock on the screen Note: If FreeSync set "On" you can be changed from blue light to orange light. • Press any Key screen to prompt "OSD Locked" message. Refresh rate num: Display the panel's current refresh rate on /off the OSD menu. 6. The transparency can see the V Frequency to blue light. Transparency: Select the transparency when using gaming mode. Language: Set the OSD menu language. 5. English 4.
User Manual
Page 28
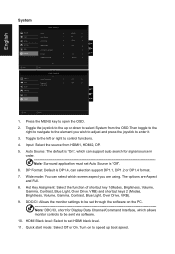
... monitor settings to be set through the software on to set Auto Source is DP1.4, can select which allows monitor controls to be sent via software. 10. English System Picture Color Audio Gaming OSD System Mode - Standard Picture Color Audio Gaming OSD System Quick Start Mode Power-off USB charge Off Off X Move Enter Quick Start Mode 1. Press the MENU key to control functions. 4. Auto Source: The default is "On", which can support auto search for Display Data Channel/Command Interface, which screen aspect you wish to adjust...
... monitor settings to be set through the software on to set Auto Source is DP1.4, can select which allows monitor controls to be sent via software. 10. English System Picture Color Audio Gaming OSD System Mode - Standard Picture Color Audio Gaming OSD System Quick Start Mode Power-off USB charge Off Off X Move Enter Quick Start Mode 1. Press the MENU key to control functions. 4. Auto Source: The default is "On", which can support auto search for Display Data Channel/Command Interface, which screen aspect you wish to adjust...
User Manual
Page 30
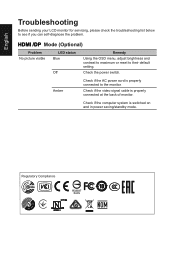
... Mode (Optional) Problem No picture visible LED status Blue Off Remedy Using the OSD menu, adjust brightness and contrast to maximum or reset to see if you can self-diagnose the problem. Check if the computer system is properly connected at the back of monitor. Check if the video signal cable is switched on and in power saving/standby mode. Regulatory Compliance 217186 60950-1 English Troubleshooting Before sending your LCD monitor for servicing, please check the troubleshooting list below to their default setting...
... Mode (Optional) Problem No picture visible LED status Blue Off Remedy Using the OSD menu, adjust brightness and contrast to maximum or reset to see if you can self-diagnose the problem. Check if the computer system is properly connected at the back of monitor. Check if the video signal cable is switched on and in power saving/standby mode. Regulatory Compliance 217186 60950-1 English Troubleshooting Before sending your LCD monitor for servicing, please check the troubleshooting list below to their default setting...

