
User Manual XF252Q P
Page 7
... working conditions, personal health and other factors greatly increase the risk of user inactivity. • Wake the monitor when it is produced with high-precision manufacturing techniques. Incorrect computer usage may occasionally misfire or appear as black or red dots. This product has been shipped enabled for power management: • Activate display's Sleep mode within 5 minutes of physical injury. English LCD pixel...
... working conditions, personal health and other factors greatly increase the risk of user inactivity. • Wake the monitor when it is produced with high-precision manufacturing techniques. Incorrect computer usage may occasionally misfire or appear as black or red dots. This product has been shipped enabled for power management: • Activate display's Sleep mode within 5 minutes of physical injury. English LCD pixel...

User Manual XF252Q P
Page 11
... vision 8 Developing good work habits 8 Federal Communications Commission 10 Supplier's Declaration of Conformity 10 Unpacking 12 SCREEN POSITION ADJUSTMENT 13 Connecting the adapter and AC Power cord 15 Power saving 15 Display Data Channel (DDC) 16 19-pin color display signal cable* 16 20-pin color display signal cable 16 Standard timing table 17 Installation 18 User Controls 19 External controls 19 Using the Shortcut Menu 20 The Function page 21 Troubleshooting 29 HDMI /DP Mode (Optional) 29
... vision 8 Developing good work habits 8 Federal Communications Commission 10 Supplier's Declaration of Conformity 10 Unpacking 12 SCREEN POSITION ADJUSTMENT 13 Connecting the adapter and AC Power cord 15 Power saving 15 Display Data Channel (DDC) 16 19-pin color display signal cable* 16 20-pin color display signal cable 16 Standard timing table 17 Installation 18 User Controls 19 External controls 19 Using the Shortcut Menu 20 The Function page 21 Troubleshooting 29 HDMI /DP Mode (Optional) 29

User Manual XF252Q P
Page 15
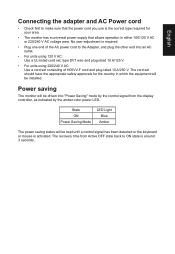
... the display controller, as indicated by the amber-color power LED. State ON Power Saving Mode LED Light Blue Amber The power saving states will be kept until a control signal has been detected or the keyboard or mouse is activated. No user-adjustment is required. • Plug one end of H05VV-F cord and plug rated 10 A/250 V. The cord set consisting of the AC power cord to the Adapter, and plug the other end into "Power Saving" mode by the control signal...
... the display controller, as indicated by the amber-color power LED. State ON Power Saving Mode LED Light Blue Amber The power saving states will be kept until a control signal has been detected or the keyboard or mouse is activated. No user-adjustment is required. • Plug one end of H05VV-F cord and plug rated 10 A/250 V. The cord set consisting of the AC power cord to the Adapter, and plug the other end into "Power Saving" mode by the control signal...

User Manual XF252Q P
Page 16
... example, supported resolutions and corresponding timing. Description 1 ML_Lane 0+ 3 ML_Lane 05 GND 7 ML_Lane 2+ 9 ML_Lane 211 GND 13 KONFIG1 PIN No. The monitor supports the DDC2B standard. 19-pin color display signal cable* PIN No. on device) 16 SDA 18 +5V Power 20-pin color display signal cable PIN No...Plug Detect PIN No. Description 2 GND 4 ML_Lane 1+ 6 ML_Lane 18 GND 10 ML_Lane 3+ 12 ML_Lane 314 CONFIG2 English Display Data Channel (DDC) To make installation easier, so long as your system supports the DDC protocol, the monitor is a communication protocol through which the monitor...
... example, supported resolutions and corresponding timing. Description 1 ML_Lane 0+ 3 ML_Lane 05 GND 7 ML_Lane 2+ 9 ML_Lane 211 GND 13 KONFIG1 PIN No. The monitor supports the DDC2B standard. 19-pin color display signal cable* PIN No. on device) 16 SDA 18 +5V Power 20-pin color display signal cable PIN No...Plug Detect PIN No. Description 2 GND 4 ML_Lane 1+ 6 ML_Lane 18 GND 10 ML_Lane 3+ 12 ML_Lane 314 CONFIG2 English Display Data Channel (DDC) To make installation easier, so long as your system supports the DDC protocol, the monitor is a communication protocol through which the monitor...
User Manual XF252Q P
Page 18
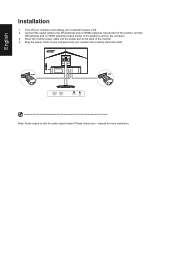
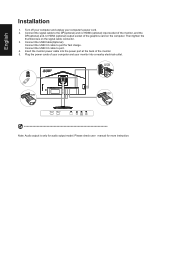
... the graphics card on the computer. 3. Connect the signal cable to the DP(optional) and /or HDMI (optional) input socket of the monitor, and the DP(optional) and /or HDMI (optional) output socket of the monitor. 4. English HDMI 1(2.0) HDMI 2(2.0) DP Note: Audio output is only for more instruction. Installation 1. Plug the power cords of your computer and your computer's power cord. 2. Insert the monitor power cable into a nearby electrical outlet. Please check user manual for audio output model.
... the graphics card on the computer. 3. Connect the signal cable to the DP(optional) and /or HDMI (optional) input socket of the monitor, and the DP(optional) and /or HDMI (optional) output socket of the monitor. 4. English HDMI 1(2.0) HDMI 2(2.0) DP Note: Audio output is only for more instruction. Installation 1. Plug the power cords of your computer and your computer's power cord. 2. Insert the monitor power cable into a nearby electrical outlet. Please check user manual for audio output model.

User Manual XF252Q P
Page 19
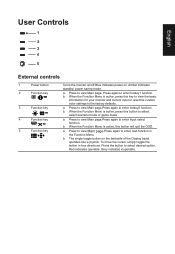
... basic information for your monitor and current input or reset the custom color settings to select select scenario mode or game mode . Grey indicates inoperable. b. Press to view Main page.Press again to enter hotkey1 function. a. English User Controls 1 2 3 4 5 External controls 1 Power button 2 Function key / 3 Function key / 4 Function key /X 5 Function key / Turns the monitor on/off.Blue indicates power on the backside of the Display bezel operates like a joystick...
... basic information for your monitor and current input or reset the custom color settings to select select scenario mode or game mode . Grey indicates inoperable. b. Press to view Main page.Press again to enter hotkey1 function. a. English User Controls 1 2 3 4 5 External controls 1 Power button 2 Function key / 3 Function key / 4 Function key /X 5 Function key / Turns the monitor on/off.Blue indicates power on the backside of the Display bezel operates like a joystick...

User Manual XF252Q P
Page 21
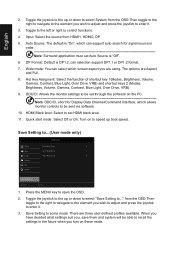
..., press the joystick to 10. Move Mode - User Brightness Contrast Black Boost Blue Light ACM HDR Super Sharpness Enter 80 50 9 Off Off Off X Off 1. Black Boost: Adjust the black level from 0 to exit current page and store. Selecting the input Open the Input control and select HDMI 1, HDMI 2, DP or Auto Source. Picture Picture Color Audio Gaming OSD System Save Settings to open the OSD. 2. When you wish to adjust and press the joystick to 100 Note...
..., press the joystick to 10. Move Mode - User Brightness Contrast Black Boost Blue Light ACM HDR Super Sharpness Enter 80 50 9 Off Off Off X Off 1. Black Boost: Adjust the black level from 0 to exit current page and store. Selecting the input Open the Input control and select HDMI 1, HDMI 2, DP or Auto Source. Picture Picture Color Audio Gaming OSD System Save Settings to open the OSD. 2. When you wish to adjust and press the joystick to 100 Note...

User Manual XF252Q P
Page 23
...: Optional Auto Off (Default) Behavior Auto checked input source status No support HDR effect Exit Information Page Note: 1. HDR = (Auto), The source signal content is SDR, the brightness can to adjustment, but content is HDR the brightness is gray out and unavailable, default parameter please refer to "Modes". 3. English • HDR Status: Picture Color Audio Gaming OSD System Mode - HDR = (Auto), features: (ACM/Gamma/Contrast/Blue Light/Color Temp/Black Boost/6-axis Hue & Saturate/FreeSync) is fixed at...
...: Optional Auto Off (Default) Behavior Auto checked input source status No support HDR effect Exit Information Page Note: 1. HDR = (Auto), The source signal content is SDR, the brightness can to adjustment, but content is HDR the brightness is gray out and unavailable, default parameter please refer to "Modes". 3. English • HDR Status: Picture Color Audio Gaming OSD System Mode - HDR = (Auto), features: (ACM/Gamma/Contrast/Blue Light/Color Temp/Black Boost/6-axis Hue & Saturate/FreeSync) is fixed at...
User Manual XF252Q P
Page 26
VRB: To choose whether to support dynamic picture more clean control, default is "Off". 4. VRB set "On", when to turn on FreeSync, will auto set VRB is not support VRB. 2. VRB setting "On", when detection of Input Timing English 6. HDR setting: "Auto" is "Off". 3. VRB set "On", when to adjustment (Brightness, Blue Light, ACM), will auto set VRB is Off Note: 1. VRB function does not affect the (Logo, Aim Point, Message and Input Icon) brightness. 5.
VRB: To choose whether to support dynamic picture more clean control, default is "Off". 4. VRB set "On", when to turn on FreeSync, will auto set VRB is not support VRB. 2. VRB setting "On", when detection of Input Timing English 6. HDR setting: "Auto" is "Off". 3. VRB set "On", when to adjustment (Brightness, Blue Light, ACM), will auto set VRB is Off Note: 1. VRB function does not affect the (Logo, Aim Point, Message and Input Icon) brightness. 5.

User Manual XF252Q P
Page 27
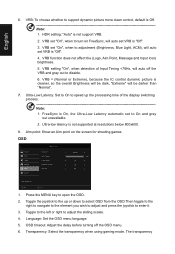
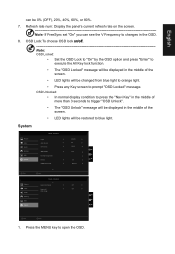
... "OSD Unlock". • The "OSD Unlock" message will be displayed in the middle of the screen. • LED lights will be changed from blue light to orange light. • Press any Key screen to prompt "OSD Locked" message. English can see the V Frequency to changes in the OSD. 8. Refresh rate num: Display the panel's current refresh rate on /off Note: OSD Locked: • Set the OSD Lock to "On" by the OSD option and press "Enter" to open the OSD. Standard Picture Color Audio Gaming OSD System Quick Start Mode...
... "OSD Unlock". • The "OSD Unlock" message will be displayed in the middle of the screen. • LED lights will be changed from blue light to orange light. • Press any Key screen to prompt "OSD Locked" message. English can see the V Frequency to changes in the OSD. 8. Refresh rate num: Display the panel's current refresh rate on /off Note: OSD Locked: • Set the OSD Lock to "On" by the OSD option and press "Enter" to open the OSD. Standard Picture Color Audio Gaming OSD System Quick Start Mode...
User Manual XF252Q P
Page 28
...: Default is "On", which screen aspect you are using. Hot Key Assigment: Select the function of shortcut key 1(Modes, Brightness, Volume, Gamma, Contrast, Blue Light, Over Drive, VRB) and shortcut keys 2 (Modes, Brightness, Volume, Gamma, Contrast, Blue Light, Over Drive, VRB). 9. Turn on the PC Note: DDC/CI, short for signal source in the future when you , save them and system will be set HDMI black level. 11. User Picture Color Audio Gaming OSD System Game Mode Action...
...: Default is "On", which screen aspect you are using. Hot Key Assigment: Select the function of shortcut key 1(Modes, Brightness, Volume, Gamma, Contrast, Blue Light, Over Drive, VRB) and shortcut keys 2 (Modes, Brightness, Volume, Gamma, Contrast, Blue Light, Over Drive, VRB). 9. Turn on the PC Note: DDC/CI, short for signal source in the future when you , save them and system will be set HDMI black level. 11. User Picture Color Audio Gaming OSD System Game Mode Action...
User Manual XF252Q P
Page 29
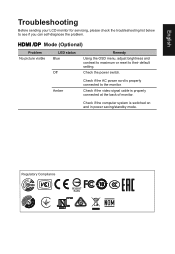
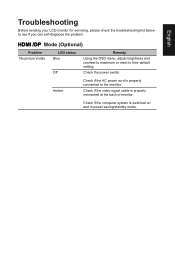
... connected to their default setting. Check if the computer system is properly connected at the back of monitor. Check the power switch. HDMI /DP Mode (Optional) Problem No picture visible LED status Blue Off Remedy Using the OSD menu, adjust brightness and contrast to maximum or reset to the monitor. Regulatory Compliance 217186 60950-1 English Troubleshooting Before sending your LCD monitor for servicing, please check the troubleshooting list below to see if you can self-diagnose the problem. Check if the video signal cable is switched...
... connected to their default setting. Check if the computer system is properly connected at the back of monitor. Check the power switch. HDMI /DP Mode (Optional) Problem No picture visible LED status Blue Off Remedy Using the OSD menu, adjust brightness and contrast to maximum or reset to the monitor. Regulatory Compliance 217186 60950-1 English Troubleshooting Before sending your LCD monitor for servicing, please check the troubleshooting list below to see if you can self-diagnose the problem. Check if the video signal cable is switched...
User Manual XF252Q X
Page 7
... power management: • Activate display's Sleep mode within 5 minutes of the monitor, using a footrest, or raising your company's health and safety department. Tips and information for comfortable use Computer users may occasionally misfire or appear as black or red dots. Long work periods, bad posture, poor work habits, stress, inadequate working in front of working conditions, personal health and other musculoskeletal disorders. English LCD pixel statement The LCD...
... power management: • Activate display's Sleep mode within 5 minutes of the monitor, using a footrest, or raising your company's health and safety department. Tips and information for comfortable use Computer users may occasionally misfire or appear as black or red dots. Long work periods, bad posture, poor work habits, stress, inadequate working in front of working conditions, personal health and other musculoskeletal disorders. English LCD pixel statement The LCD...
User Manual XF252Q X
Page 11
... of your vision 8 Developing good work habits 8 Federal Communications Commission Declaration of Conformity 10 Unpacking 12 SCREEN POSITION ADJUSTMENT 13 Connecting the adapter and AC Power cord 14 Power saving 14 Display Data Channel (DDC) 15 19-pin color display signal cable* 15 20-pin color display signal cable 15 Standard timing table 16 Installation 17 User Controls 18 External controls 18 Using the Shortcut Menu 19 The Function page 20 Troubleshooting 28 HDMI /DP Mode (Optional) 28
... of your vision 8 Developing good work habits 8 Federal Communications Commission Declaration of Conformity 10 Unpacking 12 SCREEN POSITION ADJUSTMENT 13 Connecting the adapter and AC Power cord 14 Power saving 14 Display Data Channel (DDC) 15 19-pin color display signal cable* 15 20-pin color display signal cable 15 Standard timing table 16 Installation 17 User Controls 18 External controls 18 Using the Shortcut Menu 19 The Function page 20 Troubleshooting 28 HDMI /DP Mode (Optional) 28
User Manual XF252Q X
Page 15
... power supply that the power cord you use is the correct type required for the country in either 100/120 V AC or 220/240 V AC voltage area. No user-adjustment is required. • Plug one end of H05VV-F cord and plug rated 10 A/250 V. English Connecting the adapter and AC Power cord • Check first to make sure that allows operation in which the equipment will be installed. Power saving The monitor...
... power supply that the power cord you use is the correct type required for the country in either 100/120 V AC or 220/240 V AC voltage area. No user-adjustment is required. • Plug one end of H05VV-F cord and plug rated 10 A/250 V. English Connecting the adapter and AC Power cord • Check first to make sure that allows operation in which the equipment will be installed. Power saving The monitor...
User Manual XF252Q X
Page 18
... only for more instruction. Please check user manual for audio output model. Insert the monitor power cable into a nearby electrical outlet. Plug the power cords of your computer and your computer's power cord. 2. Connect the signal cable to the DP(optional) and /or HDMI (optional) input socket of the monitor, and the DP(optional) and /or HDMI (optional) output socket of the monitor. 5. Connect the USB 3.0 cable to port for fast charge. Connect the USB Cable(Optional) Connect the USB 3.0 cable to port. 4. English Installation 1.
... only for more instruction. Please check user manual for audio output model. Insert the monitor power cable into a nearby electrical outlet. Plug the power cords of your computer and your computer's power cord. 2. Connect the signal cable to the DP(optional) and /or HDMI (optional) input socket of the monitor, and the DP(optional) and /or HDMI (optional) output socket of the monitor. 5. Connect the USB 3.0 cable to port for fast charge. Connect the USB Cable(Optional) Connect the USB 3.0 cable to port. 4. English Installation 1.
User Manual XF252Q X
Page 19
... hotkey1 function. Press again to enter Input select function. a. When the Function Menu is active, press this button will quit the OSD. b. Red indicates operable. English User Controls 1 2 3 4 5 External controls 1 Power button 2 Function key / 3 Function key / 4 Function key /X 5 Function key / Turns the monitor on/off.Blue indicates power on the backside of the Display bezel operates like a joystick. Press to view Main page.Press again to select...
... hotkey1 function. Press again to enter Input select function. a. When the Function Menu is active, press this button will quit the OSD. b. Red indicates operable. English User Controls 1 2 3 4 5 External controls 1 Power button 2 Function key / 3 Function key / 4 Function key /X 5 Function key / Turns the monitor on/off.Blue indicates power on the backside of the Display bezel operates like a joystick. Press to view Main page.Press again to select...

User Manual XF252Q X
Page 26
VRB: To choose whether to adjustment (Brightness, Blue Light, ACM), will auto set "On", when to support dynamic picture more clean control, default is "Off". 4. HDR setting: "Auto" is "Off". 3. VRB set VRB is not support VRB. 2. VRB setting "On", when detection of Input Timing English 6. VRB function does not affect the (Logo, Aim Point, Message and Input Icon) brightness. 5. VRB set "On", when to turn on FreeSync, will auto set VRB is Off Note: 1.
VRB: To choose whether to adjustment (Brightness, Blue Light, ACM), will auto set "On", when to support dynamic picture more clean control, default is "Off". 4. HDR setting: "Auto" is "Off". 3. VRB set VRB is not support VRB. 2. VRB setting "On", when detection of Input Timing English 6. VRB function does not affect the (Logo, Aim Point, Message and Input Icon) brightness. 5. VRB set "On", when to turn on FreeSync, will auto set VRB is Off Note: 1.
User Manual XF252Q X
Page 27
... lock function. • The "OSD Locked" message will be displayed in the middle of the screen. • LED lights will be changed from blue light to orange light. • Press any Key screen to prompt "OSD Locked" message. Standard Input Auto Source DP Format Wide Mode Hot Key Assignment DDC/CI HDMI Black Level HDMI1 On DP1.2 Full On X Normal Move Enter Quick Start Mode Mode - Standard Picture Color Audio Gaming OSD System Quick Start Mode Power-off USB charge Off Off X Move Enter Quick Start Mode 1. OSD Unlocked...
... lock function. • The "OSD Locked" message will be displayed in the middle of the screen. • LED lights will be changed from blue light to orange light. • Press any Key screen to prompt "OSD Locked" message. Standard Input Auto Source DP Format Wide Mode Hot Key Assignment DDC/CI HDMI Black Level HDMI1 On DP1.2 Full On X Normal Move Enter Quick Start Mode Mode - Standard Picture Color Audio Gaming OSD System Quick Start Mode Power-off USB charge Off Off X Move Enter Quick Start Mode 1. OSD Unlocked...
User Manual XF252Q X
Page 29
Amber Check if the AC power cord is properly connected to their default setting. Check if the video signal cable is switched on and in power saving/standby mode. Check the power switch. English HDMI /DP Mode (Optional) Problem No picture visible LED status Blue Off Remedy Using the OSD menu, adjust brightness and contrast to maximum or reset to the monitor. Check if the computer system is properly connected at the back of monitor. Troubleshooting Before sending your LCD monitor for servicing, please check the troubleshooting list below to see if...
Amber Check if the AC power cord is properly connected to their default setting. Check if the video signal cable is switched on and in power saving/standby mode. Check the power switch. English HDMI /DP Mode (Optional) Problem No picture visible LED status Blue Off Remedy Using the OSD menu, adjust brightness and contrast to maximum or reset to the monitor. Check if the computer system is properly connected at the back of monitor. Troubleshooting Before sending your LCD monitor for servicing, please check the troubleshooting list below to see if...


