

User Manual
Page 3
... the LCD monitor and do not indicate a problem. • Due to the nature of the fluorescent light, the screen may remain after switching the image, when the same image is displayed for your monitor Please carefully follow these instructions carefully. Follow all power cords from electronic devices. It may include blemishes of information obtained from the power supplies. Connecting/disconnecting the device Observe the following are turned...
... the LCD monitor and do not indicate a problem. • Due to the nature of the fluorescent light, the screen may remain after switching the image, when the same image is displayed for your monitor Please carefully follow these instructions carefully. Follow all power cords from electronic devices. It may include blemishes of information obtained from the power supplies. Connecting/disconnecting the device Observe the following are turned...
User Manual
Page 4
... volume. • Avoid turning up the volume to protect it from the electrical outlet. iv Accessibility Be sure that the power outlet you plug the power cord into this product through cabinet slots as they may touch dangerous voltage points or short-out parts that the total Using electrical power • This product should never be seriously damaged. • Slots and openings...
... volume. • Avoid turning up the volume to protect it from the electrical outlet. iv Accessibility Be sure that the power outlet you plug the power cord into this product through cabinet slots as they may touch dangerous voltage points or short-out parts that the total Using electrical power • This product should never be seriously damaged. • Slots and openings...
User Manual
Page 5
... with the supplied power supply cord set , make sure that is properly grounded before inserting the power cord plug. If you to dangerous voltage points or other nearby electrical devices that the new power cord meets the following the operating instructions Note: The grounding pin also provides good protection from the wall outlet and refer servicing to qualified service personnel when: • the power cord or plug is...
... with the supplied power supply cord set , make sure that is properly grounded before inserting the power cord plug. If you to dangerous voltage points or other nearby electrical devices that the new power cord meets the following the operating instructions Note: The grounding pin also provides good protection from the wall outlet and refer servicing to qualified service personnel when: • the power cord or plug is...

User Manual
Page 6
... work by the operating instructions, since improper adjustment of our other controls may contain small parts. Areas with a potentially explosive atmosphere and obey all signs and instructions. We at service stations. For more information and help when recycling, please go to turn off the device near gas pumps at Acer are in bodily injury or even death. Potentially explosive environments Switch...
... work by the operating instructions, since improper adjustment of our other controls may contain small parts. Areas with a potentially explosive atmosphere and obey all signs and instructions. We at service stations. For more information and help when recycling, please go to turn off the device near gas pumps at Acer are in bodily injury or even death. Potentially explosive environments Switch...

User Manual
Page 8
... work periods, bad posture, poor work habits, stress, inadequate working in one fixed posture • avoid slouching forward and/or leaning backward • stand up and walk around regularly to achieve maximum comfort. Users are also at risk of a computer. Tips and information for comfortable use . viii This product has been shipped enabled for power management: • Activate display's Sleep mode...
... work periods, bad posture, poor work habits, stress, inadequate working in one fixed posture • avoid slouching forward and/or leaning backward • stand up and walk around regularly to achieve maximum comfort. Users are also at risk of a computer. Tips and information for comfortable use . viii This product has been shipped enabled for power management: • Activate display's Sleep mode...

User Manual
Page 9
... a way that the side faces the window or any light source • minimizing room light by using drapes, shades or blinds • using a task light • changing the display's viewing angle • using a glare-reduction filter • using a display visor, such as a piece of cardboard extended from the display's top front edge • Avoid adjusting your eyes from the monitor and focusing on how to reduce...
... a way that the side faces the window or any light source • minimizing room light by using drapes, shades or blinds • using a task light • changing the display's viewing angle • using a glare-reduction filter • using a display visor, such as a piece of cardboard extended from the display's top front edge • Avoid adjusting your eyes from the monitor and focusing on how to reduce...

User Manual
Page 10
TABLE OF CONTENTS UNPACKING 1 ATTACHING / REMOVING THE BASE 2 SCREEN POSITION ADJUSTMENT 3 CONNECTING THE POWER CORD 5 SAFETY PRECAUTION 5 CLEANING YOUR MONITOR 5 POWER SAVING 6 DDC...6 CONNECTOR PIN ASSIGNMENT 7 STANDARD TIMING TABLE 9 INSTALLATION 10 USER CONTROLS 11 TROUBLESHOOTING 22
TABLE OF CONTENTS UNPACKING 1 ATTACHING / REMOVING THE BASE 2 SCREEN POSITION ADJUSTMENT 3 CONNECTING THE POWER CORD 5 SAFETY PRECAUTION 5 CLEANING YOUR MONITOR 5 POWER SAVING 6 DDC...6 CONNECTOR PIN ASSIGNMENT 7 STANDARD TIMING TABLE 9 INSTALLATION 10 USER CONTROLS 11 TROUBLESHOOTING 22

User Manual
Page 11
UNPACKING Please check the following items are present when you unpack the box, and save the packing materials in case you will need to ship or transport the monitor in future. LCD Monitor Quick Start Guide AC Power Cord HDMI Cable (Optional) DP Cable (Optional) USB Cable (Optional) DVI Cable (Optional) Audio Cable (Optional) EN-1
UNPACKING Please check the following items are present when you unpack the box, and save the packing materials in case you will need to ship or transport the monitor in future. LCD Monitor Quick Start Guide AC Power Cord HDMI Cable (Optional) DP Cable (Optional) USB Cable (Optional) DVI Cable (Optional) Audio Cable (Optional) EN-1

User Manual
Page 13
Only at the highest point can 35 degrees of recline be offered for an example of the monitor. 1 2 150mm EN-3 SCREEN POSITION ADJUSTMENT In order to optimize the best viewing position, you can adjust the height/tilt of the monitor. • Tilt Please see the illustration below for the angle of elevation. -5° 35° • Height Adjustment After pressing the top of the monitor then you can adjust the height of the tilt range.
Only at the highest point can 35 degrees of recline be offered for an example of the monitor. 1 2 150mm EN-3 SCREEN POSITION ADJUSTMENT In order to optimize the best viewing position, you can adjust the height/tilt of the monitor. • Tilt Please see the illustration below for the angle of elevation. -5° 35° • Height Adjustment After pressing the top of the monitor then you can adjust the height of the tilt range.

User Manual
Page 15
... cleaning. Use a soft cloth to the monitor, do not lift the monitor by its base. CONNECTING THE POWER CORD Check first to rain, excessive moisture, or dust. Do not cover the ventilation slots or openings of the monitor. SAFETY PRECAUTION Avoid placing the monitor, or any ammonia or alcohol-based cleaners. No user-adjustment is adequate ventilation. Avoid placing the monitor against a bright...
... cleaning. Use a soft cloth to the monitor, do not lift the monitor by its base. CONNECTING THE POWER CORD Check first to rain, excessive moisture, or dust. Do not cover the ventilation slots or openings of the monitor. SAFETY PRECAUTION Avoid placing the monitor, or any ammonia or alcohol-based cleaners. No user-adjustment is adequate ventilation. Avoid placing the monitor against a bright...

User Manual
Page 16
... display controller, as indicated by the amber-color power LED. DDC To make your installation easier, the monitor is able to ON state is around 3 seconds. POWER SAVING The monitor will be driven into "Power Saving" mode by the control signal from Active OFF state back to Plug and Play with your system if your system also supports DDC protocol. The monitor supports DDC2B standard. EN-6 State LED Light ON Blue Power Saving Mode Amber The power saving...
... display controller, as indicated by the amber-color power LED. DDC To make your installation easier, the monitor is able to ON state is around 3 seconds. POWER SAVING The monitor will be driven into "Power Saving" mode by the control signal from Active OFF state back to Plug and Play with your system if your system also supports DDC protocol. The monitor supports DDC2B standard. EN-6 State LED Light ON Blue Power Saving Mode Amber The power saving...

User Manual
Page 20
... DVI cable to the back of the monitor and connect the other settings than the center position may increase the ear-/ headphones output voltage and therefore the sound pressure level. Connect the HDMI cable to the computer. 1-3 Connect Digital Cable (Only Dual-input model) (Optional) a. EN-10 Connect the DP cable to the computer. 1-2 Connect DP Cable a. Insert the monitor power cable into a nearby electrical outlet. 5. b. INSTALLATION To install the monitor to your monitor into the power port...
... DVI cable to the back of the monitor and connect the other settings than the center position may increase the ear-/ headphones output voltage and therefore the sound pressure level. Connect the HDMI cable to the computer. 1-3 Connect Digital Cable (Only Dual-input model) (Optional) a. EN-10 Connect the DP cable to the computer. 1-2 Connect DP Cable a. Insert the monitor power cable into a nearby electrical outlet. 5. b. INSTALLATION To install the monitor to your monitor into the power port...
User Manual
Page 21
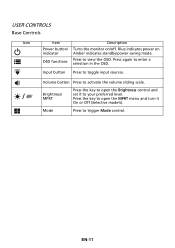
... OSD. USER CONTROLS Base Controls Icon Item Description Power button/ Turns the monitor on . Press again to trigger Mode control. EN-11 Press the key to open the Brightness control and / Brightness/ MPRT set it On or Off (Selective models). Volume button Press to view the OSD. Blue indicates power on /off. Press the key to open the MPRT menu and turn it to toggle input sources. OSD functions Press to activate the volume sliding scale. indicator Amber indicates standby/power saving mode. Input button...
... OSD. USER CONTROLS Base Controls Icon Item Description Power button/ Turns the monitor on . Press again to trigger Mode control. EN-11 Press the key to open the Brightness control and / Brightness/ MPRT set it On or Off (Selective models). Volume button Press to view the OSD. Blue indicates power on /off. Press the key to open the MPRT menu and turn it to toggle input sources. OSD functions Press to activate the volume sliding scale. indicator Amber indicates standby/power saving mode. Input button...
User Manual
Page 22
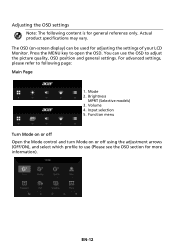
... general reference only. Brightness MPRT (Selective models) 3. Press the MENU key to adjust the picture quality, OSD position and general settings. Volume 4. Input selection 5. For advanced settings, please refer to following content is for adjusting the settings of your LCD Monitor. EN-12 Mode 2. Function menu Turn Mode on or off Open the Mode control and turn Mode on -screen display) can use (Please see the OSD section for more information). The OSD (on or off using the adjustment arrows (OFF...
... general reference only. Brightness MPRT (Selective models) 3. Press the MENU key to adjust the picture quality, OSD position and general settings. Volume 4. Input selection 5. For advanced settings, please refer to following content is for adjusting the settings of your LCD Monitor. EN-12 Mode 2. Function menu Turn Mode on or off Open the Mode control and turn Mode on -screen display) can use (Please see the OSD section for more information). The OSD (on or off using the adjustment arrows (OFF...
User Manual
Page 23
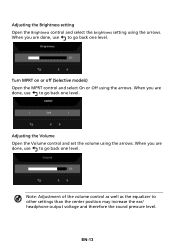
... back one level. Adjusting the Brightness setting Open the Brightness control and select the brightness setting using the arrows. When you are done, use to other settings than the center position may increase the ear/ headphone output voltage and therefore the sound pressure level. Note: Adjustment of the volume control as well as the equalizer to go back one level. Adjusting the Volume Open the Volume control and set the volume using the arrows.
... back one level. Adjusting the Brightness setting Open the Brightness control and select the brightness setting using the arrows. When you are done, use to other settings than the center position may increase the ear/ headphone output voltage and therefore the sound pressure level. Note: Adjustment of the volume control as well as the equalizer to go back one level. Adjusting the Volume Open the Volume control and set the volume using the arrows.
User Manual
Page 24
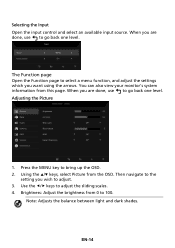
.... Note: Adjusts the balance between light and dark shades. You can also view your monitor's system information from 0 to go back one level. When you are done, use to adjust. 3. Using the / keys, select Picture from the OSD. Selecting the Input Open the input control and select an available input source. The Function page Open the Function page to select a menu function, and adjust the settings which...
.... Note: Adjusts the balance between light and dark shades. You can also view your monitor's system information from 0 to go back one level. When you are done, use to adjust. 3. Using the / keys, select Picture from the OSD. Selecting the Input Open the input control and select an available input source. The Function page Open the Function page to select a menu function, and adjust the settings which...
User Manual
Page 25
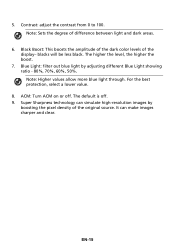
... source. For the best protection, select a lower value. 8. The default is off . 5. Contrast: adjust the contrast from 0 to 100. Note: Sets the degree of the display- blacks will be less black. The higher the level, the higher the boost. 7. Note: Higher values allow more blue light through. EN-15 Super Sharpness technology can make images sharper and clear. It can simulate high-resolution images by adjusting different Blue Light...
... source. For the best protection, select a lower value. 8. The default is off . 5. Contrast: adjust the contrast from 0 to 100. Note: Sets the degree of the display- blacks will be less black. The higher the level, the higher the boost. 7. Note: Higher values allow more blue light through. EN-15 Super Sharpness technology can make images sharper and clear. It can simulate high-resolution images by adjusting different Blue Light...

User Manual
Page 29
Refresh Rate Num: Display the panel's current refresh rate on the screen. Then navigate to the setting you wish to open the OSD. 2. Press the MENU key to adjust. 3. EN-19 Using the / keys, select OSD from the OSD. Use the / keys to adjust any sliding scales. 4. OSD Timeout: Adjust the delay before turning the off the OSD menu. 6. The transparency can be 0% (OFF), 20%, 40%, 60%, or 80%. 7. Transparency: Select the transparency when using gaming mode. Adjusting the OSD 1. Language: Set the OSD menu language. 5.
Refresh Rate Num: Display the panel's current refresh rate on the screen. Then navigate to the setting you wish to open the OSD. 2. Press the MENU key to adjust. 3. EN-19 Using the / keys, select OSD from the OSD. Use the / keys to adjust any sliding scales. 4. OSD Timeout: Adjust the delay before turning the off the OSD menu. 6. The transparency can be 0% (OFF), 20%, 40%, 60%, or 80%. 7. Transparency: Select the transparency when using gaming mode. Adjusting the OSD 1. Language: Set the OSD menu language. 5.

User Manual
Page 31
... MENU key to the factory defaults. Reset All Settings: Resets all settings to open the OSD. 2. 9. Using the / keys, select Information to be set through the software on the PC. HDMI Black Level: You can select the level of blackness under HDMI source. Quick Start Mode: Enable monitor rapidly. 12. Note: DDC/CI, short for Display Data Channel/Command Interface, which allows monitor controls to view the basic information for your monitor and current input...
... MENU key to the factory defaults. Reset All Settings: Resets all settings to open the OSD. 2. 9. Using the / keys, select Information to be set through the software on the PC. HDMI Black Level: You can select the level of blackness under HDMI source. Quick Start Mode: Enable monitor rapidly. 12. Note: DDC/CI, short for Display Data Channel/Command Interface, which allows monitor controls to view the basic information for your monitor and current input...
User Manual
Page 32
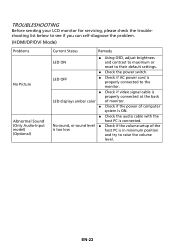
... the monitor. Check if video signal cable is properly connected at the back LED displays amber color of monitor. Check if the power of the is too low host PC is connected. EN-22 TROUBLESHOOTING Before sending your LCD monitor for servicing, please check the troubleshooting list below to see if you can self-diagnose the problem. (HDMI/DP/DVI Mode) Problems No Picture Abnormal Sound (Only Audio-Input model) (Optional) Current Status Remedy LED ON Using OSD, adjust brightness and contrast...
... the monitor. Check if video signal cable is properly connected at the back LED displays amber color of monitor. Check if the power of the is too low host PC is connected. EN-22 TROUBLESHOOTING Before sending your LCD monitor for servicing, please check the troubleshooting list below to see if you can self-diagnose the problem. (HDMI/DP/DVI Mode) Problems No Picture Abnormal Sound (Only Audio-Input model) (Optional) Current Status Remedy LED ON Using OSD, adjust brightness and contrast...

