
User Manual
Page 1
TABLE OF CONTENTS SPECIAL NOTES ON LCD MONITORS 1 INFORMATION FOR YOUR SAFETY AND COMFORT 2 UNPACKING 5 ATTACHING / REMOVING THE BASE 6 SCREEN POSITION ADJUSTMENT 6 WALL MOUNTING (OPTINAL 7 CONNECTING THE POWER CORD 8 SAFETY PRECAUTION 8 CLEANING YOUR MONITOR 8 POWER SAVING 9 DDC ...9 CONNECTOR PIN ASSIGNMENT 10 STANDARD TIMING TABLE 12 INSTALLATION 13 USER CONTROLS 14 HOW TO ADJUST A SETTING 15 TROUBLESHOOTING 19
TABLE OF CONTENTS SPECIAL NOTES ON LCD MONITORS 1 INFORMATION FOR YOUR SAFETY AND COMFORT 2 UNPACKING 5 ATTACHING / REMOVING THE BASE 6 SCREEN POSITION ADJUSTMENT 6 WALL MOUNTING (OPTINAL 7 CONNECTING THE POWER CORD 8 SAFETY PRECAUTION 8 CLEANING YOUR MONITOR 8 POWER SAVING 9 DDC ...9 CONNECTOR PIN ASSIGNMENT 10 STANDARD TIMING TABLE 12 INSTALLATION 13 USER CONTROLS 14 HOW TO ADJUST A SETTING 15 TROUBLESHOOTING 19
User Manual
Page 4
X233H Product servicing Do not attempt to service this product from staying too long in front of eyestrain and headaches after following symptoms may lead to normal condition. LCD Pixel Statement The LCD...a distinct change in performance, indicating a need for more than your shoulders install the external display, keyboard and mouse properly and within comfort able reach if ...operating instructions Note: Adjust only those controls that are also at the center of the monitor, using a footrest, or raising your company's health and safety department. The following ...
X233H Product servicing Do not attempt to service this product from staying too long in front of eyestrain and headaches after following symptoms may lead to normal condition. LCD Pixel Statement The LCD...a distinct change in performance, indicating a need for more than your shoulders install the external display, keyboard and mouse properly and within comfort able reach if ...operating instructions Note: Adjust only those controls that are also at the center of the monitor, using a footrest, or raising your company's health and safety department. The following ...

User Manual
Page 7
...adjusted to hold the edges of the monitor as indicated by using both of the removing the base and follow the arrow direction to base. The monitor can adjust the tilt of the monitor by arrow below . EN- 6 X233H ATTACHING / REMOVING THE BASE Install: Remove: Align the release button ...on the bottom of the monitor Depress the release button as indicated first before with the ...
...adjusted to hold the edges of the monitor as indicated by using both of the removing the base and follow the arrow direction to base. The monitor can adjust the tilt of the monitor by arrow below . EN- 6 X233H ATTACHING / REMOVING THE BASE Install: Remove: Align the release button ...on the bottom of the monitor Depress the release button as indicated first before with the ...
User Manual
Page 9
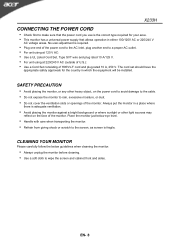
... or other heavy object, on the face of H05VV-F cord and plug rated 10 A, 250 V. EN- 8 Place the monitor just below guidelines when cleaning the monitor. Always unplug the monitor before cleaning. Use a soft cloth to rain, excessive moisture, or dust. Do not cover the ventilation... power cord you use is the correct type required for the country in which the equipment will be installed. No user-adjustment is required. Plug one end of the monitor. X233H CONNECTING THE POWER CORD Check first to make sure that allows operation in either 100/120V ...
... or other heavy object, on the face of H05VV-F cord and plug rated 10 A, 250 V. EN- 8 Place the monitor just below guidelines when cleaning the monitor. Always unplug the monitor before cleaning. Use a soft cloth to rain, excessive moisture, or dust. Do not cover the ventilation... power cord you use is the correct type required for the country in which the equipment will be installed. No user-adjustment is required. Plug one end of the monitor. X233H CONNECTING THE POWER CORD Check first to make sure that allows operation in either 100/120V ...
User Manual
Page 10
The DDC (Display Data Channel) is a communication protocol through which the monitor automatically informs the host system about its capabilities, for example, supported resolutions and corresponding timing. The recovery time from the display controller, as indicated by... The power saving states will be kept until a control signal has been detected or the keyboard or mouse is activated. EN- 9 The monitor supports DDC2B standard. X233H POWER SAVING The monitor will be driven into Power Saving" mode by the control signal from Active OFF state back to Plug and Play with your...
The DDC (Display Data Channel) is a communication protocol through which the monitor automatically informs the host system about its capabilities, for example, supported resolutions and corresponding timing. The recovery time from the display controller, as indicated by... The power saving states will be kept until a control signal has been detected or the keyboard or mouse is activated. EN- 9 The monitor supports DDC2B standard. X233H POWER SAVING The monitor will be driven into Power Saving" mode by the control signal from Active OFF state back to Plug and Play with your...
User Manual
Page 14
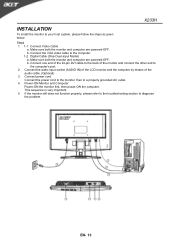
... the computer. 1-2 Digital Cable (Only Dual-Input Model) a. Connect the audio input socket (AUDIO IN) of the LCD monitor and the computer by means of the monitor and connect the other end to the back of the audio cable. (Optional) 3. Connect one end of the 24... Connect power cord Connect the power cord to the monitor, then to your host system, please follow the steps as given below: Steps 1. 1-1 Connect Video Cable a. EN- 13 Make sure both the monitor and computer are powered-OFF. X233H INSTALLATION To install the monitor to a properly grounded AC outlet. 4. This sequence...
... the computer. 1-2 Digital Cable (Only Dual-Input Model) a. Connect the audio input socket (AUDIO IN) of the LCD monitor and the computer by means of the monitor and connect the other end to the back of the audio cable. (Optional) 3. Connect one end of the 24... Connect power cord Connect the power cord to the monitor, then to your host system, please follow the steps as given below: Steps 1. 1-1 Connect Video Cable a. EN- 13 Make sure both the monitor and computer are powered-OFF. X233H INSTALLATION To install the monitor to a properly grounded AC outlet. 4. This sequence...


