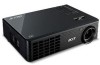
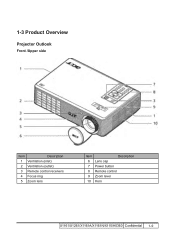
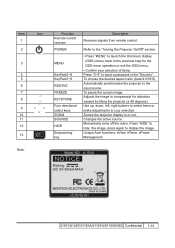
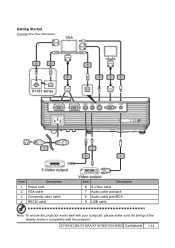
Acer X1161, X1261, X110 and H5360 Projector Series Service Guide
Page 15
1-3 Product Overview Projector Outlook Front /Upper side Item Description 1 Ventilation (inlet) 2 Ventilation (outlet) 3 Remote control receivers 4 Focus ring 5 Zoom lens Item Description 6 Lens cap 7 Power button 8 Remote control 9 Zoom lever 10 Horn X1161/X1261/X1161A/X1161N/X110/H5360 Confidential 1-
Acer X1161, X1261, X110 and H5360 Projector Series Service Guide
Page 19
... the OSD menu. • Confirm your selection. Zooms the projector display in the "Security". Adjusts the image to the input source. Changes the active source. Press "HIDE" to hide the image, press again to input a password in or out. Unique Acer functions: eView, eTimer, ePower Management. Item 1 2 3 ... degrees). Use up, down, left, right buttons to select items or make adjustments to the "Turning the Projector On/Off" section. X1161/X1261/X1161A/X1161N/X110/H5360 Confidential 1-13 To pause the screen image. POWER Refer to your selection of items. Press "0~9" ...
Acer X1161, X1261, X110 and H5360 Projector Series Service Guide
Page 20
X1161/X1261/X1161A/X1161N/X110/H5360 Confidential 1-14 Getting Started Connecting the Projector Item Description 1 Power cord 2 VGA cable 3 Composite video cable 4 RS232 cable Item Description 6 S-Video cable 7 Audio cable jack/jack 8 Audio cable jack/RCA 9 USB cable Note: To ensure the projector works well with your computer, please make sure the timing of the display mode is compatible with the projector.
Acer X1161, X1261, X110 and H5360 Projector Series Service Guide
Page 25
Screw Bit (-): 107 4. Long Nose Nipper 6. If you need to section 2-21. - Operators should wear electrostatic chains. * Note: - X1161/X1261/X1161A/X1161N/X110/H5360 Confidential 2- Tweezers 7. Hex Sleeves 5mm 5. Projector * Before you have to get into Service Mode and record the lamp usage hour, please refer to replace the Main Board, you start: This...
Acer X1161, X1261, X110 and H5360 Projector Series Service Guide
Page 55
... Remote Controller c. Ensure that the signal cables and source are work as well 14 Audio Abnormal (X1261/H5360 only) - Check Speaker X1161/X1261/X1161A/X1161N/X110/H5360 Confidential 3- Check IR Sensor Board d. Check Main Board - Do "Reset (All data)" of spec.) - Ensure the ... Controller Failed a. Check Main Board - Clean DMD Chip and Engine Module - No Symptom Procedure - Check Battery b. Ensure that your Projector is clean 10 Dead Pixel/Dust (Out of the OSD Menu 13 Function Abnormal - Ensure the projection screen without dirt - Check DMD...
Acer X1161, X1261, X110 and H5360 Projector Series Service Guide
Page 56
...and "Menu" buttons sequentially on remote controller to obtain the SNID number, then calculate the Universal Password. Execute the EDID Upgrade Procedure (refer to 6-5 of projector? - If not, please do the following steps to get into Service Mode to get the Universal Password: (1) Click the "AcerSNID" Forgetting Password 15 (... printed on the backside of Chapter 6) c. This unique password is a back door of Administrator Password which is on the Security Card) (3) Click "Calculate". X1161/X1261/X1161A/X1161N/X110/H5360 Confidential 3- No Symptom Procedure -
Acer X1161, X1261, X110 and H5360 Projector Series Service Guide
Page 57
...4-3 OSD Reset 1. After final QC step, we have to get into Service Mode (1) Press "Power", "Left", "Left" and "Menu" buttons sequentially on the projector 2. HDTV Source (480P, 720P, 1080i, 1080P) - The following actions sequentially to erase all end-users' settings and restore the default setting: (1) Please get into... to erase all saved change again and restore the OSD default setting. Minolta CL-100 - DVD player with SVGA/XGA resolution - X1161/X1261/X1161A/X1161N/X110/H5360 Confidential 4- IBM PC with Multi-system, equipped "Component", "S-Video","Composite" and "HDMI". -
Acer X1161, X1261, X110 and H5360 Projector Series Service Guide
Page 64
...Menu" buttons sequentially to get into Service Mode. (3) Choose "Analog Settings", press "Menu" button to access "Video Calibration for correction. Please put the Projector on both left and right sides should not over 8 color levels.) InFocus II / 64 gray RGBW 3. Test signal: 480i - Color saturation - G ... Service Mode. - There should appear normal and sort in Service Mode. The color should not have any lack of RGBW. X1161/X1261/X1161A/X1161N/X110/H5360 Confidential 4- Test pattern: In focus II or 64 grey RGBW * After finishing ADC adjustment, check 64 gray RGBW...
Acer X1161, X1261, X110 and H5360 Projector Series Service Guide
Page 66
... "Display mode" is "Bright", "Brightness" is "50", "Contrast" is "70", and the "Format" is normal. 5. Check if the "mute" is "4:3". X1161/X1261/X1161A/X1161N/X110/H5360 Confidential 4-10 Adjust the volume to maximum by VGA cable, press "Menu" button, get into OSD mode, the settings are well performed... diagonal 1. Connect VGA IN port of Chroma by using the remote controller. - Equipment: DVD Player with VGA port of Projector with HDMI output - Product must be warmed up for H5360) Procedure Inspection item Criteria - Environment luminance: 2 Lux - -
Acer X1161, X1261, X110 and H5360 Projector Series Service Guide
Page 68
...verify the (DDC) DDC1/DDC2B operation of the DDC test is functioning smoothly. Display Data Channel - T he purpose of the projector and to verify Plug & Play function. Focus ring is to full screen size using OSD Horizontal and Vertical Size controls. Well-...functioned It should be complete and workable. X1161/X1261/X1161A/X1161N/X110/H5360 Confidential 4-12 Check points for functionality. Function Inspection General - All OSD functions must be checked for exterior...
Acer X1161, X1261, X110 and H5360 Projector Series Service Guide
Page 69
... Laptop Note: - The FW Upgrade procedure for X1161A/X1161N/X110/H5360 is the same as X1161, we take X1161 for X1261/H5360) - Please download "DLP Composer Lite 9.2" and "X1161 X1261 FlashDeviceParameters" from website to put in PC and set right path in 5-4 step 4) Note: - Projector - X1161/X1261/X1161A/X1161N/X110/H5360 Confidential 5- RS232 cable: 42.83618G001 (for...
Acer X1161, X1261, X110 and H5360 Projector Series Service Guide
Page 72
...on "power" button and plug in the power cord. - Connect projector with PC by USB cable. 2. If you have installed the USB driver, there is no need to perform this action. (1) (2) (3) (5) X1161/X1261/X1161A/X1161N/X110/H5360 Confidential 5- H old on the screen. (2) Select "Install... the software automatically (Recommended)". (3) Click "Next". (4) Searching picture, please wait for X1161/ X1161A/X1161N/X110) 1. The power LED lights red and blue simultaneously after 5 seconds, then loosen "power" button. - Note: - 5-3 USB Driver...
Acer X1161, X1261, X110 and H5360 Projector Series Service Guide
Page 73
... Composer installation files in the power cord. - C onnect projector with PC by RS232 cable. (for X1161/X1161A/X1161N/X110) - Click "X1161 X1261 FlashDeviceParameters" folder. - H old on "power" button and plug in . - Please connect projector with PC by USB cable. (for X1261/H5360) Note: - Click "OK". X1161/X1261/X1161A/X1161N/X110/H5360 Confidential 5- Execute the "DLP ComposerTM Lite...
Acer X1161, X1261, X110 and H5360 Projector Series Service Guide
Page 76
X1161/X1261/X1161A/X1161N/X110/H5360 Confidential 5- 5-5 Waveform Download - Hold on "power" button and plug in the power cord. - After 5 seconds, the projector will flash blue, then loosen "power" button. - Waveform Download is completed. After 2 seconds, the power LED will automatically get into standby status. -
Acer X1161, X1261, X110 and H5360 Projector Series Service Guide
Page 78
EDID File (*.ini) Hardware - Monitor - EDID Program - Projector - DVI Cable (42.83N06G001) (for EDID Key-in (Fixture: JP3 must be closed) - Generic Fixture (80.00001.001) for H5360) - Power Adapter (47.57803G001) - 6-2 Equipment Needed Software - RS-232 9 Pin Cable (pin to DVI(F) Adapter (42.82B13G001) (for Projector (42.53506G002) - Power Cord for H5360) - VGA Cable (42.87305G102) - HDMI(M) to pin, F-M) (42.83C07G001) - PC X1161/X1261/X1161A/X1161N/X110/H5360 Confidential 6-
Acer X1161, X1261, X110 and H5360 Projector Series Service Guide
Page 79
Connect all ports (1) Connect P1 of fixture with COM Port of PC/Laptop by RS232 Cable. (2) Connect P3 of fixture with VGA Port of projector by VGA Cable. (3) Plug Power Adapter to JP1 of fixture. (4) Plug Power Cord to projector. 6-3 Setup Procedure (VGA) 1. VGA Cable P3 JP1 Adapter JP3 P1 RS232 Cable Power Port VGA Port X1161/X1261/X1161A/X1161N/X110/H5360 Confidential 6- Note: You must confirm that the JP3 is closed.
Acer X1161, X1261, X110 and H5360 Projector Series Service Guide
Page 83
D.C. X1161 25 X1161/X1261/X1161A/X1161N/X110/H5360 Confidential For updated part numbers, please refer to show the exploded image of the projector. Appendix A (Exploded Image) Note: This chapter is only designed to RSPL report.
Acer X1161, X1261, X110 and H5360 Projector Series Service Guide
Page 84
...Description BOTTOM MODULE X1161 ENGINE MODULE X1161 FAN SHIELDING MODULE X1161 IO MODULE X1161 FRONT MODULE X1161 LAMP MODULE FOR PROJECTOR X1161 LAMP MODULE X1161 ASSY LAMP COVER MODULE X1161 (SERVICE) LAMP COVER LN2520 X1161 LAMP COVER AL FOIL X1161 LOCK SCREW PAN...X1161 MYLAR LIGHTCUT ENG-BLOWER X1161 MYLAR FOR LENS X1161 SPONGE LIGHTCUT ZOOM X1161 SPONGE POWER BUTTON X1161 EMI GASKET W13*H3*L40 EMI GASKET / 6*6*55 EMI GASKET H30*L30*W10 EMI TAPE W*20/L*70 EMI TAPE L25*W16 STAND OFF M3*4L D8.0 2100MP SPONGE LIGHTCUT FR-CW X1161 NAME LABEL X1161 Parts Supply V V V V X1161/X1261/X1161A/X1161N...
Acer X1161, X1261, X110 and H5360 Projector Series Service Guide
Page 86
... BOTTOM MODULE X1261 ENGINE MODULE X1261 FAN SHIELDING MODULE X1161 IO MODULE X1261 FRONT MODULE X1161 LAMP MODULE FOR PROJECTOR X1161 LAMP MODULE X1161 ASSY LAMP COVER MODULE X1161 (SERVICE) LAMP COVER LN2520 X1161 LAMP COVER AL FOIL X1161 LOCK SCREW PAN MECH M3*8.5-3.5 BLACK (1018+HEAT TREATMENT...X1161 MYLAR FOR LENS X1161 SPONGE LIGHTCUT ZOOM X1161 SPONGE POWER BUTTON X1161 EMI GASKET W13*H3*L40 EMI GASKET / 6*6*55 EMI GASKET H30*L30*W10 EMI TAPE W*20/L*70 EMI TAPE L25*W16 STAND OFF M3*4L D8.0 2100MP SPONGE LIGHTCUT FR-CW X1161 NAME LABEL X1261 Parts Supply V V V V X1161/X1261/X1161A/X1161N...
Acer X1161, X1261, X110 and H5360 Projector Series Service Guide
Page 104
X1161/X1261/X1161A/X1161N/X110/H5360 Confidential I . Serial Number System Definition Serial Number Format for Projector (take X1261 for X1261. Its serial code is produced at CPC on fifteenth week of the year = 15) 3 : 00000 = Serial Numbers 4 : 59 = Manufacturing Code 5 : 0 = Version Code 6 : 1 = Auto-Language Code EX: EYK0201001915000005901 This label represents the serial number for example) EYK0201001 915 00000 59 0 1 1 2 3 4 5 6 1 : EYK0201001 = Part Number 2 : 915 = Date Code (ex:2009 = 9, the fifteenth week of 2009. It is 00000. Appendix B I