
User Manual
Page 17
... instructions xiii Tips and information for comfortable use xiii Your Acer tablet PC tour 1 Tablet PC 1 Front view 1 Back view 2 Top view 3 Bottom view 3 Left view 4 Right view 4 Booting your tablet 5 Key functions for boot menus 5 Connect the tablet to the keyboard dock 5 Secure the tablet to the keyboard dock 6 Keyboard dock 6 Top view 6 Front view...
... instructions xiii Tips and information for comfortable use xiii Your Acer tablet PC tour 1 Tablet PC 1 Front view 1 Back view 2 Top view 3 Bottom view 3 Left view 4 Right view 4 Booting your tablet 5 Key functions for boot menus 5 Connect the tablet to the keyboard dock 5 Secure the tablet to the keyboard dock 6 Keyboard dock 6 Top view 6 Front view...
User Manual
Page 20
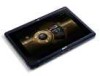
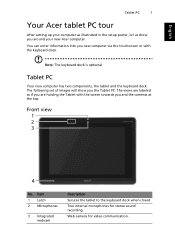
...Front view 1 2 3 4 No. English Tablet PC 1 Your Acer tablet PC tour After setting up your computer as if you are labeled as illustrated in the setup poster, let us show you the Tablet PC. Tablet PC Your new computer has two components, the tablet and the keyboard dock. Note: The keyboard...and the cameras at the top. Two internal microphones for video communication. Item 1 Latch 2 Microphones 3 Integrated webcam Description Secures the tablet to the keyboard dock when closed. You can enter information into you new computer via the touchscreen or with the screen towards you...
...Front view 1 2 3 4 No. English Tablet PC 1 Your Acer tablet PC tour After setting up your computer as if you are labeled as illustrated in the setup poster, let us show you the Tablet PC. Tablet PC Your new computer has two components, the tablet and the keyboard dock. Note: The keyboard...and the cameras at the top. Two internal microphones for video communication. Item 1 Latch 2 Microphones 3 Integrated webcam Description Secures the tablet to the keyboard dock when closed. You can enter information into you new computer via the touchscreen or with the screen towards you...
User Manual
Page 21
... system). Press the power button while holding the Windows key to perform the + < Alt> + function (this is referred to open the Start menu or wake tablet from Sleep mode. System in Standby mode. Item Description 1 Integrated webcam Web camera for video communication. 2 SIM card slot Accepts a 3G SIM card (configuration may... indicator color Blue Slow flash: Orange Flashing: Orange Off Power status System turned on model). 3 Speaker Delivers audio output. System entering Hibernate mode. English 2 Your Acer tablet PC tour No.
... system). Press the power button while holding the Windows key to perform the + < Alt> + function (this is referred to open the Start menu or wake tablet from Sleep mode. System in Standby mode. Item Description 1 Integrated webcam Web camera for video communication. 2 SIM card slot Accepts a 3G SIM card (configuration may... indicator color Blue Slow flash: Orange Flashing: Orange Off Power status System turned on model). 3 Speaker Delivers audio output. System entering Hibernate mode. English 2 Your Acer tablet PC tour No.
User Manual
Page 22
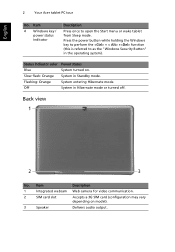
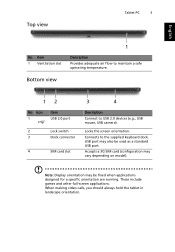
... No. Item 1 Ventilation slot Bottom view 1 Description Provides adequate air flow to the supplied keyboard dock. When making video calls, you should always hold the tablet in landscape orientation. Accepts a 3G SIM card (configuration may be used as a standard USB port. Note: Display orientation may vary depending on model). USB port... full-screen applications. Icon 1 Item USB 2.0 port 2 Lock switch 3 Dock connector 4 SIM card slot 3 4 Description Connect to USB 2.0 devices (e.g., USB mouse, USB camera). Top view Tablet PC 3 English No.
... No. Item 1 Ventilation slot Bottom view 1 Description Provides adequate air flow to the supplied keyboard dock. When making video calls, you should always hold the tablet in landscape orientation. Accepts a 3G SIM card (configuration may be used as a standard USB port. Note: Display orientation may vary depending on model). USB port... full-screen applications. Icon 1 Item USB 2.0 port 2 Lock switch 3 Dock connector 4 SIM card slot 3 4 Description Connect to USB 2.0 devices (e.g., USB mouse, USB camera). Top view Tablet PC 3 English No.
User Manual
Page 23
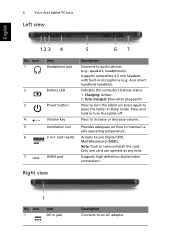
...Icon 1 Item DC-in jack Description Connects to increase or decrease volume. Acer smart handheld headsets). Fully charged: Blue when plugged in microphone (e.g. Press and hold to turn the tablet off. Press to an AC adapter. Supports compatible 3.5 mm headsets with ...Description Connects to remove/install the card. Press to turn the tablet on; press again to maintain a safe operating temperature. Note: Push to audio devices (e.g., speakers, headphones). Only one card can operate at any time. 4 Your Acer tablet PC tour Left view English 12 3 4 5 67 No...
...Icon 1 Item DC-in jack Description Connects to increase or decrease volume. Acer smart handheld headsets). Fully charged: Blue when plugged in microphone (e.g. Press and hold to turn the tablet off. Press to an AC adapter. Supports compatible 3.5 mm headsets with ...Description Connects to remove/install the card. Press to turn the tablet on; press again to maintain a safe operating temperature. Note: Push to audio devices (e.g., speakers, headphones). Only one card can operate at any time. 4 Your Acer tablet PC tour Left view English 12 3 4 5 67 No...
User Manual
Page 24
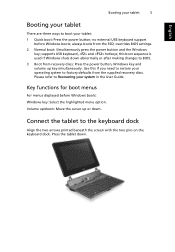
... or after making changes to BIOS. 3 Boot from recovery discs: Press the power button, Windows key and volume up or down. Press the tablet down : Move the cursor up key simultaneously. Key functions for boot menus For menus displayed before Windows boots; overrides BIOS settings. 2 Normal boot...: Simultaneously press the power button and the Windows key; this if you need to restore your operating system to boot your tablet: 1 Quick boot: Press the power button; Please refer to the keyboard dock Align the two arrows printed beneath the screen with the two...
... or after making changes to BIOS. 3 Boot from recovery discs: Press the power button, Windows key and volume up or down. Press the tablet down : Move the cursor up key simultaneously. Key functions for boot menus For menus displayed before Windows boots; overrides BIOS settings. 2 Normal boot...: Simultaneously press the power button and the Windows key; this if you need to restore your operating system to boot your tablet: 1 Quick boot: Press the power button; Please refer to the keyboard dock Align the two arrows printed beneath the screen with the two...
User Manual
Page 25
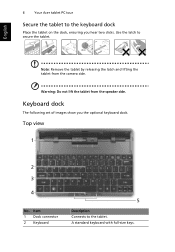
English Note: Remove the tablet by releasing the latch and lifting the tablet from the speaker side. 6 Your Acer tablet PC tour Secure the tablet to the keyboard dock Place the tablet on the dock, ensuring you the optional keyboard dock. A standard keyboard with full-size keys. Warning: Do not lift the tablet from the camera side. Use the latch to the tablet. Keyboard dock The following set of images show you hear two clicks. Top view 1 2 3 4 No. Item 1 Dock connector 2 Keyboard 5 Description Connects to secure the tablet.
English Note: Remove the tablet by releasing the latch and lifting the tablet from the speaker side. 6 Your Acer tablet PC tour Secure the tablet to the keyboard dock Place the tablet on the dock, ensuring you the optional keyboard dock. A standard keyboard with full-size keys. Warning: Do not lift the tablet from the camera side. Use the latch to the tablet. Keyboard dock The following set of images show you hear two clicks. Top view 1 2 3 4 No. Item 1 Dock connector 2 Keyboard 5 Description Connects to secure the tablet.
User Manual
Page 26
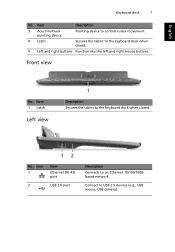
English Keyboard dock 7 No. Front view No. Item 1 Latch Left view 1 Description Secures the tablet to the keyboard dock when closed . 12 No. Item Description 3 Acer FineTrack pointing device Pointing device to control cursor movement. 4 Latch Secures the tablet to the keyboard dock when closed . 5 Left and right buttons Function like the left and right mouse buttons. Icon 1 2 Item Ethernet (RJ-45) port USB 2.0 port Description Connects to USB 2.0 devices (e.g., USB mouse, USB camera). Connect to an Ethernet 10/100/1000based network.
English Keyboard dock 7 No. Front view No. Item 1 Latch Left view 1 Description Secures the tablet to the keyboard dock when closed . 12 No. Item Description 3 Acer FineTrack pointing device Pointing device to control cursor movement. 4 Latch Secures the tablet to the keyboard dock when closed . 5 Left and right buttons Function like the left and right mouse buttons. Icon 1 2 Item Ethernet (RJ-45) port USB 2.0 port Description Connects to USB 2.0 devices (e.g., USB mouse, USB camera). Connect to an Ethernet 10/100/1000based network.
User Manual
Page 39
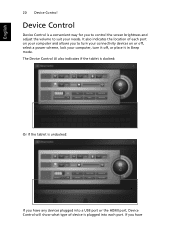
... scheme, lock your needs. It also indicates the location of device is a convenient way for you have The Device Control UI also indicates if the tablet is docked: Or if the tablet is undocked: If you to control the screen brightness and adjust the volume to turn it in Sleep mode.
... scheme, lock your needs. It also indicates the location of device is a convenient way for you have The Device Control UI also indicates if the tablet is docked: Or if the tablet is undocked: If you to control the screen brightness and adjust the volume to turn it in Sleep mode.
User Manual
Page 46
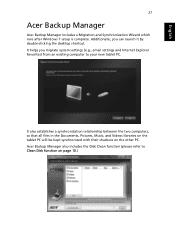
... in the Documents, Pictures, Music, and Videos libraries on the tablet PC will be kept synchronized with their shadows on page 10.) Acer Backup Manager also includes the Disk Clean function (please refer to your new tablet PC. English 27 Acer Backup Manager Acer Backup Manager includes a Migration and Synchronization Wizard which runs after Windows...
... in the Documents, Pictures, Music, and Videos libraries on the tablet PC will be kept synchronized with their shadows on page 10.) Acer Backup Manager also includes the Disk Clean function (please refer to your new tablet PC. English 27 Acer Backup Manager Acer Backup Manager includes a Migration and Synchronization Wizard which runs after Windows...
User Manual
Page 47
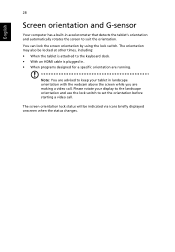
... webcam above the screen while you are running. Please rotate your display to the landscape orientation and use the lock switch to keep your tablet in . • When programs designed for a specific orientation are making a video call . The orientation may also be indicated via icons... briefly displayed onscreen when the status changes. English 28 Screen orientation and G-sensor Your computer has a built-in accelerometer that detects the tablet's orientation and automatically rotates the screen to the keyboard dock. • With an HDMI cable is attached to suit the orientation. You...
... webcam above the screen while you are running. Please rotate your display to the landscape orientation and use the lock switch to keep your tablet in . • When programs designed for a specific orientation are making a video call . The orientation may also be indicated via icons... briefly displayed onscreen when the status changes. English 28 Screen orientation and G-sensor Your computer has a built-in accelerometer that detects the tablet's orientation and automatically rotates the screen to the keyboard dock. • With an HDMI cable is attached to suit the orientation. You...
User Manual
Page 48
... connected to conserve energy. Note: An external DVD drive needs to be reminded to remove the discs from the drive before your computer. While the tablet is detected for a period of time (called an inactivity timeout), the computer stops some or all power-saving chores for maximum power conservation and maximum...
... connected to conserve energy. Note: An external DVD drive needs to be reminded to remove the discs from the drive before your computer. While the tablet is detected for a period of time (called an inactivity timeout), the computer stops some or all power-saving chores for maximum power conservation and maximum...
User Manual
Page 54
... computer's BIOS. To activate the BIOS utility, connect a USB keybaord to run this utility. while the computer logo is a hardware configuration program built into your tablet PC and press during the POST; Note: To access the BIOS Utility, you do not need to run it. English BIOS utility 35 BIOS utility...
... computer's BIOS. To activate the BIOS utility, connect a USB keybaord to run this utility. while the computer logo is a hardware configuration program built into your tablet PC and press during the POST; Note: To access the BIOS Utility, you do not need to run it. English BIOS utility 35 BIOS utility...

User Manual
Page 56
To view the COA, you will need to a USB port and the printer. The COA is connected securely to pull out the tab. 1 Place the tablet screen down on a suitable surface and open the SD Card slot cover. 2 Insert a pen into one of security features and may not be removed from ...
To view the COA, you will need to a USB port and the printer. The COA is connected securely to pull out the tab. 1 Place the tablet screen down on a suitable surface and open the SD Card slot cover. 2 Insert a pen into one of security features and may not be removed from ...


