User Guide
Page 2
... to the contents hereof and specifically disclaims the implied warranties of such revisions or changes. All correspondence concerning your computer. Copyright © 2009. Veriton Series Desktop Computer Model number Serial number Purchase date Place of Acer Incorporated. No part of purchase information in any form or by any person of merchantability or fitness for...
... to the contents hereof and specifically disclaims the implied warranties of such revisions or changes. All correspondence concerning your computer. Copyright © 2009. Veriton Series Desktop Computer Model number Serial number Purchase date Place of Acer Incorporated. No part of purchase information in any form or by any person of merchantability or fitness for...
User Guide
Page 6
As an ENERGY STAR partner, Acer Inc. Incorrect computer usage may appear in a cost effective way and without sacrificing quality or product features. More information refers to Acer system with an ENERGY STAR sticker. Long work periods, bad posture, poor work habits, stress, ... throbbing • stiffness or tightness This product has been shipped enabled for energy efficiency. Tips and information for comfortable use Computer users may complain of eyestrain and headaches after long hours of working conditions, personal health and other musculoskeletal disorders. vi ENERGY...
As an ENERGY STAR partner, Acer Inc. Incorrect computer usage may appear in a cost effective way and without sacrificing quality or product features. More information refers to Acer system with an ENERGY STAR sticker. Long work periods, bad posture, poor work habits, stress, ... throbbing • stiffness or tightness This product has been shipped enabled for energy efficiency. Tips and information for comfortable use Computer users may complain of eyestrain and headaches after long hours of working conditions, personal health and other musculoskeletal disorders. vi ENERGY...

User Guide
Page 7
vii • coldness or weakness If you view your monitor more comfortable computer use , consult a physician immediately and inform your company's health and safety department. Observe the following sections provide suggestions on your leg muscles • take short ... and mouse properly and within comfortable reach • if you have these symptoms, or any other recurring or persistent discomfort and/or pain related to computer use . The following tips: • refrain from staying too long in one fixed posture • avoid slouching forward and/or leaning backward • stand up...
vii • coldness or weakness If you view your monitor more comfortable computer use , consult a physician immediately and inform your company's health and safety department. Observe the following sections provide suggestions on your leg muscles • take short ... and mouse properly and within comfortable reach • if you have these symptoms, or any other recurring or persistent discomfort and/or pain related to computer use . The following tips: • refrain from staying too long in one fixed posture • avoid slouching forward and/or leaning backward • stand up...

User Guide
Page 8
... Breathe fresh air as often as possible. • Exercise regularly and maintain a healthy body. If this is unavoidable, work habits to make your computer use more information, please refer to an awkward viewing angle. • Avoid looking at the middle of the display. • Adjust the display ...shades or blinds • using a task light • changing the display's viewing angle • using a glare-reduction filter • using the computer on page 20 in such a way that the side faces the window or any light source • minimizing room light by looking at bright light...
... Breathe fresh air as often as possible. • Exercise regularly and maintain a healthy body. If this is unavoidable, work habits to make your computer use more information, please refer to an awkward viewing angle. • Avoid looking at the middle of the display. • Adjust the display ...shades or blinds • using a task light • changing the display's viewing angle • using a glare-reduction filter • using the computer on page 20 in such a way that the side faces the window or any light source • minimizing room light by looking at bright light...
User Guide
Page 9
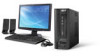
... v Tips and information for comfortable use vi 1 System tour 1 Front panel 2 Rear panel 2 Optical drive 3 Taking care of your CDs and DVDs 3 2 Setting up your computer 5 Arranging a comfortable work area 6 Positioning your monitor 6 Positioning your keyboard 6 Positioning your mouse 6 Connecting peripherals 7 Connecting your mouse and keyboard 7 USB interface 7 PS/2 interface 7 Connecting...
... v Tips and information for comfortable use vi 1 System tour 1 Front panel 2 Rear panel 2 Optical drive 3 Taking care of your CDs and DVDs 3 2 Setting up your computer 5 Arranging a comfortable work area 6 Positioning your monitor 6 Positioning your keyboard 6 Positioning your mouse 6 Connecting peripherals 7 Connecting your mouse and keyboard 7 USB interface 7 PS/2 interface 7 Connecting...

User Guide
Page 12
... Microphone-in jack (front) Speaker-out/line-out port USB ports OBR (One Button Recovery) button (for selected models) Indicators Power button Rear panel Your computer's rear panel consists of the following: Icon Component Power supply Power cord socket Voltage selector switch PS/2 mouse port PS/2 keyboard port Serial port Parallel...
... Microphone-in jack (front) Speaker-out/line-out port USB ports OBR (One Button Recovery) button (for selected models) Indicators Power button Rear panel Your computer's rear panel consists of the following: Icon Component Power supply Power cord socket Voltage selector switch PS/2 mouse port PS/2 keyboard port Serial port Parallel...

User Guide
Page 13
... sure that the label or title side of dirt or damage can affect the data on the disk, impair DVD-ROM is a type of your computer's CD or DVD drive: 1. English 3 Audio jacks function table Color/Use Blue Green Pink Orange Black Gray Headphone Line-in Headphone 1.1 CH Line-in Line...-super multi drive allow you to record or burn recordable and rewritable disks. Any kind of the disk is located on page 7 Optical drive Your computer may come with a CD-ROM, DVD-ROM, DVD/CD-RW combo, DVD-Dual or DVD-Super multi drive. When the disk tray slides open, place...
... sure that the label or title side of dirt or damage can affect the data on the disk, impair DVD-ROM is a type of your computer's CD or DVD drive: 1. English 3 Audio jacks function table Color/Use Blue Green Pink Orange Black Gray Headphone Line-in Headphone 1.1 CH Line-in Line...-super multi drive allow you to record or burn recordable and rewritable disks. Any kind of the disk is located on page 7 Optical drive Your computer may come with a CD-ROM, DVD-ROM, DVD/CD-RW combo, DVD-Dual or DVD-Super multi drive. When the disk tray slides open, place...

User Guide
Page 14
Cleaning kits can be purchased in a circular motion. • Clean your CD or DVD drive periodically. Do not wipe in any computer or electronics shop. 4 1 System tour English the disk lens reader on the CD or DVD drive, or stop the computer from successfully reading the disk. • When handling disks, always hold them by the edges to avoid smudges or fingerprints. • When cleaning disks, use a clean, dust-free cloth and wipe in a straight line from the center to the Cleaning Kit for instructions. You may refer to the edge.
Cleaning kits can be purchased in a circular motion. • Clean your CD or DVD drive periodically. Do not wipe in any computer or electronics shop. 4 1 System tour English the disk lens reader on the CD or DVD drive, or stop the computer from successfully reading the disk. • When handling disks, always hold them by the edges to avoid smudges or fingerprints. • When cleaning disks, use a clean, dust-free cloth and wipe in a straight line from the center to the Cleaning Kit for instructions. You may refer to the edge.
User Guide
Page 15
2 Setting up your computer
2 Setting up your computer
User Guide
Page 16
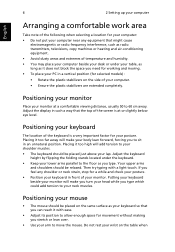
... models) : • Rotate the plastic stabilizers on the side of your wrist on the same surface as you type. Do not rest your computer. • Ensure the plastic stabilizers are extended completely. Then try typing with ease. • Adjust its position to allow enough space for movement...copy machines or heating and air-conditioning equipment. • Avoid dusty areas and extremes of temperature and humidity. • You may place your computer beside your desk or under the keyboard. • Keep your lower arms parallel to the floor as your keyboard so that you can reach...
... models) : • Rotate the plastic stabilizers on the side of your wrist on the same surface as you type. Do not rest your computer. • Ensure the plastic stabilizers are extended completely. Then try typing with ease. • Adjust its position to allow enough space for movement...copy machines or heating and air-conditioning equipment. • Avoid dusty areas and extremes of temperature and humidity. • You may place your computer beside your desk or under the keyboard. • Keep your lower arms parallel to the floor as your keyboard so that you can reach...

User Guide
Page 17
... added to the PCI Express slot, the monitor should be connected to the add-on the rear panel of your computer. Connecting your mouse and keyboard USB interface Plug your computer. located PS/2 interface Plug the PS/2 mouse and keyboard cable into any of the USB ports on the rear panel of... on the front and rear panels of your reference only. For the most part, you only have four things to the monitor manual for your computer . Note: When a VGA card is easy.
... added to the PCI Express slot, the monitor should be connected to the add-on the rear panel of your computer. Connecting your mouse and keyboard USB interface Plug your computer. located PS/2 interface Plug the PS/2 mouse and keyboard cable into any of the USB ports on the rear panel of... on the front and rear panels of your reference only. For the most part, you only have four things to the monitor manual for your computer . Note: When a VGA card is easy.
User Guide
Page 18
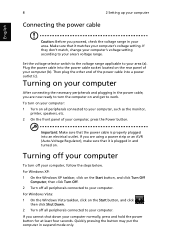
... using a power strip or an AVR (Auto-Voltage Regulator), make sure that it matches your area (a). Turning on all peripherals connected to your computer normally, press and hold the power button for at least four seconds. If you are now ready to your area. For Windows XP: 1 On... Make sure that the power cable is plugged in suspend mode only. To turn the computer on . Turning off your computer To turn off all peripherals connected to turn on your computer: 1 Turn on your computer, press the Power button. Set the voltage selector switch to the voltage range applicable to...
... using a power strip or an AVR (Auto-Voltage Regulator), make sure that it matches your area (a). Turning on all peripherals connected to your computer normally, press and hold the power button for at least four seconds. If you are now ready to your area. For Windows XP: 1 On... Make sure that the power cable is plugged in suspend mode only. To turn the computer on . Turning off your computer To turn off all peripherals connected to turn on your computer: 1 Turn on your computer, press the Power button. Set the voltage selector switch to the voltage range applicable to...

User Guide
Page 19
3 Upgrading your computer
3 Upgrading your computer
User Guide
Page 20
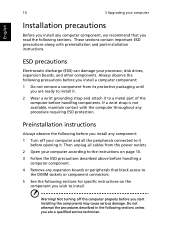
... Always observe the following before opening it before you read the following sections. English 10 3 Upgrading your computer Installation precautions Before you install any computer component, we recommend that block access to the DIMM sockets or component connectors. 5 See the following sections...packaging until you are ready to install it. 2 Wear a wrist grounding strap and attach it to a metal part of the computer before handling components. Do not attempt the procedures described in the following sections unless you are a qualified service technician. ESD precautions ...
... Always observe the following before opening it before you read the following sections. English 10 3 Upgrading your computer Installation precautions Before you install any computer component, we recommend that block access to the DIMM sockets or component connectors. 5 See the following sections...packaging until you are ready to install it. 2 Wear a wrist grounding strap and attach it to a metal part of the computer before handling components. Do not attempt the procedures described in the following sections unless you are a qualified service technician. ESD precautions ...

User Guide
Page 21
... then gently lift it upward to detach it that the components are installed according to it . See the following after installing a computer component: 1 See to the step- by-step instructions in their respective sections. 2 Replace any expansion boards or peripherals that you have... turned off your computer. To remove the computer cover 1 Turn off your computer and all cables. 2 Place your computer Caution: Before you proceed, make sure that you can install additional components. Opening your computer on page 10. If your computer is in the vertical position, remove...
... then gently lift it upward to detach it that the components are installed according to it . See the following after installing a computer component: 1 See to the step- by-step instructions in their respective sections. 2 Replace any expansion boards or peripherals that you have... turned off your computer. To remove the computer cover 1 Turn off your computer and all cables. 2 Place your computer Caution: Before you proceed, make sure that you can install additional components. Opening your computer on page 10. If your computer is in the vertical position, remove...

User Guide
Page 22
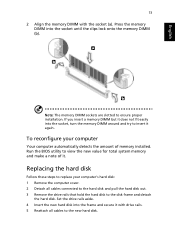
If you perform these components, contact your computer are upgradeable, such as the memory, the hard disk, the CPU and the expansion cards. To remove a memory DIMM Note: The memory DIMM has only ... the mainboard. To install a memory DIMM 1 Locate the memory DIMM socket on page 10 when installing or removing a computer component. Gently pull the memory DIMM out of the socket (b). English 12 3 Upgrading your computer Certain components of your dealer or a qualified service technician for safety purposes, we do not recommend that you...
If you perform these components, contact your computer are upgradeable, such as the memory, the hard disk, the CPU and the expansion cards. To remove a memory DIMM Note: The memory DIMM has only ... the mainboard. To install a memory DIMM 1 Locate the memory DIMM socket on page 10 when installing or removing a computer component. Gently pull the memory DIMM out of the socket (b). English 12 3 Upgrading your computer Certain components of your dealer or a qualified service technician for safety purposes, we do not recommend that you...
User Guide
Page 23
If you insert a memory DIMM but it . Replacing the hard disk Follow these steps to replace your computer Your computer automatically detects the amount of it does not fit easily into the socket until the clips lock onto the memory DIMM (b). Press the memory DIMM ...into the socket, turn the memory DIMM around and try to insert it with the socket (a). To reconfigure your computer's hard disk: 1 Remove the computer cover. 2 Detach all cables to the new hard disk. Set the drive rails aside. 4 Insert the new hard disk into the frame and...
If you insert a memory DIMM but it . Replacing the hard disk Follow these steps to replace your computer Your computer automatically detects the amount of it does not fit easily into the socket until the clips lock onto the memory DIMM (b). Press the memory DIMM ...into the socket, turn the memory DIMM around and try to insert it with the socket (a). To reconfigure your computer's hard disk: 1 Remove the computer cover. 2 Detach all cables to the new hard disk. Set the drive rails aside. 4 Insert the new hard disk into the frame and...
User Guide
Page 24
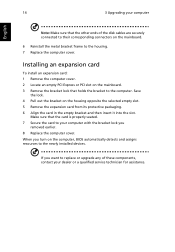
...If you want to replace or upgrade any of the disk cables are securely connected to their corresponding connectors on the computer, BIOS automatically detects and assigns resources to the computer. Save the lock. 4 Pull out the bracket on the mainboard. 3 Remove the bracket lock that the card... is properly seated. 7 Secure the card to the housing. 7 Replace the computer cover. Installing an expansion card To install an expansion card: 1 Remove the computer cover. 2 Locate an empty PCI Express or PCI slot on the housing opposite the selected empty slot. ...
...If you want to replace or upgrade any of the disk cables are securely connected to their corresponding connectors on the computer, BIOS automatically detects and assigns resources to the computer. Save the lock. 4 Pull out the bracket on the mainboard. 3 Remove the bracket lock that the card... is properly seated. 7 Secure the card to the housing. 7 Replace the computer cover. Installing an expansion card To install an expansion card: 1 Remove the computer cover. 2 Locate an empty PCI Express or PCI slot on the housing opposite the selected empty slot. ...
User Guide
Page 26
... switch but the system did not boot up. If the LED is plugged in the floppy drive? Nothing appears on the rear panel of the computer is set to the correct voltage. • Check if you properly plugged the power cable into an electrical outlet. • If you can restart your.... If the LED is not lit, no power is followed by easy answers and solutions. Just press any key to save power. If restarting your computer does not work , you are using a power strip, make sure it with a system diskette and press + + to the system. Try the following: • Check if...
... switch but the system did not boot up. If the LED is plugged in the floppy drive? Nothing appears on the rear panel of the computer is set to the correct voltage. • Check if you properly plugged the power cable into an electrical outlet. • If you can restart your.... If the LED is not lit, no power is followed by easy answers and solutions. Just press any key to save power. If restarting your computer does not work , you are using a power strip, make sure it with a system diskette and press + + to the system. Try the following: • Check if...
User Guide
Page 27
... USB port and the corresponding port on the good disk there may be a problem with the drive. Contact your USB keyboard to toggle from the computer. Check the following : • Make sure you are using the correct type of disk. • Make sure the CD or DVD is inserted...8226; Check if the CD or DVD is connected securely to the printer's documentation. Check the following : • The volume may be muted. If your computer, the internal or built-in speakers are automatically turned off. Check the following : • Make sure the printer is connected to a power outlet and ...
... USB port and the corresponding port on the good disk there may be a problem with the drive. Contact your USB keyboard to toggle from the computer. Check the following : • Make sure you are using the correct type of disk. • Make sure the CD or DVD is inserted...8226; Check if the CD or DVD is connected securely to the printer's documentation. Check the following : • The volume may be muted. If your computer, the internal or built-in speakers are automatically turned off. Check the following : • Make sure the printer is connected to a power outlet and ...


