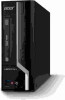
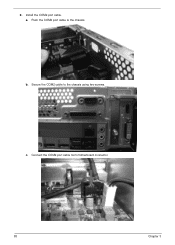
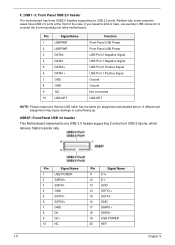
Acer Veriton X4620G Desktop Service Guide
Page 50
Pull the COM2 port cable form the chassis. Disconnect the COM2 port cable from motherboard. Chapter 3 42 c. Removing the COM2 Port Cable and Printer Port Cable 1. Remove the two screws that secure the COM2 cable to the chassis. b. a. Remove the COM2 port cable.
Acer Veriton X4620G Desktop Service Guide
Page 51
2. a. b. c. Pull the printer port cable from motherboard. Remove the two screws that secure the print cable to the chassis. Disconnect the printer port cable from the chassis. 43 Chapter 3 Remove the printer port cable.
Acer Veriton X4620G Desktop Service Guide
Page 90
Push the printer port cable to the chassis using two screws. b. Secure the print cable to the chassis. c. Chapter 3 82 Reinstalling the Printer Port Cable and COM2 Port Cable 1. Install the printer port cable. a. Connect the printer port cable to motherboard connector.
Acer Veriton X4620G Desktop Service Guide
Page 91
a. c. Connect the COM2 port cable from motherboard connector. 83 Chapter 3 b. Push the COM2 port cable to the chassis using two screws. Secure the COM2 cable to the chassis. 2. Install the COM2 port cable.
Acer Veriton X4620G Desktop Service Guide
Page 114
Jumper Setting The section explains how to turn the system off. 1-2: NORMAL 2-3: ME disable 3-pin BIOS Flash protect 1-2: BIOS_WP 2-3: NORMAL CLR_CMOS Chapter 5 106 Pin 1 is labeled. Jumper Settings Jumper CLR_CMOS ME_DISABLE BIOS_WP Type 3-pin 3-pin Description Clear CMOS Disable ME Setting (default) 1-2: NORMAL 2-3: CLEAR Before clearing the CMOS, make sure to set jumper for correct configuration of the motherboard jumpers. Checking Jumper Settings The following illustration shows the location of the mainboard.
Acer Veriton X4620G Desktop Service Guide
Page 115
Whenthe jumper cap is placed on both pins, thejumper is OPEN. The illustrations show a 2-pin jumper. If you remove the jumpercap, or place the jumper cap on the correct pins. When setting the jumpers, ensure that the jumper caps are Placed on just one pin are SHORT. 107 Chapter 5 Pins1 and 2 are numbered. Setting Jumper Use the motherboard jumpers to set system configuration options. Jumpers with more Than one pin,the jumper is SHORT. This illustration shows a 3-pin jumper.
Acer Veriton X4620G Desktop Service Guide
Page 116
... 9 Left channel to HD onboard headers,please set as below picture. Checking Connector Connecting Optional Devices Refer to the following for information on connecting the motherboard's optionaldevices: F_AUDIO: Front Panel Audio Header The front panel audio header allows the user to install auxiliary front-orientedmicrophone and line-out ports for easier...
Acer Veriton X4620G Desktop Service Guide
Page 119
... at the front of case, use auxiliary USB connector to connect the front-mounted ports tothe motherboard. F_USB1~3: Front Panel USB 2.0 header The motherboard has three USB2.0 headers supporting six USB 2.0 ports. USB3F: Front Panel USB 3.0 header This Motherboard implements one USB 3.0 header supporting 2 extra front USB 3.0ports, which delivers 5Gb/s transfer rate...