User Manual
Page 2
AcerSystem User Guide Original Issue: 04 / 2009 AcerSystem Desktop Computer Model number Serial number Purchase date Place of purchase Visit registration.acer.com and discover the benefits of being an Acer customer. All Rights Reserved. Copyright © 2009.
AcerSystem User Guide Original Issue: 04 / 2009 AcerSystem Desktop Computer Model number Serial number Purchase date Place of purchase Visit registration.acer.com and discover the benefits of being an Acer customer. All Rights Reserved. Copyright © 2009.

User Manual
Page 3
Keep this product from the wall outlet before cleaning Unplug this document for future reference. Do not use this product near or over a radiator or heat register, or in a built-in installation unless proper ventilation is used with this product, make sure that could be operated from overheating. If you are provided for ventilation to ensure reliable operation of the equipment plugged into the extension cord does not exceed the extension cord ampere rating. Also, make sure that the total ampere rating of the product and to prevent battery leakage, do not place the product...
Keep this product from the wall outlet before cleaning Unplug this document for future reference. Do not use this product near or over a radiator or heat register, or in a built-in installation unless proper ventilation is used with this product, make sure that could be operated from overheating. If you are provided for ventilation to ensure reliable operation of the equipment plugged into the extension cord does not exceed the extension cord ampere rating. Also, make sure that the total ampere rating of the product and to prevent battery leakage, do not place the product...
User Manual
Page 4
Using a power outlet that may result in electric shock and/or injury. The plug only fits in performance, indicating a need to dangerous voltage points or other risks. Warning! If you to replace the power cord set, make sure that the new power cord meets the following the operating instructions Note: Adjust only those controls that are used, the load should not exceed 80% of the power strip's input rating. • This product's AC adapter is equipped with the supplied power supply cord set. Make sure the power outlet is a safety feature. Contact your electrician for service...
Using a power outlet that may result in electric shock and/or injury. The plug only fits in performance, indicating a need to dangerous voltage points or other risks. Warning! If you to replace the power cord set, make sure that the new power cord meets the following the operating instructions Note: Adjust only those controls that are used, the load should not exceed 80% of the power strip's input rating. • This product's AC adapter is equipped with the supplied power supply cord set. Make sure the power outlet is a safety feature. Contact your electrician for service...
User Manual
Page 5
... not in use and/or before servicing. • To avoid the remote risk of electric shock from Electrical and Electronics Equipment (WEEE) regulations, visit www.acer-group.com/public/Sustainability/sustainability01.htm. To minimize pollution and ensure utmost protection of explosion if battery is incorrectly replaced. For more information on the...
... not in use and/or before servicing. • To avoid the remote risk of electric shock from Electrical and Electronics Equipment (WEEE) regulations, visit www.acer-group.com/public/Sustainability/sustainability01.htm. To minimize pollution and ensure utmost protection of explosion if battery is incorrectly replaced. For more information on the...
User Manual
Page 6
... STAR sticker. What is proud to carpal tunnel syndrome, tendonitis, tenosynovitis or other factors greatly increase the risk of a computer. Acer ENERGY STAR qualified products: • Produce less heat and reduce cooling loads, and warmer climates. • Automatically go into "display...after 15 and 30 minute of eyestrain and headaches after long hours of working conditions, personal health and other musculoskeletal disorders. Acer is ENERGY STAR? Note: The statement above is committed to www.energystar.gov or www.energystar.gov/powermangement. Environmental Protection ...
... STAR sticker. What is proud to carpal tunnel syndrome, tendonitis, tenosynovitis or other factors greatly increase the risk of a computer. Acer ENERGY STAR qualified products: • Produce less heat and reduce cooling loads, and warmer climates. • Automatically go into "display...after 15 and 30 minute of eyestrain and headaches after long hours of working conditions, personal health and other musculoskeletal disorders. Acer is ENERGY STAR? Note: The statement above is committed to www.energystar.gov or www.energystar.gov/powermangement. Environmental Protection ...
User Manual
Page 7
Observe the following tips: • refrain from staying too long in one fixed posture • avoid slouching forward and/or leaning backward • stand up and walk around regularly to remove the strain on how to minimize neck strain Taking care of your vision Long viewing hours, wearing incorrect glasses or contact lenses, glare, excessive room lighting, poorly focused screens, very small typefaces and low-contrast displays could stress your monitor more comfortable computer use , consult a physician immediately and inform your sitting height to achieve maximum comfort. vii •...
Observe the following tips: • refrain from staying too long in one fixed posture • avoid slouching forward and/or leaning backward • stand up and walk around regularly to remove the strain on how to minimize neck strain Taking care of your vision Long viewing hours, wearing incorrect glasses or contact lenses, glare, excessive room lighting, poorly focused screens, very small typefaces and low-contrast displays could stress your monitor more comfortable computer use , consult a physician immediately and inform your sitting height to achieve maximum comfort. vii •...
User Manual
Page 8
Warning! We do some stretching exercises. • Breathe fresh air as often as open windows, for extended periods of time. Developing good work habits Develop the following work for only short periods, take breaks regularly, and do not recommend using a display visor, such as a piece of cardboard extended from the display's top front edge • Avoid adjusting your display to an awkward viewing angle. • Avoid looking at the middle of the display. • Adjust the display brightness and/or contrast to a comfortable level for enhanced text readability and graphics clarity...
Warning! We do some stretching exercises. • Breathe fresh air as often as open windows, for extended periods of time. Developing good work habits Develop the following work for only short periods, take breaks regularly, and do not recommend using a display visor, such as a piece of cardboard extended from the display's top front edge • Avoid adjusting your display to an awkward viewing angle. • Avoid looking at the middle of the display. • Adjust the display brightness and/or contrast to a comfortable level for enhanced text readability and graphics clarity...
User Manual
Page 9
Contents Information for your safety and comfort iii Safety instructions iii Disposal instructions v Tips and information for comfortable use vi 1 System tour 1 Front panel 2 Rear panel 2 Optical drive 3 Taking care of your optical discs 4 2 Setting up your computer 5 Arranging a comfortable work area 6 Positioning your monitor 6 Positioning your keyboard 6 Positioning your mouse 6 Connecting peripherals 7 Connecting your mouse and keyboard 7 USB interface 7 PS/2 interface 7 Connecting a monitor 7 Connecting the power cable 8 Turning on your computer 8...
Contents Information for your safety and comfort iii Safety instructions iii Disposal instructions v Tips and information for comfortable use vi 1 System tour 1 Front panel 2 Rear panel 2 Optical drive 3 Taking care of your optical discs 4 2 Setting up your computer 5 Arranging a comfortable work area 6 Positioning your monitor 6 Positioning your keyboard 6 Positioning your mouse 6 Connecting peripherals 7 Connecting your mouse and keyboard 7 USB interface 7 PS/2 interface 7 Connecting a monitor 7 Connecting the power cable 8 Turning on your computer 8...
User Manual
Page 10
Installing an expansion card 14 4 Frequently asked questions 15 Frequently asked questions 16 5 Regulations and safety notices 19 FCC notice 20 Modem notices 21 Laser compliance statement 23 LCD pixel statement 23 Macrovision copyright protection notice 24 Radio device regulatory notice 24 General 24 European Union (EU) 24 The FCC RF safety requirement 25 Canada - Actual configuration may vary. Low-power license-exempt radio communication devices (RSS-210) 25 Remark: All images are for reference purposes only.
Installing an expansion card 14 4 Frequently asked questions 15 Frequently asked questions 16 5 Regulations and safety notices 19 FCC notice 20 Modem notices 21 Laser compliance statement 23 LCD pixel statement 23 Macrovision copyright protection notice 24 Radio device regulatory notice 24 General 24 European Union (EU) 24 The FCC RF safety requirement 25 Canada - Actual configuration may vary. Low-power license-exempt radio communication devices (RSS-210) 25 Remark: All images are for reference purposes only.

User Manual
Page 12
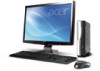
English 2 1 System tour Front panel The front panel of your computer has the following: Icon Description 5.25-inch drive bay(s) 3.5-inch drive bay(s) Microphone-in jack (front) Speaker-/line-out jack (front) USB ports OBR (One Button Recovery) button (For selected models only) Indicators Power button Rear panel The rear panel of your computer has the following: Icon Description Power supply Power cord socket Voltage selector switch PS/2 mouse port PS/2 keyboard port Serial port Parallel/printer port
English 2 1 System tour Front panel The front panel of your computer has the following: Icon Description 5.25-inch drive bay(s) 3.5-inch drive bay(s) Microphone-in jack (front) Speaker-/line-out jack (front) USB ports OBR (One Button Recovery) button (For selected models only) Indicators Power button Rear panel The rear panel of your computer has the following: Icon Description Power supply Power cord socket Voltage selector switch PS/2 mouse port PS/2 keyboard port Serial port Parallel/printer port
User Manual
Page 13
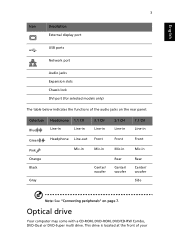
Optical drive Your computer may come with a CD-ROM, DVD-ROM, DVD/CD-RW Combo, DVD-Dual or DVD-Super multi drive. This drive is located at the front of the audio jacks on the rear panel: Color/use Blue Green Pink Orange Black Gray Headphone 1.1 CH Line-in Line-in Headphone Line-out Mic-in 3.1 CH Line-in Front Mic-in Center/ woofer 5.1 CH Line-in Front Mic-in Rear Center/ woofer 7.1 CH Line-in Front Mic-in Rear Center/ woofer Side Note: See "Connecting peripherals" on page 7. English 3 Icon Description External display port USB ports Network port Audio jacks Expansion slots...
Optical drive Your computer may come with a CD-ROM, DVD-ROM, DVD/CD-RW Combo, DVD-Dual or DVD-Super multi drive. This drive is located at the front of the audio jacks on the rear panel: Color/use Blue Green Pink Orange Black Gray Headphone 1.1 CH Line-in Line-in Headphone Line-out Mic-in 3.1 CH Line-in Front Mic-in Center/ woofer 5.1 CH Line-in Front Mic-in Rear Center/ woofer 7.1 CH Line-in Front Mic-in Rear Center/ woofer Side Note: See "Connecting peripherals" on page 7. English 3 Icon Description External display port USB ports Network port Audio jacks Expansion slots...
User Manual
Page 14
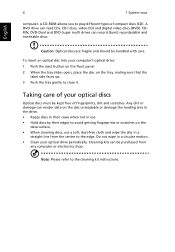
English 4 1 System tour computer. Caution: Optical discs are fragile and should be purchased from the center to play different types of fingerprints, dirt and scratches. Note: Please refer to close it. A DVD drive can record (burn) recordadable and rewritable discs. Taking care of your optical drive periodically. Any dirt or damage can be handled with care. CDRW, DVD-Dual and DVD-Super multi drives can read CDs, CD-I discs, video-CDs and digital video discs (DVD). Cleaning kits can render data on the disc unreadable or damage the reading lens in the drive. • ...
English 4 1 System tour computer. Caution: Optical discs are fragile and should be purchased from the center to play different types of fingerprints, dirt and scratches. Note: Please refer to close it. A DVD drive can record (burn) recordadable and rewritable discs. Taking care of your optical drive periodically. Any dirt or damage can be handled with care. CDRW, DVD-Dual and DVD-Super multi drives can read CDs, CD-I discs, video-CDs and digital video discs (DVD). Cleaning kits can render data on the disc unreadable or damage the reading lens in the drive. • ...
User Manual
Page 15
2 Setting up your computer
2 Setting up your computer

User Manual
Page 16
Adjust the keyboard height by flipping the folding stands located under your table, as long as it does not block the space you feel any shoulder or neck strain, stop for a while and check your posture. • Position your keyboard in front of your monitor. Positioning your monitor Place your monitor at or slightly below eye level. Putting your keyboard beside your monitor will make your body lean forward, forcing you type which could add tension to your neck muscles. Positioning your keyboard The location of the keyboard is at a comfortable viewing distance, usually 50 to 60...
Adjust the keyboard height by flipping the folding stands located under your table, as long as it does not block the space you feel any shoulder or neck strain, stop for a while and check your posture. • Position your keyboard in front of your monitor. Positioning your monitor Place your monitor at or slightly below eye level. Putting your keyboard beside your monitor will make your body lean forward, forcing you type which could add tension to your neck muscles. Positioning your keyboard The location of the keyboard is at a comfortable viewing distance, usually 50 to 60...
User Manual
Page 17
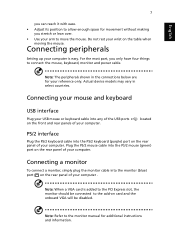
English 7 you can reach it with ease. • Adjust its position to allow enough space for additional instructions and information. For the most part, you stretch or lean over. • Use your computer. Connecting a monitor To connect a monitor, simply plug the monitor cable into the PS/2 keyboard (purple) port on card and the onboard VGA will be disabled. Do not rest your computer is added to the PCI Express slot, the monitor should be connected to the add-on the rear panel of your computer. located PS/2 interface Plug the PS/2 keyboard cable into the monitor (blue) port on...
English 7 you can reach it with ease. • Adjust its position to allow enough space for additional instructions and information. For the most part, you stretch or lean over. • Use your computer. Connecting a monitor To connect a monitor, simply plug the monitor cable into the PS/2 keyboard (purple) port on card and the onboard VGA will be disabled. Do not rest your computer is added to the PCI Express slot, the monitor should be connected to the add-on the rear panel of your computer. located PS/2 interface Plug the PS/2 keyboard cable into the monitor (blue) port on...
User Manual
Page 18
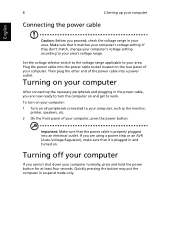
Important: Make sure that the power cable is plugged in and turned on. Quickly pressing the button may put the computer in suspend mode only. If they don't match, change your computer's voltage setting according to your computer: 1 Turn on your area. Turning on your computer After connecting the necessary peripherals and plugging in the power cable, you are using a power strip or an AVR (Auto-Voltage Regulator), make sure that it is properly plugged into an electrical outlet. If you are now ready to turn on all peripherals connected to work. To turn the computer ...
Important: Make sure that the power cable is plugged in and turned on. Quickly pressing the button may put the computer in suspend mode only. If they don't match, change your computer's voltage setting according to your computer: 1 Turn on your area. Turning on your computer After connecting the necessary peripherals and plugging in the power cable, you are using a power strip or an AVR (Auto-Voltage Regulator), make sure that it is properly plugged into an electrical outlet. If you are now ready to turn on all peripherals connected to work. To turn the computer ...

User Manual
Page 19
3 Upgrading your computer
3 Upgrading your computer
User Manual
Page 20
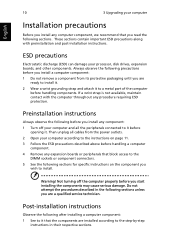
English 10 3 Upgrading your computer Installation precautions Before you install any computer component, we recommend that you read the following after installing a computer component: 1 See to it that block access to the DIMM sockets or component connectors. 5 See the following sections unless you are a qualified service technician. If a wrist strap is not available, maintain contact with preinstallation and post-installation instructions. Warning! Post-installation instructions Observe the following sections. Preinstallation instructions Always observe the following precautions ...
English 10 3 Upgrading your computer Installation precautions Before you install any computer component, we recommend that you read the following after installing a computer component: 1 See to it that block access to the DIMM sockets or component connectors. 5 See the following sections unless you are a qualified service technician. If a wrist strap is not available, maintain contact with preinstallation and post-installation instructions. Warning! Post-installation instructions Observe the following sections. Preinstallation instructions Always observe the following precautions ...
User Manual
Page 21
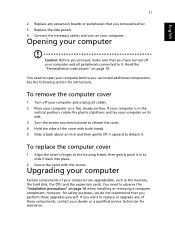
Opening your computer Caution: Before you proceed, make sure that you can install additional components. You need to observe the "Installation precautions" on page 10. See the following section for safety purposes, we do not recommend that you removed earlier. 3 Replace the side panels. 4 Connect the necessary cables and turn on your computer on a flat, steady surface. To remove the computer cover 1 Turn off your computer is in to slide it back into place. 2 Secure the cover with both hands. 5 Slide it back about an inch and then gently lift it upward to release the cover. ...
Opening your computer Caution: Before you proceed, make sure that you can install additional components. You need to observe the "Installation precautions" on page 10. See the following section for safety purposes, we do not recommend that you removed earlier. 3 Replace the side panels. 4 Connect the necessary cables and turn on your computer on a flat, steady surface. To remove the computer cover 1 Turn off your computer is in to slide it back into place. 2 Secure the cover with both hands. 5 Slide it back about an inch and then gently lift it upward to release the cover. ...

User Manual
Page 22
English 12 3 Upgrading your computer To remove a memory DIMM Note: The memory DIMM has only one notch located toward the center of the module. 1 Remove the side panel. 2 Locate the memory DIMM socket on the mainboard. 3 Press the holding clips on the mainboard. To install a memory DIMM 1 Locate the memory DIMM socket on both sides of the socket (b). Gently pull the memory DIMM out of the memory DIMM socket outward to release the memory DIMM (a).
English 12 3 Upgrading your computer To remove a memory DIMM Note: The memory DIMM has only one notch located toward the center of the module. 1 Remove the side panel. 2 Locate the memory DIMM socket on the mainboard. 3 Press the holding clips on the mainboard. To install a memory DIMM 1 Locate the memory DIMM socket on both sides of the socket (b). Gently pull the memory DIMM out of the memory DIMM socket outward to release the memory DIMM (a).