Veriton 5800/6800/7800 Service Guide (Gigabyte MB)
Page 34
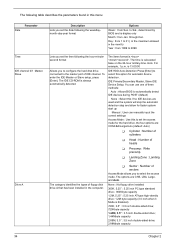
... to select the access mode. The options are used and the system will skip the automatic detection step and allow for faster system start up Manual : User can use one of floppy disk drive A that has been installed in the computer. Day : from 1 to 31 ( or the maximum allowed in.... to select this menu: Parameter Date Description Lets you set the date following the weekdaymonth-day-year format Options Week : from Jan. You can manually input the correct settings Access Mode : Use this to 2098 Time Lets you set the time following the hour-minutesecond format The items format is...
... to select the access mode. The options are used and the system will skip the automatic detection step and allow for faster system start up Manual : User can use one of floppy disk drive A that has been installed in the computer. Day : from 1 to 31 ( or the maximum allowed in.... to select this menu: Parameter Date Description Lets you set the date following the weekdaymonth-day-year format Options Week : from Jan. You can manually input the correct settings Access Mode : Use this to 2098 Time Lets you set the time following the hour-minutesecond format The items format is...
Veriton 5800/6800/7800 Service Guide (Gigabyte MB)
Page 47
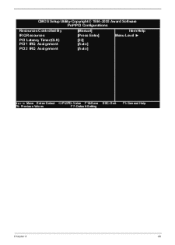
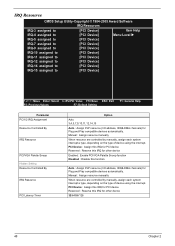
CMOS Setup Utility-Copyright © 1984-2005 Award Software PnP/PCI Configurations Item Help Resources Controlled By [Manual] Menu Level IRQ Resources [Press Enter] PCI Latency Timer(CLK) [32] PCI1 IRQ Assignment [Auto] PCI2 IRQ Assignment [Auto] : Move Enter: Select F5: Previous Values +/-/PU/PD: Value F10:Save F7: Default Setting ESC: Exit F1: General Help Chapter 2 46
CMOS Setup Utility-Copyright © 1984-2005 Award Software PnP/PCI Configurations Item Help Resources Controlled By [Manual] Menu Level IRQ Resources [Press Enter] PCI Latency Timer(CLK) [32] PCI1 IRQ Assignment [Auto] PCI2 IRQ Assignment [Auto] : Move Enter: Select F5: Previous Values +/-/PU/PD: Value F10:Save F7: Default Setting ESC: Exit F1: General Help Chapter 2 46

Veriton 5800/6800/7800 Service Guide (Gigabyte MB)
Page 48
...Reserved : Reserve this IRQ for other device IRQ Resource PCI Latency Timer 32/64/96/128 47 Chapter 2 Manual : Assign resource manually When resource are controlled by manually, assign each system interrupt a type, depending on the type of device using the interrupt. IRQ Resource CMOS...15 Option Auto : Assign PnP resource (I /O address, IRQ& DMA channels) for Plug and Play compatible devices automatically. Manual : Assign resource manually When resource are controlled by manually, assign each system interrupt a type, depending on the type of device using the interrupt.
...Reserved : Reserve this IRQ for other device IRQ Resource PCI Latency Timer 32/64/96/128 47 Chapter 2 Manual : Assign resource manually When resource are controlled by manually, assign each system interrupt a type, depending on the type of device using the interrupt. IRQ Resource CMOS...15 Option Auto : Assign PnP resource (I /O address, IRQ& DMA channels) for Plug and Play compatible devices automatically. Manual : Assign resource manually When resource are controlled by manually, assign each system interrupt a type, depending on the type of device using the interrupt.
Veriton 5800/6800/7800 Service Guide (Gigabyte MB)
Page 86
Error Symptom Parallel/Serial Ports Action/FRU Execute "Load BIOS Default Settings" in BIOS Setup to the printer service manual. 2. Refer to confirm ports presence before diagnosing any parallel/serial ports problems. Serial or parallel port loop-back test failed. 1. Refer to OFF. 2. Ensure ... the same as the setting in BIOS Setup of the machine, just above the connector for the power cable) is not set to the service manual for the printer. Main board. 1. Ensure the Soft-off the system.) Pressing power switch does not turn off system. (Only unplugging the power cord ...
Error Symptom Parallel/Serial Ports Action/FRU Execute "Load BIOS Default Settings" in BIOS Setup to the printer service manual. 2. Refer to confirm ports presence before diagnosing any parallel/serial ports problems. Serial or parallel port loop-back test failed. 1. Refer to OFF. 2. Ensure ... the same as the setting in BIOS Setup of the machine, just above the connector for the power cable) is not set to the service manual for the printer. Main board. 1. Ensure the Soft-off the system.) Pressing power switch does not turn off system. (Only unplugging the power cord ...
Veriton 5800/6800/7800 Service Guide (Gigabyte MB)
Page 123
In the Technical Information section you have included an Acrobat File to facilitate the problem-free downloading of Acer's Notebook, Desktop and Server models including: Service guides User's manuals Training materials Main manuals Bios updates Software utilities Spare parts lists TABs (Technical Announcement Bulletin) For these purposes, we have any suggestions or comments, please...
In the Technical Information section you have included an Acrobat File to facilitate the problem-free downloading of Acer's Notebook, Desktop and Server models including: Service guides User's manuals Training materials Main manuals Bios updates Software utilities Spare parts lists TABs (Technical Announcement Bulletin) For these purposes, we have any suggestions or comments, please...
Veriton 5800/6800/7800 Service Guide (MSI MB)
Page 36
... : Select this if no IDE devices are used and the system will skip the automatic detection step and allow for faster system start up Manual : User can manually input the correct settings Access Mode : Use this to Sat., determined by BIOS and is 13:00:00 Allows you to the master port...
... : Select this if no IDE devices are used and the system will skip the automatic detection step and allow for faster system start up Manual : User can manually input the correct settings Access Mode : Use this to Sat., determined by BIOS and is 13:00:00 Allows you to the master port...

Veriton 5800/6800/7800 Service Guide (MSI MB)
Page 49
CMOS Setup Utility-Copyright © 1984-2005 Award Software PnP/PCI Configurations Resources Controlled By [Manual] Item Help IRQ Resources [Press Enter] Menu Level X PCI Latency Timer(CLK) [32] PCI1 IRQ Assignment [Auto] PCI2 IRQ Assignment [Auto] KLIJ: Move Enter: Select +/-/PU/PD: Value F10:Save ESC: Exit F5: Previous Values F7: Default Setting F1: General Help Chapter 2 47
CMOS Setup Utility-Copyright © 1984-2005 Award Software PnP/PCI Configurations Resources Controlled By [Manual] Item Help IRQ Resources [Press Enter] Menu Level X PCI Latency Timer(CLK) [32] PCI1 IRQ Assignment [Auto] PCI2 IRQ Assignment [Auto] KLIJ: Move Enter: Select +/-/PU/PD: Value F10:Save ESC: Exit F5: Previous Values F7: Default Setting F1: General Help Chapter 2 47
Veriton 5800/6800/7800 Service Guide (MSI MB)
Page 50
... (I /O address, IRQ& DMA channels) for Plug and Play compatible devices automatically. Manual : Assign resource manually When resource are controlled by manually, assign each system interrupt a type, depending on the type of device using the interrupt. Manual : Assign resource manually When resource are controlled by manually, assign each system interrupt a type, depending on the type of device...
... (I /O address, IRQ& DMA channels) for Plug and Play compatible devices automatically. Manual : Assign resource manually When resource are controlled by manually, assign each system interrupt a type, depending on the type of device using the interrupt. Manual : Assign resource manually When resource are controlled by manually, assign each system interrupt a type, depending on the type of device...

Veriton 5800/6800/7800 Service Guide (MSI MB)
Page 90
...above the connector for the printer. Ensure the power override switch (situated at the back of Power Management is not set to the printer service manual. 2. Executing software shutdown from Windows98 Start menu does not turn off the system. (Only pressing power switch can turn off . 2. No ... Keyboard Power Supply Pressing power switch does not turn on keyboard do not work. 1. Printer problems. 1. Load default settings. 2. Refer to the service manual for the power cable) is the same as the setting in BIOS Setup to Instant-off the system). 1. Printer cable. 4.
...above the connector for the printer. Ensure the power override switch (situated at the back of Power Management is not set to the printer service manual. 2. Executing software shutdown from Windows98 Start menu does not turn off the system. (Only pressing power switch can turn off . 2. No ... Keyboard Power Supply Pressing power switch does not turn on keyboard do not work. 1. Printer problems. 1. Load default settings. 2. Refer to the service manual for the power cable) is the same as the setting in BIOS Setup to Instant-off the system). 1. Printer cable. 4.

Veriton 5800/6800/7800 User"s Guide (EN)
Page 2
...in the space provided below. All correspondence concerning your computer. Veriton 5800/6800/7800 Series Desktop Computer Model number Serial number Purchase date Place of Acer Incorporated. Copyright © 2005. No part of Acer Incorporated. Other companies' product names or trademarks are registered ...of merchantability or fitness for identification purposes only and belong to notify any person of purchase information in this manual or supplementary documents and publications. Record the model number, serial number, purchase date, and place of such revisions or...
...in the space provided below. All correspondence concerning your computer. Veriton 5800/6800/7800 Series Desktop Computer Model number Serial number Purchase date Place of Acer Incorporated. Copyright © 2005. No part of Acer Incorporated. Other companies' product names or trademarks are registered ...of merchantability or fitness for identification purposes only and belong to notify any person of purchase information in this manual or supplementary documents and publications. Record the model number, serial number, purchase date, and place of such revisions or...

Veriton 5800/6800/7800 User"s Guide (EN)
Page 46
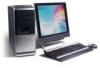
Note: Refer to the add-on the rear panel of your computer . 38 4 Setting up your computer Connecting a monitor To connect a monitor, simply plug the monitor cable into the monitor port (blue port) located on card and the onboard VGA will be disabled. Note: When a VGA card is added to the PCI Express slot, the monitor should be connected to the monitor manual for additional instructions and information.
Note: Refer to the add-on the rear panel of your computer . 38 4 Setting up your computer Connecting a monitor To connect a monitor, simply plug the monitor cable into the monitor port (blue port) located on card and the onboard VGA will be disabled. Note: When a VGA card is added to the PCI Express slot, the monitor should be connected to the monitor manual for additional instructions and information.
Veriton 5800/6800/7800 User"s Guide (EN)
Page 50
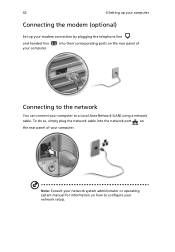
To do so, simply plug the network cable into their corresponding ports on the rear panel of Connecting to the network You can connect your computer to configure your computer. Note: Consult your computer. 42 4 Setting up your computer Connecting the modem (optional) Set up your modem connection by plugging the telephone line and handset line your network setup. into the network port on the rear panel of your network system administrator or operating system manual for information on how to a Local Area Network (LAN) using a network cable.
To do so, simply plug the network cable into their corresponding ports on the rear panel of Connecting to the network You can connect your computer to configure your computer. Note: Consult your computer. 42 4 Setting up your computer Connecting the modem (optional) Set up your modem connection by plugging the telephone line and handset line your network setup. into the network port on the rear panel of your network system administrator or operating system manual for information on how to a Local Area Network (LAN) using a network cable.


