
User Manual
Page 2
...registered trademarks of such revisions or changes. Record the model number, serial number, purchase date, and place of purchase Acer and the Acer logo are used herein for a particular purpose. No part of merchantability or fitness for identification purposes only and belong...the contents hereof and specifically disclaims the implied warranties of this publication may be made periodically to their respective companies. Veriton Series Desktop Computer Model number Serial number Purchase date Place of purchase information in this manual or supplementary documents and publications....
...registered trademarks of such revisions or changes. Record the model number, serial number, purchase date, and place of purchase Acer and the Acer logo are used herein for a particular purpose. No part of merchantability or fitness for identification purposes only and belong...the contents hereof and specifically disclaims the implied warranties of this publication may be made periodically to their respective companies. Veriton Series Desktop Computer Model number Serial number Purchase date Place of purchase information in this manual or supplementary documents and publications....
User Manual
Page 10
... computer 3900Pro 53 To remove the computer cover 53 To replace the computer cover 54 Opening your Veriton 5900Pro 55 To remove the computer cover 55 To replace the computer cover 55 Opening your Veriton 6900Pro/7900Pro 56 To remove the side panel 56 To replace the side panel 57 Upgrading your...
... computer 3900Pro 53 To remove the computer cover 53 To replace the computer cover 54 Opening your Veriton 5900Pro 55 To remove the computer cover 55 To replace the computer cover 55 Opening your Veriton 6900Pro/7900Pro 56 To remove the side panel 56 To replace the side panel 57 Upgrading your...

User Manual
Page 11
... DIMM 58 To install a DDR2 DIMM 59 To reconfigure your computer 60 Replacing the Veriton 3900Pro's hard disk 60 Installing an expansion card 63 Replacing the Veriton 5900Pro's hard disk 63 Installing an expansion card 64 Replacing the Veriton 6900Pro/7900Pro's hard disk 65 Installing an expansion card 66 6 Frequently asked questions 67...
... DIMM 58 To install a DDR2 DIMM 59 To reconfigure your computer 60 Replacing the Veriton 3900Pro's hard disk 60 Installing an expansion card 63 Replacing the Veriton 5900Pro's hard disk 63 Installing an expansion card 64 Replacing the Veriton 6900Pro/7900Pro's hard disk 65 Installing an expansion card 66 6 Frequently asked questions 67...
User Manual
Page 25
...on four DIMMs Supporting up to 4 GB of DDR2 533/667/800 RAM Veriton 3900Pro: External 5.25" drive bays 3.5" drive bays Veriton 5900Pro: Two external 5.25" drive bays Three 3.5" drive bays (two internal, one external) Veriton 6900Pro: Two external 5.25" drive bays Six 3.5" drive bays (four internal..., two external) Veriton 7900Pro: Three external 5.25" drive bays Six 3.5" drive bays (four internal, two external) Intel® 82566 DM ...
...on four DIMMs Supporting up to 4 GB of DDR2 533/667/800 RAM Veriton 3900Pro: External 5.25" drive bays 3.5" drive bays Veriton 5900Pro: Two external 5.25" drive bays Three 3.5" drive bays (two internal, one external) Veriton 6900Pro: Two external 5.25" drive bays Six 3.5" drive bays (four internal..., two external) Veriton 7900Pro: Three external 5.25" drive bays Six 3.5" drive bays (four internal, two external) Intel® 82566 DM ...
User Manual
Page 26
... or LCD monitors Lock pad and intrusion alert Veriton 3900Pro Series: 345 (H) x 101.3 (W) x 414.7 (D) mm Veriton 5900Pro Series: 370 (H) x 130.2 (W) x 435 (D) mm Veriton 6900Pro Series: 370 (H) x 183 (W) x 450 (D) mm Veriton 7900Pro Series: 450 (H) x 187 (W) x 495 (D) mm Acer Empowering Technology Acer eSettings Management Acer eLock Management Acer eDataSecurity Management Acer ePerformance Management Acer eRecovery Management PC2001 SMBIOS (DMI) 2.3.1 PCI 2.3 WFM 2.0 ACPI...
... or LCD monitors Lock pad and intrusion alert Veriton 3900Pro Series: 345 (H) x 101.3 (W) x 414.7 (D) mm Veriton 5900Pro Series: 370 (H) x 130.2 (W) x 435 (D) mm Veriton 6900Pro Series: 370 (H) x 183 (W) x 450 (D) mm Veriton 7900Pro Series: 450 (H) x 187 (W) x 495 (D) mm Acer Empowering Technology Acer eSettings Management Acer eLock Management Acer eDataSecurity Management Acer ePerformance Management Acer eRecovery Management PC2001 SMBIOS (DMI) 2.3.1 PCI 2.3 WFM 2.0 ACPI...

User Manual
Page 28
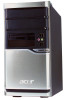
...1 On the Windows XP/Vista taskbar, click on your computer. If any of the following items are missing or damaged, contact your dealer immediately: • Veriton series • Items contained in the accessory box • USB or PS/2 keyboard • USB or PS/2 mouse • User's Guide and installation ...Guide is also available on the Start button then select Help and Support. 2 On the Help and Support Center home page, double-click the Veriton Series Online icon. 16 1 First things first Package contents Before you unpack your computer, make sure that you have enough space to set up...
...1 On the Windows XP/Vista taskbar, click on your computer. If any of the following items are missing or damaged, contact your dealer immediately: • Veriton series • Items contained in the accessory box • USB or PS/2 keyboard • USB or PS/2 mouse • User's Guide and installation ...Guide is also available on the Start button then select Help and Support. 2 On the Help and Support Center home page, double-click the Veriton Series Online icon. 16 1 First things first Package contents Before you unpack your computer, make sure that you have enough space to set up...
User Manual
Page 32
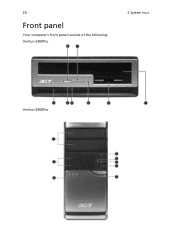
20 Front panel Your computer's front panel consists of the following: Veriton 5900Pro 2 System tour Veriton 6900Pro
20 Front panel Your computer's front panel consists of the following: Veriton 5900Pro 2 System tour Veriton 6900Pro
User Manual
Page 33
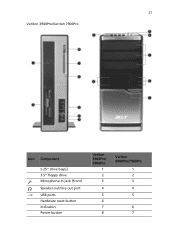
21 Veriton 3900Pro/Veriton 7900Pro Icon Component 5.25" drive bay(s) 3.5" floppy drive Microphone-in jack (front) Speaker-out/line-out port USB ports Hardware reset button Indicators Power button Veriton 3900Pro/ 5900Pro 1 2 3 4 5 6 7 8 Veriton 6900Pro/7900Pro 1 2 3 4 5 6 7
21 Veriton 3900Pro/Veriton 7900Pro Icon Component 5.25" drive bay(s) 3.5" floppy drive Microphone-in jack (front) Speaker-out/line-out port USB ports Hardware reset button Indicators Power button Veriton 3900Pro/ 5900Pro 1 2 3 4 5 6 7 8 Veriton 6900Pro/7900Pro 1 2 3 4 5 6 7
User Manual
Page 34
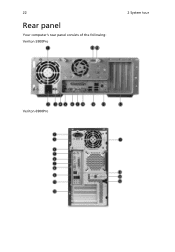
22 Rear panel Your computer's rear panel consists of the following: Veriton 5900Pro 2 System tour Veriton 6900Pro
22 Rear panel Your computer's rear panel consists of the following: Veriton 5900Pro 2 System tour Veriton 6900Pro

User Manual
Page 35
23 Veriton 3900Pro/Veriton 7900Pro Icon Component # Power supply 1 Power cord socket 2 Voltage selector switch 3 PS/2 mouse port 4 PS/2 keyboard port 5 Serial port 6 Parallel/printer port 7 CRT/LCD monitor port 8 USB ports 9 Network port 10
23 Veriton 3900Pro/Veriton 7900Pro Icon Component # Power supply 1 Power cord socket 2 Voltage selector switch 3 PS/2 mouse port 4 PS/2 keyboard port 5 Serial port 6 Parallel/printer port 7 CRT/LCD monitor port 8 USB ports 9 Network port 10

User Manual
Page 36
Only for Veriton 6900Pro / Veriton 7900Pro Audio jacks function table Color/Use Blue Green Pink Orange Black Gray Headphone Line-in Headphone 1.1 CH Line-in Line-out Mic-in 3.1 CH Line-in Front Mic-in Center & woofer 5.1 CH Line-in Front Mic-in Rear Center & woofer 7.1 CH Line-in Front Mic-in Rear Center & woofer Side Note: See "Connecting peripherals" on page 39 and "Connecting options" on page 43 for more information. 24 2 System tour Icon Component # Audio jack 11 Expansion slots 12 Chassis lock pad 13 Hardware reset button 14* *.
Only for Veriton 6900Pro / Veriton 7900Pro Audio jacks function table Color/Use Blue Green Pink Orange Black Gray Headphone Line-in Headphone 1.1 CH Line-in Line-out Mic-in 3.1 CH Line-in Front Mic-in Center & woofer 5.1 CH Line-in Front Mic-in Rear Center & woofer 7.1 CH Line-in Front Mic-in Rear Center & woofer Side Note: See "Connecting peripherals" on page 39 and "Connecting options" on page 43 for more information. 24 2 System tour Icon Component # Audio jack 11 Expansion slots 12 Chassis lock pad 13 Hardware reset button 14* *.

User Manual
Page 42
... you to record or burn recordable and rewritable disks. However, they are also compact, lightweight and easy to play different types of compact disks (CDs). Veriton 3900Pro Veriton 5900Pro The DVD drive allows you to play not only old CD-ROMs, CD-I disks, and video CDs, but digital video disks (DVDs) as...
... you to record or burn recordable and rewritable disks. However, they are also compact, lightweight and easy to play different types of compact disks (CDs). Veriton 3900Pro Veriton 5900Pro The DVD drive allows you to play not only old CD-ROMs, CD-I disks, and video CDs, but digital video disks (DVDs) as...

User Manual
Page 43
When the disk tray slides open, place the CD or DVD gently on the tray. Make sure that the label or title side of the disk is facing upward. Veriton 3900Pro When holding a disk, hold it by the edges to avoid leaving smudges or fingerprints. 31 Veriton 6900Pro/7900Pro 2.
When the disk tray slides open, place the CD or DVD gently on the tray. Make sure that the label or title side of the disk is facing upward. Veriton 3900Pro When holding a disk, hold it by the edges to avoid leaving smudges or fingerprints. 31 Veriton 6900Pro/7900Pro 2.

User Manual
Page 44
32 Veriton 5900Pro 2 System tour Veriton 6900Pro/7900Pro 3. Push the tray and it will close automatically.
32 Veriton 5900Pro 2 System tour Veriton 6900Pro/7900Pro 3. Push the tray and it will close automatically.

User Manual
Page 45
For instructions on how to the edge. "Replacing the Veriton 5900Pro's hard disk" on page 60. 33 Taking care of dirt or damage can be ... Cleaning kits can affect the data on the disk, impair the disk lens reader on page 65. "Replacing the Veriton 6900Pro/7900Pro's hard disk" on the CD or DVD drive, or stop the computer from the center to upgrade ...or replace your hard disk, see: "Replacing the Veriton 3900Pro's hard disk" on page 63. Hard disk Your computer is pre-installed with a high-capacity Enhanced-IDE (E-IDE)...
For instructions on how to the edge. "Replacing the Veriton 5900Pro's hard disk" on page 60. 33 Taking care of dirt or damage can be ... Cleaning kits can affect the data on the disk, impair the disk lens reader on page 65. "Replacing the Veriton 6900Pro/7900Pro's hard disk" on the CD or DVD drive, or stop the computer from the center to upgrade ...or replace your hard disk, see: "Replacing the Veriton 3900Pro's hard disk" on page 63. Hard disk Your computer is pre-installed with a high-capacity Enhanced-IDE (E-IDE)...

User Manual
Page 67
... the cover with both hands. To replace the computer cover 1 Align the cover to the housing frame and then push it in to open your Veriton 5900Pro Caution! Read the "Preinstallation instructions" on a flat, steady surface. 3 Turn the thumbscrews counterclockwise with your computer and unplug all peripherals connected to it . 55...
... the cover with both hands. To replace the computer cover 1 Align the cover to the housing frame and then push it in to open your Veriton 5900Pro Caution! Read the "Preinstallation instructions" on a flat, steady surface. 3 Turn the thumbscrews counterclockwise with your computer and unplug all peripherals connected to it . 55...

User Manual
Page 68
See the following section for instructions: To remove the side panel 1 Turn off your computer and all cables. 2 Place your Veriton 6900Pro/ 7900Pro Caution! Read the "Preinstallation instructions" on a flat, steady surface. 3 Turn the screws counterclockwise with both hands. You need to release the cover. 4 Hold ... . Slide it back about an inch and then gently pull it outward to it . Before you proceed, make sure that you can install additional components. Veriton 6900Pro 56 4 Upgrading your computer Opening your computer on page 51.
See the following section for instructions: To remove the side panel 1 Turn off your computer and all cables. 2 Place your Veriton 6900Pro/ 7900Pro Caution! Read the "Preinstallation instructions" on a flat, steady surface. 3 Turn the screws counterclockwise with both hands. You need to release the cover. 4 Hold ... . Slide it back about an inch and then gently pull it outward to it . Before you proceed, make sure that you can install additional components. Veriton 6900Pro 56 4 Upgrading your computer Opening your computer on page 51.

User Manual
Page 69
57 Veriton 7900Pro To replace the side panel 1 Align the side panel's hinges to the housing frame and then push it in to slide it back into place. 2 Secure the side panels with the two screws.
57 Veriton 7900Pro To replace the side panel 1 Align the side panel's hinges to the housing frame and then push it in to slide it back into place. 2 Secure the side panels with the two screws.

User Manual
Page 72
Replacing the Veriton 3900Pro's hard disk Follow these steps to replace your computer into the socket, turn the DDR2 DIMM around and try to insert it . 60 4 Upgrading your computer's hard disk: 1 Remove the computer cover (see page 53). 2 Detach all cables connected to the CD or DVD drive, the 3.5-inch floppy drive and hard disk. To reconfigure your computer Your computer automatically detects the amount of it again. Run the BIOS utility to view the new value for total system memory and make a note of memory installed.
Replacing the Veriton 3900Pro's hard disk Follow these steps to replace your computer into the socket, turn the DDR2 DIMM around and try to insert it . 60 4 Upgrading your computer's hard disk: 1 Remove the computer cover (see page 53). 2 Detach all cables connected to the CD or DVD drive, the 3.5-inch floppy drive and hard disk. To reconfigure your computer Your computer automatically detects the amount of it again. Run the BIOS utility to view the new value for total system memory and make a note of memory installed.

User Manual
Page 75
... cables are securely connected to their corresponding connectors on the mainboard. 6 Reinstall the metal bracket frame to the housing. 7 Replace the computer cover. Replacing the Veriton 5900Pro's hard disk Follow these steps to replace your computer's hard disk: 1 Remove the computer cover. 2 Detach all cables to the new hard disk. Save...
... cables are securely connected to their corresponding connectors on the mainboard. 6 Reinstall the metal bracket frame to the housing. 7 Replace the computer cover. Replacing the Veriton 5900Pro's hard disk Follow these steps to replace your computer's hard disk: 1 Remove the computer cover. 2 Detach all cables to the new hard disk. Save...


