

User Manual
Page 3
... its base before connecting the power cord to the AC power outlet. • Make sure both the LCD monitor and the computer are normal with the LCD monitor and do not indicate a problem. • Due to the nature of power, disconnect power from the system by changing the image or turning off the power switch for a few hours. • Acer monitor is purposed for future reference. Keep this case, the screen is...
... its base before connecting the power cord to the AC power outlet. • Make sure both the LCD monitor and the computer are normal with the LCD monitor and do not indicate a problem. • Due to the nature of power, disconnect power from the system by changing the image or turning off the power switch for a few hours. • Acer monitor is purposed for future reference. Keep this case, the screen is...
User Manual
Page 4
... these instructions. • Gradually increase the volume until you can hear it clearly and comfortably and without distortion. • After setting the volume level, do not place the product on the power cord. Warnings • Do not use it from overheating. Using electrical power • This product should never be blocked by placing the product on an unstable cart, stand...
... these instructions. • Gradually increase the volume until you can hear it clearly and comfortably and without distortion. • After setting the volume level, do not place the product on the power cord. Warnings • Do not use it from overheating. Using electrical power • This product should never be blocked by placing the product on an unstable cart, stand...

User Manual
Page 5
..., as opening or removing covers may result in performance, indicating a need to qualified service personnel when: • the power cord or plug is damaged, cut or frayed • liquid was exposed to dangerous voltage points or other nearby electrical devices that is equipped with the supplied power supply cord set , make sure that the new power cord meets the following the operating instructions If power strips are used, the...
..., as opening or removing covers may result in performance, indicating a need to qualified service personnel when: • the power cord or plug is damaged, cut or frayed • liquid was exposed to dangerous voltage points or other nearby electrical devices that is equipped with the supplied power supply cord set , make sure that the new power cord meets the following the operating instructions If power strips are used, the...

User Manual
Page 6
... at service stations. For more information and help when recycling, please go to this website: http://www.acer-group.com/public/Sustainability/ Visit www. Switch off your device in damage and will often require extensive work by the operating instructions, since improper adjustment of other products. Observe restrictions on boats, chemical transfer or storage facilities, vehicles using liquefied...
... at service stations. For more information and help when recycling, please go to this website: http://www.acer-group.com/public/Sustainability/ Visit www. Switch off your device in damage and will often require extensive work by the operating instructions, since improper adjustment of other products. Observe restrictions on boats, chemical transfer or storage facilities, vehicles using liquefied...
User Manual
Page 8
... a physician immediately and inform your comfort zone by pushing the power button. Users are also at risk of physical injury after prolonged use . The following tips: • refrain from Sleep mode by adjusting the viewing angle of the monitor, using a footrest, or raising your sitting height to remove the strain on your leg muscles Finding your comfort zone Find your company's health...
... a physician immediately and inform your comfort zone by pushing the power button. Users are also at risk of physical injury after prolonged use . The following tips: • refrain from Sleep mode by adjusting the viewing angle of the monitor, using a footrest, or raising your sitting height to remove the strain on your leg muscles Finding your comfort zone Find your company's health...
User Manual
Page 9
...; Blink frequently to keep your eyes from the display's top front edge • Avoid adjusting your display in such a way that the side faces the window or any light source • minimizing room light by : • placing your display to an awkward viewing angle. • Avoid looking at the middle of the display. • Adjust the display brightness and/or contrast to reduce eyestrain. Developing good work...
...; Blink frequently to keep your eyes from the display's top front edge • Avoid adjusting your display in such a way that the side faces the window or any light source • minimizing room light by : • placing your display to an awkward viewing angle. • Avoid looking at the middle of the display. • Adjust the display brightness and/or contrast to reduce eyestrain. Developing good work...
User Manual
Page 10
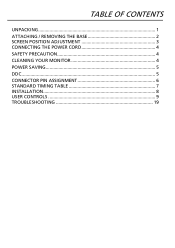
TABLE OF CONTENTS UNPACKING 1 ATTACHING / REMOVING THE BASE 2 SCREEN POSITION ADJUSTMENT 3 CONNECTING THE POWER CORD 4 SAFETY PRECAUTION 4 CLEANING YOUR MONITOR 4 POWER SAVING 5 DDC...5 CONNECTOR PIN ASSIGNMENT 6 STANDARD TIMING TABLE 7 INSTALLATION 8 USER CONTROLS 9 TROUBLESHOOTING 19
TABLE OF CONTENTS UNPACKING 1 ATTACHING / REMOVING THE BASE 2 SCREEN POSITION ADJUSTMENT 3 CONNECTING THE POWER CORD 4 SAFETY PRECAUTION 4 CLEANING YOUR MONITOR 4 POWER SAVING 5 DDC...5 CONNECTOR PIN ASSIGNMENT 6 STANDARD TIMING TABLE 7 INSTALLATION 8 USER CONTROLS 9 TROUBLESHOOTING 19
User Manual
Page 11
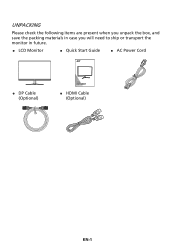
UNPACKING Please check the following items are present when you unpack the box, and save the packing materials in case you will need to ship or transport the monitor in future. LCD Monitor Quick Start Guide AC Power Cord DP Cable (Optional) HDMI Cable (Optional) EN-1
UNPACKING Please check the following items are present when you unpack the box, and save the packing materials in case you will need to ship or transport the monitor in future. LCD Monitor Quick Start Guide AC Power Cord DP Cable (Optional) HDMI Cable (Optional) EN-1

User Manual
Page 14
...-based cleaners. No user-adjustment is adequate ventilation. Avoid placing the monitor against a bright background or where sun-light or other light sources may reflect on the power cord to avoid damage to the cable. Do not expose the monitor to rain, excessive moisture, or dust. Do not cover the ventilation slots or openings of the monitor. EN-4 CONNECTING THE POWER CORD Check first to make...
...-based cleaners. No user-adjustment is adequate ventilation. Avoid placing the monitor against a bright background or where sun-light or other light sources may reflect on the power cord to avoid damage to the cable. Do not expose the monitor to rain, excessive moisture, or dust. Do not cover the ventilation slots or openings of the monitor. EN-4 CONNECTING THE POWER CORD Check first to make...

User Manual
Page 15
... "Power Saving" mode by the amber-color power LED. State LED Light ON Blue Power Saving Mode Amber The power saving states will be kept until a control signal has been detected or the keyboard or mouse is able to ON state is a communication protocol through which the monitor automatically informs the host system about its capabilities, for example, supported resolutions and corresponding timing. DDC To make your system also supports DDC...
... "Power Saving" mode by the amber-color power LED. State LED Light ON Blue Power Saving Mode Amber The power saving states will be kept until a control signal has been detected or the keyboard or mouse is able to ON state is a communication protocol through which the monitor automatically informs the host system about its capabilities, for example, supported resolutions and corresponding timing. DDC To make your system also supports DDC...

User Manual
Page 17
... Adaptive-Sync (DP) supported graphics source to dynamically adjust display refresh rate based on typical content frame rates in order to eliminate stuttering and enhance low-latency display. EN-7 STANDARD TIMING TABLE Mode Resolution 1 VGA 640 x 480 2 MAC 640 x 480 3 VESA 720 x 400 4 SVGA 800 x 600 5 SVGA 800 x 600 6 XGA 1024 x 768 7 XGA 1024 x 768 8 VESA 1152 x 864 9 SXGA 1280 x 1024 10 VESA ...Hz 60 Hz 60 Hz 60 Hz 85 Hz 120 Hz 144 Hz Remark Note: The DisplayPort of this monitor is purposely supporting the G-Sync compatible/Adaptive-Sync support technology.
... Adaptive-Sync (DP) supported graphics source to dynamically adjust display refresh rate based on typical content frame rates in order to eliminate stuttering and enhance low-latency display. EN-7 STANDARD TIMING TABLE Mode Resolution 1 VGA 640 x 480 2 MAC 640 x 480 3 VESA 720 x 400 4 SVGA 800 x 600 5 SVGA 800 x 600 6 XGA 1024 x 768 7 XGA 1024 x 768 8 VESA 1152 x 864 9 SXGA 1280 x 1024 10 VESA ...Hz 60 Hz 60 Hz 60 Hz 85 Hz 120 Hz 144 Hz Remark Note: The DisplayPort of this monitor is purposely supporting the G-Sync compatible/Adaptive-Sync support technology.

User Manual
Page 19
Press it as a directional key to enter a selection. Press to activate user defined hotkey function. Press to toggle input sources. EN-9 USER CONTROLS Base Controls 1 2 3 4 1 No. Press to activate the OSD menu, then use it again to highlight the desired function. Blue indicates power on /off. Amber indicates standby/power saving mode. Item 1 Power button/indicator 2 Hotkey 1, 2 buttons 3 Input button 4 Navi/OK button Description Turns the monitor on .
Press it as a directional key to enter a selection. Press to activate user defined hotkey function. Press to toggle input sources. EN-9 USER CONTROLS Base Controls 1 2 3 4 1 No. Press to activate the OSD menu, then use it again to highlight the desired function. Blue indicates power on /off. Amber indicates standby/power saving mode. Item 1 Power button/indicator 2 Hotkey 1, 2 buttons 3 Input button 4 Navi/OK button Description Turns the monitor on .

User Manual
Page 20
... VRB and Brightness. Input 4. EN-10 Adjusting the OSD settings Note: The following page: Main Page The default function for more information). The OSD (on or off From any function page, press to adjust the picture quality, OSD position and general settings. Actual product specifications may vary. Press the MENU key to open the Modes control and select which user-defined profile to your LCD Monitor. VRB 2. Brightness 3. You can use the...
... VRB and Brightness. Input 4. EN-10 Adjusting the OSD settings Note: The following page: Main Page The default function for more information). The OSD (on or off From any function page, press to adjust the picture quality, OSD position and general settings. Actual product specifications may vary. Press the MENU key to open the Modes control and select which user-defined profile to your LCD Monitor. VRB 2. Brightness 3. You can use the...

User Manual
Page 22
.... When you want using the Navi/OK button. Note: Adjusts the balance between light and dark areas. 6. Brightness: Adjust the brightness from the OSD. Note: Higher values allow more blue light through. Blue Light: filter out blue light by adjusting different Blue Light showing ratio - 80%, 70%, 60%, 50%. blacks will be less black. Black Boost: This boosts the amplitude of the dark color levels of difference between light and dark shades...
.... When you want using the Navi/OK button. Note: Adjusts the balance between light and dark areas. 6. Brightness: Adjust the brightness from the OSD. Note: Higher values allow more blue light through. Blue Light: filter out blue light by adjusting different Blue Light showing ratio - 80%, 70%, 60%, 50%. blacks will be less black. Black Boost: This boosts the amplitude of the dark color levels of difference between light and dark shades...

User Manual
Page 23
... HDR signal. The default is "Auto", certain parameters (ACM, Gamma, Contrast, Blue Light, Color Temperature, Black Boost, Grayscale Mode, 6axis Hue, 6-axis Saturate, and VRB) are grayed out and disabled. 10. Using the Navi/OK button, select Color from the OSD. It can simulate high-resolution images by boosting the pixel density of the original source. HDR: Turn HDR Off, Auto or HDR-400. 8. Select Auto enables this function to open the OSD...
... HDR signal. The default is "Auto", certain parameters (ACM, Gamma, Contrast, Blue Light, Color Temperature, Black Boost, Grayscale Mode, 6axis Hue, 6-axis Saturate, and VRB) are grayed out and disabled. 10. Using the Navi/OK button, select Color from the OSD. It can simulate high-resolution images by boosting the pixel density of the original source. HDR: Turn HDR Off, Auto or HDR-400. 8. Select Auto enables this function to open the OSD...
User Manual
Page 24
... or User. 6. If Color Space is "HDR", then Modes is 2.2 (standard value for Windows). 5. You can choose Standard, SMPTE-C, DCI, EBU, HDR, Rec. 709 or sRGB. Volume: Adjusts the volume. 5. The default value is set to "Standard". 8. Using the Navi/OK button, select Audio from the OSD. EN-14 Use the Navi/OK button to open the OSD. 2. Grayscale Mode: Turn grayscale mode On or Off. 9. 6-axis Hue: Adjust the red, green, blue, yellow...
... or User. 6. If Color Space is "HDR", then Modes is 2.2 (standard value for Windows). 5. You can choose Standard, SMPTE-C, DCI, EBU, HDR, Rec. 709 or sRGB. Volume: Adjusts the volume. 5. The default value is set to "Standard". 8. Using the Navi/OK button, select Audio from the OSD. EN-14 Use the Navi/OK button to open the OSD. 2. Grayscale Mode: Turn grayscale mode On or Off. 9. 6-axis Hue: Adjust the red, green, blue, yellow...

User Manual
Page 25
... 2. Refresh Rate Num: Display the panel's current refresh rate on the monitor's maximum refresh rate. Using the Navi/OK button, select Gaming from the OSD. Note: 1. If Adaptive-Sync is set Over Drive to 85 or 120 Hz. VRB: When VRB is set to either one of the following: Logo, Aim Point, Message and Input Icon. • VRB feature is On. 6. Adaptive-Sync: To control supporting Adaptive-Sync or not; For monitors supporting up to open...
... 2. Refresh Rate Num: Display the panel's current refresh rate on the monitor's maximum refresh rate. Using the Navi/OK button, select Gaming from the OSD. Note: 1. If Adaptive-Sync is set Over Drive to 85 or 120 Hz. VRB: When VRB is set to either one of the following: Logo, Aim Point, Message and Input Icon. • VRB feature is On. 6. Adaptive-Sync: To control supporting Adaptive-Sync or not; For monitors supporting up to open...

User Manual
Page 26
... of the display switching process. If Adaptive-Sync is "ON", then the Ultra-Low Latency is not supported at resolutions below 800 x 600. 9. Ultra-Low Latency is automatically turned On and grayed out. 2. Press the MENU key to adjust. 3. Transparency: Select the transparency when using gaming mode. Note: 1. The transparency can be 0% (OFF), 20%, 40%, 60%, or 80%. 7. To remove the OSD Lock message...
... of the display switching process. If Adaptive-Sync is "ON", then the Ultra-Low Latency is not supported at resolutions below 800 x 600. 9. Ultra-Low Latency is automatically turned On and grayed out. 2. Press the MENU key to adjust. 3. Transparency: Select the transparency when using gaming mode. Note: 1. The transparency can be 0% (OFF), 20%, 40%, 60%, or 80%. 7. To remove the OSD Lock message...

User Manual
Page 27
Use the Navi/OK button to be set at DP1.4. 7. Input: Select the source from the OSD. Auto Source: Automatically searches for Display Data Channel/Command Interface, which allows monitor controls to select the setting. 4. Note: DDC/CI, short for available input sources. 6. Quick Start Mode: Enable monitor rapidly. Then navigate to the setting you wish to be sent via software. 10. Hot Key Assignment: Select the function of blackness under HDMI source. DDC...
Use the Navi/OK button to be set at DP1.4. 7. Input: Select the source from the OSD. Auto Source: Automatically searches for Display Data Channel/Command Interface, which allows monitor controls to select the setting. 4. Note: DDC/CI, short for available input sources. 6. Quick Start Mode: Enable monitor rapidly. Then navigate to the setting you wish to be sent via software. 10. Hot Key Assignment: Select the function of blackness under HDMI source. DDC...

User Manual
Page 29
... LCD monitor for servicing, please check the troubleshooting list below to see if you can self-diagnose the problem. (HDMI/DP Mode) Problems Current Status LED ON No Picture LED OFF LED displays amber color Abnormal Sound (Only Audio-Input model) (Optional) No sound, or sound level is too low Remedy Using OSD, adjust brightness and contrast to maximum or reset to their default settings. Check the power switch. Check if AC power cord is properly connected to the monitor. Check if video signal cable is properly connected...
... LCD monitor for servicing, please check the troubleshooting list below to see if you can self-diagnose the problem. (HDMI/DP Mode) Problems Current Status LED ON No Picture LED OFF LED displays amber color Abnormal Sound (Only Audio-Input model) (Optional) No sound, or sound level is too low Remedy Using OSD, adjust brightness and contrast to maximum or reset to their default settings. Check the power switch. Check if AC power cord is properly connected to the monitor. Check if video signal cable is properly connected...


