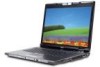
TravelMate 8200 Service Guide
Page 9
...Advanced Menu 55 Security Menu 56 Boot Menu 58 Exit Menu 59 Chapter 3 General Information 61 Before You Begin 61 Disassembly Procedure Flowchart 62 Disassembly Procedure 64 Removing the Battery Pack 64 Removing the HDD Module 64 Removing the Memory and the MiniPCI Card 65... Disassembling the Main Unit 66 Disassembling the LCD Module 72 Disassembling the ODD Module 75 Disassembling the CCD Module 75 Disassembling the HDD Module 76 Chapter 4 System Check Procedures 79 External Diskette Drive Check 79...
...Advanced Menu 55 Security Menu 56 Boot Menu 58 Exit Menu 59 Chapter 3 General Information 61 Before You Begin 61 Disassembly Procedure Flowchart 62 Disassembly Procedure 64 Removing the Battery Pack 64 Removing the HDD Module 64 Removing the Memory and the MiniPCI Card 65... Disassembling the Main Unit 66 Disassembling the LCD Module 72 Disassembling the ODD Module 75 Disassembling the CCD Module 75 Disassembling the HDD Module 76 Chapter 4 System Check Procedures 79 External Diskette Drive Check 79...
TravelMate 8200 Service Guide
Page 70
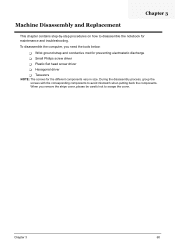
... Replacement Chapter 3 This chapter contains step-by-step procedures on how to disassemble the notebook for the different components vary in size. Chapter 3 60 During the disassembly process, group the screws with the corresponding components to scrape the cover. When you need the tools below: T Wrist ... T Small Philips screw driver T Plastic flat head screw driver T Hexagonal driver T Tweezers NOTE: The screws for maintenance and troubleshooting. To disassemble the computer, you remove the stripe cover, please be careful not to avoid mismatch when putting back the components.
... Replacement Chapter 3 This chapter contains step-by-step procedures on how to disassemble the notebook for the different components vary in size. Chapter 3 60 During the disassembly process, group the screws with the corresponding components to scrape the cover. When you need the tools below: T Wrist ... T Small Philips screw driver T Plastic flat head screw driver T Hexagonal driver T Tweezers NOTE: The screws for maintenance and troubleshooting. To disassemble the computer, you remove the stripe cover, please be careful not to avoid mismatch when putting back the components.
TravelMate 8200 Service Guide
Page 71
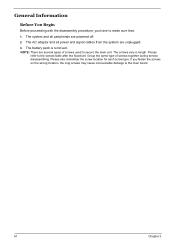
NOTE: There are several types of screws together during service disassembling. Please also remember the screw location for each screw type. If you have to the screws table after the flowchart. Group the same type of ... vary in length. The AC adaptor and all peripherals are unplugged. 3. The battery pack is removed. General Information Before You Begin Before proceeding with the disassembly procedure, you fasten the screws on the wrong location, the long screws may cause irrecoverable damage to secure the main unit. Please refer to make...
NOTE: There are several types of screws together during service disassembling. Please also remember the screw location for each screw type. If you have to the screws table after the flowchart. Group the same type of ... vary in length. The AC adaptor and all peripherals are unplugged. 3. The battery pack is removed. General Information Before You Begin Before proceeding with the disassembly procedure, you fasten the screws on the wrong location, the long screws may cause irrecoverable damage to secure the main unit. Please refer to make...

TravelMate 8200 Service Guide
Page 72
Disassembly Procedure Flowchart The flowchart gives you a graphic representation on the entire disassembly and reassembly and instructs you how to remove the components. Chapter 3 62
Disassembly Procedure Flowchart The flowchart gives you a graphic representation on the entire disassembly and reassembly and instructs you how to remove the components. Chapter 3 62
TravelMate 8200 Service Guide
Page 74
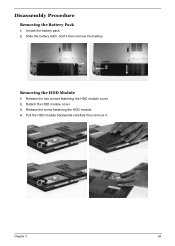
Disassembly Procedure Removing the Battery Pack 1. Removing the HDD Module 1. Slide the battery latch, hold it . Pull the HDD module backwards carefully then remove it then remove the battery. Release the two screws fastening the HDD module cover. 2. Chapter 3 64 Detach the HDD module cover. 3. Release the screw fastening the HDD module. 4. Unlock the battery pack. 2.
Disassembly Procedure Removing the Battery Pack 1. Removing the HDD Module 1. Slide the battery latch, hold it . Pull the HDD module backwards carefully then remove it then remove the battery. Release the two screws fastening the HDD module cover. 2. Chapter 3 64 Detach the HDD module cover. 3. Release the screw fastening the HDD module. 4. Unlock the battery pack. 2.

TravelMate 8200 Service Guide
Page 76
Open the notebook as shown. 5. Release the connector then disconnect the main board side cable as shown. Disconnect the keyboard then remove the keyboard. To remove the middle cover, you have to remove the two screws on the rear side. 2. Remove the two screws fastening the keyboard. 6. Detach the keyboard carefully then turn it over as shown. 7. Chapter 3 66 Detach the middle cover carefully because the cable of LED board and main board is under the middle cover. 3. Disassembling the Main Unit 1. Disconnect the middle cover side cable then remove the middle cover. 4.
Open the notebook as shown. 5. Release the connector then disconnect the main board side cable as shown. Disconnect the keyboard then remove the keyboard. To remove the middle cover, you have to remove the two screws on the rear side. 2. Remove the two screws fastening the keyboard. 6. Detach the keyboard carefully then turn it over as shown. 7. Chapter 3 66 Detach the middle cover carefully because the cable of LED board and main board is under the middle cover. 3. Disassembling the Main Unit 1. Disconnect the middle cover side cable then remove the middle cover. 4.

TravelMate 8200 Service Guide
Page 82
Detach inverter board then disconnect the LCD backlight cable and the inverter cable. 4. Detach the six LCD screw rubber cushions and remove the six screws fastening the LCD bezel. 2. Remove the four screws securing the LCD bracket. 5. Chapter 3 72 Then carefully detach the LCD bezel. 3. Detach the LCD. Disconnect the CCD module. 6. Disassembling the LCD Module 1.
Detach inverter board then disconnect the LCD backlight cable and the inverter cable. 4. Detach the six LCD screw rubber cushions and remove the six screws fastening the LCD bezel. 2. Remove the four screws securing the LCD bracket. 5. Chapter 3 72 Then carefully detach the LCD bezel. 3. Detach the LCD. Disconnect the CCD module. 6. Disassembling the LCD Module 1.

TravelMate 8200 Service Guide
Page 85
Then detach the ODD bezel. Disassembling the CCD Module 1. Disassembling the ODD Module 1. Detach the CCD module holder. 2. Remove the two screws fastening the CCD board and detach the CCD board. 75 Chapter 3 Insert a screwdriver or a clip into the emergency eject hole to eject the optical disk drive as shown 3. Remove the four screws fastening the ODD holder and detach the ODD holder. 2. Separate the cases of the CCD module. 3.
Then detach the ODD bezel. Disassembling the CCD Module 1. Disassembling the ODD Module 1. Detach the CCD module holder. 2. Remove the two screws fastening the CCD board and detach the CCD board. 75 Chapter 3 Insert a screwdriver or a clip into the emergency eject hole to eject the optical disk drive as shown 3. Remove the four screws fastening the ODD holder and detach the ODD holder. 2. Separate the cases of the CCD module. 3.

TravelMate 8200 Service Guide
Page 86
Chapter 3 76 Disassembling the HDD Module 1. Remove the two screws securing the HDD bracket and detach the HDD bracket.
Chapter 3 76 Disassembling the HDD Module 1. Remove the two screws securing the HDD bracket and detach the HDD bracket.
TravelMate 8200 User's Guide - EN
Page 86
... may touch dangerous voltage points or short-out parts that could result in a fire or electric shock. Do not disassemble or dispose of them away from the wall outlet before serving or disassembling this unit. English 76 8 If an extension cord is used batteries promptly. 14 To avoid hazard of unexpected electrical...
... may touch dangerous voltage points or short-out parts that could result in a fire or electric shock. Do not disassemble or dispose of them away from the wall outlet before serving or disassembling this unit. English 76 8 If an extension cord is used batteries promptly. 14 To avoid hazard of unexpected electrical...

TravelMate 8200 User's Guide - EN
Page 87
... ADVARSEL: LASERSTRÅLING NAR DEKSEL ÅPNESSTIRR IKKE INN I STRÅLEN LCD pixel statement The LCD unit is protected by U.S. Reverse engineering or disassembly is prohibited. CLASS 1 LASER PRODUCT CAUTION: INVISIBLE LASER RADIATION WHEN OPEN.
... ADVARSEL: LASERSTRÅLING NAR DEKSEL ÅPNESSTIRR IKKE INN I STRÅLEN LCD pixel statement The LCD unit is protected by U.S. Reverse engineering or disassembly is prohibited. CLASS 1 LASER PRODUCT CAUTION: INVISIBLE LASER RADIATION WHEN OPEN.


