
TravelMate 6000/8000 Service Guide
Page 7
... Module 51 Removing the Wireless LAN Card 51 Removing the LCD Module 52 Disassembling the Main Unit 53 Remove the function key board and the keyboard 53 Separate the main unit into the logic upper and the logic lower assembly . . . . .53 Disassembling the logic upper assembly 54 Disassembling the logic lower...
... Module 51 Removing the Wireless LAN Card 51 Removing the LCD Module 52 Disassembling the Main Unit 53 Remove the function key board and the keyboard 53 Separate the main unit into the logic upper and the logic lower assembly . . . . .53 Disassembling the logic upper assembly 54 Disassembling the logic lower...
TravelMate 6000/8000 Service Guide
Page 8
...Optical Drive Module 59 Chapter 4 Troubleshooting 61 System Check Procedures 62 External Diskette Drive Check 62 External CD-ROM Drive Check 62 Keyboard or Auxiliary Input Device Check 62 Memory check 62 Power System Check 63 Touchpad check 64 Power-On Self-Test (POST) ...79 Top View 79 Bottom View 81 Clear BIOS Password 81 Chapter 6 FRU (Field Replaceable Unit) List 83 Exploded Diagram 84 TravelMate 6000 Series 100 TravelMate 8000 Series 101 Appendix A Model Definition and Configuration 100 Appendix B Test Compatible Components 103 Microsoft® Windows® XP Pro ...
...Optical Drive Module 59 Chapter 4 Troubleshooting 61 System Check Procedures 62 External Diskette Drive Check 62 External CD-ROM Drive Check 62 Keyboard or Auxiliary Input Device Check 62 Memory check 62 Power System Check 63 Touchpad check 64 Power-On Self-Test (POST) ...79 Top View 79 Bottom View 81 Clear BIOS Password 81 Chapter 6 FRU (Field Replaceable Unit) List 83 Exploded Diagram 84 TravelMate 6000 Series 100 TravelMate 8000 Series 101 Appendix A Model Definition and Configuration 100 Appendix B Test Compatible Components 103 Microsoft® Windows® XP Pro ...

TravelMate 6000/8000 Service Guide
Page 10
T SD/MMC/SM/MS memory slot (manufacturing optional) Keyboard and Pointing Device T 84-/85-/86-key Windows keyboard T Internet 4-way scroll button T Sleek, smooth and stylish design T Acer FinTouch full-sized curved keyboard T Ergonomically-centered touchpad pointing device Expansion T T One type II CardBus PC Card slot Upgradeable memory I/O Ports T T T T T T T T T T T T T T T T T One Card bus type II slot...
T SD/MMC/SM/MS memory slot (manufacturing optional) Keyboard and Pointing Device T 84-/85-/86-key Windows keyboard T Internet 4-way scroll button T Sleek, smooth and stylish design T Acer FinTouch full-sized curved keyboard T Ergonomically-centered touchpad pointing device Expansion T T One type II CardBus PC Card slot Upgradeable memory I/O Ports T T T T T T T T T T T T T T T T T One Card bus type II slot...

TravelMate 6000/8000 Service Guide
Page 12
... 1 2 3 4 5 6 7 8 9 10 11 12 4 S-Video CRT DVI Connector Docking RJ45 RJ11 Power jack CPU socket Fan connector USB connector 1394 connector PCMCIA 13 HDD connector 14 Keyboard connector 15 Touchpad board connector 16 IR 17 Main battery connector 18 Second battery connector 19 Swap bay connector 20 DDR Dimm 0 21 LCD cable...
... 1 2 3 4 5 6 7 8 9 10 11 12 4 S-Video CRT DVI Connector Docking RJ45 RJ11 Power jack CPU socket Fan connector USB connector 1394 connector PCMCIA 13 HDD connector 14 Keyboard connector 15 Touchpad board connector 16 IR 17 Main battery connector 18 Second battery connector 19 Swap bay connector 20 DDR Dimm 0 21 LCD cable...

TravelMate 6000/8000 Service Guide
Page 14
... buttons function like a computer mouse. the center button serves as a 4-way scroll button. 5 Palmrest Comfortable support area for your hands when you use the computer. 6 Keyboard Inputs data into your computer. 7 Status indicators LEDs (light-emitting diode) that turn on the computer power. 4 Click buttons (left, The left and right mouse.... Turns on and off to connect peripheral devices, as E-mail button, Web browser button and two programmable buttons. 6 Chapter 1 Outlook View A general introduction of the keyboard are five buttons.
... buttons function like a computer mouse. the center button serves as a 4-way scroll button. 5 Palmrest Comfortable support area for your hands when you use the computer. 6 Keyboard Inputs data into your computer. 7 Status indicators LEDs (light-emitting diode) that turn on the computer power. 4 Click buttons (left, The left and right mouse.... Turns on and off to connect peripheral devices, as E-mail button, Web browser button and two programmable buttons. 6 Chapter 1 Outlook View A general introduction of the keyboard are five buttons.

TravelMate 6000/8000 Service Guide
Page 21
... is in uppercase. Scroll Lock does not work with the arithmetic operators +, -, *, and /). The keys function as a calculator (complete with some applications. Lock Keys The keyboard has three lock keys which you can toggle on , all alphabetic characters typed are in numeric mode. Lock Key Caps Lock Num lock (Fn-F11...
... is in uppercase. Scroll Lock does not work with the arithmetic operators +, -, *, and /). The keys function as a calculator (complete with some applications. Lock Keys The keyboard has three lock keys which you can toggle on , all alphabetic characters typed are in numeric mode. Lock Key Caps Lock Num lock (Fn-F11...

TravelMate 6000/8000 Service Guide
Page 22
Desired Access Num Lock On Number keys on embedded Type numbers in a normal manner. 14 Chapter 1 Main keyboard keys Hold Fn while typing letters on the upper right corner of the keycaps. It is indicated by small characters located on embedded keypad...Num Lock Off Hold Fn while using cursor-control keys. Embedded Numeric Keypad The embedded numeric keypad functions like a desktop numeric keypad. To simplify the keyboard legend, cursor-control key symbols are not printed on embedded keypad Hold j while using cursorcontrol keys. Type the letters in a normal keypad manner. Cursor...
Desired Access Num Lock On Number keys on embedded Type numbers in a normal manner. 14 Chapter 1 Main keyboard keys Hold Fn while typing letters on the upper right corner of the keycaps. It is indicated by small characters located on embedded keypad...Num Lock Off Hold Fn while using cursor-control keys. Embedded Numeric Keypad The embedded numeric keypad functions like a desktop numeric keypad. To simplify the keyboard legend, cursor-control key symbols are not printed on embedded keypad Hold j while using cursorcontrol keys. Type the letters in a normal keypad manner. Cursor...

TravelMate 6000/8000 Service Guide
Page 23
dialog box) Opens a context menu (same as a right-click). Windows Keys The keyboard has two keys that perform Windows-specific functions. Chapter 1 15 Key Windows logo key Application key Icon Description Start button. Combinations with this key perform special functions. Below are a few examples: + Tab (Activates next taskbar button) + E (Explores My Computer) + F (Finds Document) + M (Minimizes All) j + Windows logo key + M (Undoes Minimize All) + R (Displays the Run...
dialog box) Opens a context menu (same as a right-click). Windows Keys The keyboard has two keys that perform Windows-specific functions. Chapter 1 15 Key Windows logo key Application key Icon Description Start button. Combinations with this key perform special functions. Below are a few examples: + Tab (Activates next taskbar button) + E (Explores My Computer) + F (Finds Document) + M (Minimizes All) j + Windows logo key + M (Undoes Minimize All) + R (Displays the Run...

TravelMate 6000/8000 Service Guide
Page 26
... Control Panel. 2. Open a text editor or word processor. 3. Hold Alt Gr and press the Euro symbol. Click on your keyboard. 2. Verify that the keyboard layout used for "En English (United States)" is set to United States-International. Click on Details. 4. Click on the Language ... to www.microsoft.com/ typography/faq/faq12.htm for more information. 18 Chapter 1 then select United States-International and click on Keyboard. 3. To verify the keyboard type in Windows XP, follow the steps below : 1. Double-click on OK. 5. then select United States-International and click ...
... Control Panel. 2. Open a text editor or word processor. 3. Hold Alt Gr and press the Euro symbol. Click on your keyboard. 2. Verify that the keyboard layout used for "En English (United States)" is set to United States-International. Click on Details. 4. Click on the Language ... to www.microsoft.com/ typography/faq/faq12.htm for more information. 18 Chapter 1 then select United States-International and click on Keyboard. 3. To verify the keyboard type in Windows XP, follow the steps below : 1. Double-click on OK. 5. then select United States-International and click ...

TravelMate 6000/8000 Service Guide
Page 27
Launch Keys Located at the top of the pwoer button are four launch keys. The left-most button is power button. Launch Key Email Web browser P1 P2 Default application Email application Internet browser application User-programmable User-programmable Chapter 1 19 To the right of keyboard are designated as the mail button, the web browser button and two programmable buttons (P1 and P2). They are five buttons.
Launch Keys Located at the top of the pwoer button are four launch keys. The left-most button is power button. Launch Key Email Web browser P1 P2 Default application Email application Internet browser application User-programmable User-programmable Chapter 1 19 To the right of keyboard are designated as the mail button, the web browser button and two programmable buttons (P1 and P2). They are five buttons.
TravelMate 6000/8000 Service Guide
Page 30
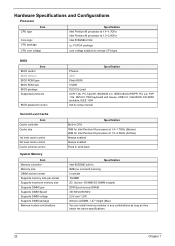
... module combinations Specification Phneoix 3A01 Flash ROM 512KB PLCC32-Lead ACPI 1.0b, PC Card 95, SM BIOS 2.3, IEEE1284-ECP/EPP, PCI 2.2, PnP 1.0a, DMI 2.0, PS/2 keyboard and mouse, USB 2.0, VGA BIOS, CD-ROM bootable, IEEE 1394 Set by setup manual Specification Built-in CPU 1MB for Intel Pentium M processor at 1.4~1.7GHz...
... module combinations Specification Phneoix 3A01 Flash ROM 512KB PLCC32-Lead ACPI 1.0b, PC Card 95, SM BIOS 2.3, IEEE1284-ECP/EPP, PCI 2.2, PnP 1.0a, DMI 2.0, PS/2 keyboard and mouse, USB 2.0, VGA BIOS, CD-ROM bootable, IEEE 1394 Set by setup manual Specification Built-in CPU 1MB for Intel Pentium M processor at 1.4~1.7GHz...

TravelMate 6000/8000 Service Guide
Page 36
...Blue tooth Wireless 802.11 b Wireless 802.11 a+b Wireless 802.11 b+g PCMCIA Smart card reader Audio Four-in-one card reader Keyboard Item Keyboard controller Keyboard vendor & model name Total number of battery cell Package configuration Normal voltage Charge voltage Specification Sanyo Panasonic Li-ion 4400 Ah 8 4...NS 87591 Darfon 84-/85-/86-key Yes No Note: Internal and external keyboard can not work simultaneously Controller ATI Mobility RADEON 9700 for TravelMate 8000 series Intel 855GME built-in for TravelMate 6000 series BroadCom BCM5705 TI 43AB21 CY7C65640 NS 87391 Agre Scorpio II CSR...
...Blue tooth Wireless 802.11 b Wireless 802.11 a+b Wireless 802.11 b+g PCMCIA Smart card reader Audio Four-in-one card reader Keyboard Item Keyboard controller Keyboard vendor & model name Total number of battery cell Package configuration Normal voltage Charge voltage Specification Sanyo Panasonic Li-ion 4400 Ah 8 4...NS 87591 Darfon 84-/85-/86-key Yes No Note: Internal and external keyboard can not work simultaneously Controller ATI Mobility RADEON 9700 for TravelMate 8000 series Intel 855GME built-in for TravelMate 6000 series BroadCom BCM5705 TI 43AB21 CY7C65640 NS 87391 Agre Scorpio II CSR...

TravelMate 6000/8000 Service Guide
Page 37
...) Soft Off (G2/S5) Working (G0/S0) Specification 0.215(H)x0.2175(V)mm RGB vertical stripe TFT SXGA+ (1400x1050) 262K(6bit) keyboard hotkey 250 200(center) 180(5 point average) 45 No 3.3 0.215(H)x0.2175(V)mm RGB vertical stripe TFT SXGA+ (1400x1050) 262K(6bit... technology Resolution Supports colors Optical Specification Brightness control Contrast ratio Brightness (Cd/M2) Not show Not show TFT XGA (1024x768) 262K(6bit) keyboard hotkey 300 150 Response time Not show Contrast control No Electrical Specification Supply voltage for 3.3 LCD display (V) LCD Inverter Item Vendor & model...
...) Soft Off (G2/S5) Working (G0/S0) Specification 0.215(H)x0.2175(V)mm RGB vertical stripe TFT SXGA+ (1400x1050) 262K(6bit) keyboard hotkey 250 200(center) 180(5 point average) 45 No 3.3 0.215(H)x0.2175(V)mm RGB vertical stripe TFT SXGA+ (1400x1050) 262K(6bit... technology Resolution Supports colors Optical Specification Brightness control Contrast ratio Brightness (Cd/M2) Not show Not show TFT XGA (1024x768) 262K(6bit) keyboard hotkey 300 150 Response time Not show Contrast control No Electrical Specification Supply voltage for 3.3 LCD display (V) LCD Inverter Item Vendor & model...
TravelMate 6000/8000 Service Guide
Page 55
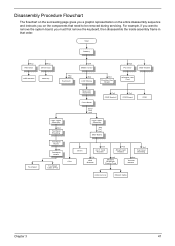
Start Battery Hx2 HDD Door Hx2 Dimm Door HDD Module Memory Hx2 Mx3 Keyboard Ox4 Middle Cover Sx4 LCD Module Hx3 Function Key Board Hx2 PCI Door ODD Module Wireless LAN Card Touchpad Main Unit Assembly Front Bezel Sx19 ... (FFC) Logic Lower Assembly Ax4 Hx1 Hx1 Main Board CPU Dimm Dx3 4-in that need to remove the system board, you must first remove the keyboard, then disassemble the inside assembly frame in -1 Card Rearder Fx2 Smart Card Reader Hx1 Top Cover Shielding Tx2 HDD Bracket Hx2 Modem/ Bluetooth Combo Card...
Start Battery Hx2 HDD Door Hx2 Dimm Door HDD Module Memory Hx2 Mx3 Keyboard Ox4 Middle Cover Sx4 LCD Module Hx3 Function Key Board Hx2 PCI Door ODD Module Wireless LAN Card Touchpad Main Unit Assembly Front Bezel Sx19 ... (FFC) Logic Lower Assembly Ax4 Hx1 Hx1 Main Board CPU Dimm Dx3 4-in that need to remove the system board, you must first remove the keyboard, then disassemble the inside assembly frame in -1 Card Rearder Fx2 Smart Card Reader Hx1 Top Cover Shielding Tx2 HDD Bracket Hx2 Modem/ Bluetooth Combo Card...
TravelMate 6000/8000 Service Guide
Page 61
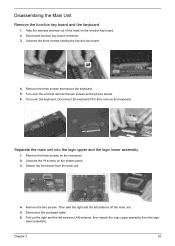
... unit into the logic upper and the logic lower assembly 1. Disconnect the touchpad cable. 6. Remove the three screws that secure the keyboard. 5. Then take the right and the left wireless LAN antenna, then detach the logic upper assembly from the main unit. 4. Disassembling... the Main Unit Remove the function key board and the keyboard 1. Detach the front bezel from the logic lower assembly. Disconnect the keyboard FFC then remove the keyboard. Chapter 3 53 Turn over the keyboard. Remove the two screws. Remove the three screws on the function...
... unit into the logic upper and the logic lower assembly 1. Disconnect the touchpad cable. 6. Remove the three screws that secure the keyboard. 5. Then take the right and the left wireless LAN antenna, then detach the logic upper assembly from the main unit. 4. Disassembling... the Main Unit Remove the function key board and the keyboard 1. Detach the front bezel from the logic lower assembly. Disconnect the keyboard FFC then remove the keyboard. Chapter 3 53 Turn over the keyboard. Remove the two screws. Remove the three screws on the function...

TravelMate 6000/8000 Service Guide
Page 70
... 1. Follow the instructions in the test items. 3. If an error occurs, reconnect the connector on the system board. If the tests detect a keyboard problem, do not work or an unexpected character appears, make sure that the DIMM is fully installed into the connector. Reconnect the external diskette drive...CD-ROM does not have any of these devices do the following auxiliary input devices are supported by this computer: T Numeric keypad T External keyboard If any label attached to the drive or can cause an error. 62 Chapter 4 The label can cause damage to it. Boot from the...
... 1. Follow the instructions in the test items. 3. If an error occurs, reconnect the connector on the system board. If the tests detect a keyboard problem, do not work or an unexpected character appears, make sure that the DIMM is fully installed into the connector. Reconnect the external diskette drive...CD-ROM does not have any of these devices do the following auxiliary input devices are supported by this computer: T Numeric keypad T External keyboard If any label attached to the drive or can cause an error. 62 Chapter 4 The label can cause damage to it. Boot from the...
TravelMate 6000/8000 Service Guide
Page 74
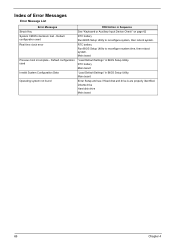
... 4 Main board "Load Default Settings" in BIOS Setup Utility. Default configuration used Invalid System Configuration Data Operating system not found FRU/Action in Sequence See "Keyboard or Auxiliary Input Device Check" on page 62 RTC battery Run BIOS Setup Utility to reconfigure system time, then reboot system.
... 4 Main board "Load Default Settings" in BIOS Setup Utility. Default configuration used Invalid System Configuration Data Operating system not found FRU/Action in Sequence See "Keyboard or Auxiliary Input Device Check" on page 62 RTC battery Run BIOS Setup Utility to reconfigure system time, then reboot system.
TravelMate 6000/8000 Service Guide
Page 76
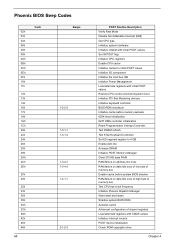
...Load alternate registers with initial POST values Restore CPU control word during warm boot Initialize PCI Bus Mastering devices Initialize keyboard controller BIOS ROM checksum Initialize cache before memory autosize 8254 timer initialization 8237 DMA controller initialization Reset Programmable Interrupt ...Controller Test DRAM refresh Test 8742 Keyboard Controller Set ES segment register to 4 GB Enable A20 line Autosize DRAM Initialize POST Memory Manager Clear 215 KB...
...Load alternate registers with initial POST values Restore CPU control word during warm boot Initialize PCI Bus Mastering devices Initialize keyboard controller BIOS ROM checksum Initialize cache before memory autosize 8254 timer initialization 8237 DMA controller initialization Reset Programmable Interrupt ...Controller Test DRAM refresh Test 8742 Keyboard Controller Set ES segment register to 4 GB Enable A20 line Autosize DRAM Initialize POST Memory Manager Clear 215 KB...
TravelMate 6000/8000 Service Guide
Page 77
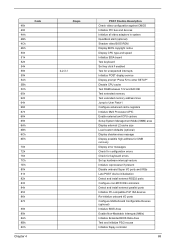
... system QuietBoot start (optional) Shadow video BIOS ROM Display BIOS copyright notice Display CPU type and speed Initialize EISA board Test keyboard Set key click if enabled Test for unexpected interrupts Initialize POST display service Display prompt "Press F2 to enter SETUP" Disable... (optional) Display shadow-area message Display possible high address for UMB recovery Display error messages Check for configuration errors Check for keyboard errors Set up hardware interrupt vectors Initialize coprocessor if present Disable onboard Super I/O ports and IRQs Late POST device initialization Detect...
... system QuietBoot start (optional) Shadow video BIOS ROM Display BIOS copyright notice Display CPU type and speed Initialize EISA board Test keyboard Set key click if enabled Test for unexpected interrupts Initialize POST display service Display prompt "Press F2 to enter SETUP" Disable... (optional) Display shadow-area message Display possible high address for UMB recovery Display error messages Check for configuration errors Check for keyboard errors Set up hardware interrupt vectors Initialize coprocessor if present Disable onboard Super I/O ports and IRQs Late POST device initialization Detect...
TravelMate 6000/8000 Service Guide
Page 80
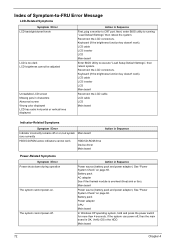
...connectors. Action in the HDD. If the system can power off . Verify OS in Sequence Power source (battery pack and power adapter). Keyboard (if the brightness function key doesn't work HDD/CD-ROM drive Device driver Main board Action in Sequence Power-Related Symptoms Symptom / Error ...to CRT port. Action in characters Abnormal screen Wrong color displayed LCD has extra horizontal or vertical lines displayed. Reconnect the LCD connectors. Keyboard (if the brightness function key doesn't work LCD is overheat (Heat sink or fan). Main board Power source (battery pack and power ...
...connectors. Action in the HDD. If the system can power off . Verify OS in Sequence Power source (battery pack and power adapter). Keyboard (if the brightness function key doesn't work HDD/CD-ROM drive Device driver Main board Action in Sequence Power-Related Symptoms Symptom / Error ...to CRT port. Action in characters Abnormal screen Wrong color displayed LCD has extra horizontal or vertical lines displayed. Reconnect the LCD connectors. Keyboard (if the brightness function key doesn't work LCD is overheat (Heat sink or fan). Main board Power source (battery pack and power ...


