TravelMate 6000/8000 Service Guide
Page 51
... not have a crisis recovery diskette at hand, then you should create a Crisis Recovery Diskette before you use the Phlash. NOTE: Do not install memory-related drivers (XMS, EMS, DPMI) when you use the AC adaptor power supply when you may not boot the system because the BIOS is required for the...
... not have a crisis recovery diskette at hand, then you should create a Crisis Recovery Diskette before you use the Phlash. NOTE: Do not install memory-related drivers (XMS, EMS, DPMI) when you use the AC adaptor power supply when you may not boot the system because the BIOS is required for the...

TravelMate 6000/8000 Service Guide
Page 53
... 3 45 When you need the following tools: T Wrist grounding strap and conductive mat for preventing electrostatic discharge T Small Philips screw driver T Philips screw driver T Flat head screwdriver T Plastic flat head screw driver T Hex screw driver T Tweezers NOTE: The screws for maintenance and troubleshooting. Chapter 3 Machine Disassembly and Replacement This chapter contains step-by-step...
... 3 45 When you need the following tools: T Wrist grounding strap and conductive mat for preventing electrostatic discharge T Small Philips screw driver T Philips screw driver T Flat head screwdriver T Plastic flat head screw driver T Hex screw driver T Tweezers NOTE: The screws for maintenance and troubleshooting. Chapter 3 Machine Disassembly and Replacement This chapter contains step-by-step...
TravelMate 6000/8000 Service Guide
Page 60
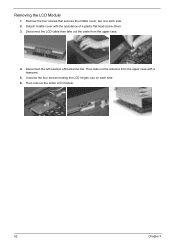
Detach middle cover with a tweezers. 5. Then remove the entire LCD module. 52 Chapter 3 Then take out the cable from the upper case with the assistance of a plastic flat head screw driver. 3. Remove the four screws that secures the middle cover; Unscrew the four screws holding the LCD hinges; two on each side. 2. two one each side. 6. Removing the LCD Module 1. Disconnect the left wireless LAN antenna line. Disconnect the LCD cable then take out the antenna from the upper case. 4.
Detach middle cover with a tweezers. 5. Then remove the entire LCD module. 52 Chapter 3 Then take out the cable from the upper case with the assistance of a plastic flat head screw driver. 3. Remove the four screws that secures the middle cover; Unscrew the four screws holding the LCD hinges; two on each side. 2. two one each side. 6. Removing the LCD Module 1. Disconnect the left wireless LAN antenna line. Disconnect the LCD cable then take out the antenna from the upper case. 4.

TravelMate 6000/8000 Service Guide
Page 64
Pop out the memory then remove it . 56 Chapter 3 Disconnect the smart card reader FPC. 19. Then remove the CPU. 15. Remove the modem/bluetooth combo card then disconnect the connector. 17. 13. Unscrew the two screws that secure the modem/bluetooth combo card. Turn the CPU lock counter clock-wise with a flat head screw driver. Then remove the top cover shielding. 14. Disconnect the bluetooth antenna and the modem cable. 18. Disconnect the microphone cable. Unscrew the two screws holding the smart card reader then remove it . 16.
Pop out the memory then remove it . 56 Chapter 3 Disconnect the smart card reader FPC. 19. Then remove the CPU. 15. Remove the modem/bluetooth combo card then disconnect the connector. 17. 13. Unscrew the two screws that secure the modem/bluetooth combo card. Turn the CPU lock counter clock-wise with a flat head screw driver. Then remove the top cover shielding. 14. Disconnect the bluetooth antenna and the modem cable. 18. Disconnect the microphone cable. Unscrew the two screws holding the smart card reader then remove it . 16.

TravelMate 6000/8000 Service Guide
Page 72
... the charge indicator still does not light up , replace the battery pack. Do not replace a non-defective FRU: 1. After rebooting, run Syn touch driver. 2. If the main board to correct the problem. If no, then go to room temperature. Power off the computer. 2. If yes, then replace...'t work , then replace FPC on recharging or discharging. Repeat the steps 1 and 2, for a short time. For example, run Tracking Pad PS2 Mode Driver. Replace touch pad PCB. 7. Check the Battery Pack To check the battery pack, do the following : From Software: 1. This helps you use a ...
... the charge indicator still does not light up , replace the battery pack. Do not replace a non-defective FRU: 1. After rebooting, run Syn touch driver. 2. If the main board to correct the problem. If no, then go to room temperature. Power off the computer. 2. If yes, then replace...'t work , then replace FPC on recharging or discharging. Repeat the steps 1 and 2, for a short time. For example, run Tracking Pad PS2 Mode Driver. Replace touch pad PCB. 7. Check the Battery Pack To check the battery pack, do the following : From Software: 1. This helps you use a ...
TravelMate 6000/8000 Service Guide
Page 80
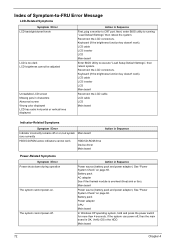
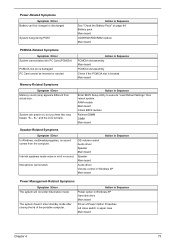
... during operation The system cannot power-on , but system Main board runs correctly HDD/CD-ROM active indicators cannot work HDD/CD-ROM drive Device driver Main board Action in Sequence First, plug a monitor to -FRU Error Message LCD-Related Symptoms Symptom / Error LCD backlight doesn't work LCD is too dark...
... during operation The system cannot power-on , but system Main board runs correctly HDD/CD-ROM active indicators cannot work HDD/CD-ROM drive Device driver Main board Action in Sequence First, plug a monitor to -FRU Error Message LCD-Related Symptoms Symptom / Error LCD backlight doesn't work LCD is too dark...
TravelMate 6000/8000 Service Guide
Page 81
Action in upper case Main board Chapter 4 73 Action in Sequence Power option in Windows XP Hard disk drive Main board Driver of the portable computer. RAM module Main board Check BIOS revision Reinsert DIMM DIMM Main board Speaker-Related Symptoms Symptom / Error In Windows,... Internal speakers make noise or emit no sound comes from actual size. Microphone cannot work Action in Sequence OS volume control Audio driver Speaker Main board Speaker Main board Audio driver Volume control in Sequence See "Check the Battery Pack" on , but you hear two long beeps: "B--, B--" and the ...
Action in upper case Main board Chapter 4 73 Action in Sequence Power option in Windows XP Hard disk drive Main board Driver of the portable computer. RAM module Main board Check BIOS revision Reinsert DIMM DIMM Main board Speaker-Related Symptoms Symptom / Error In Windows,... Internal speakers make noise or emit no sound comes from actual size. Microphone cannot work Action in Sequence OS volume control Audio driver Speaker Main board Speaker Main board Audio driver Volume control in Sequence See "Check the Battery Pack" on , but you hear two long beeps: "B--, B--" and the ...

TravelMate 6000/8000 Service Guide
Page 82
... devices. Action in Sequence The system doesn't resume from hibernation/ standby mode. USB does not work . Run printer self-test. Device driver Device cable Device Main board Keyboard/Touchpad-Related Symptoms Symptom / Error Keyboard (one or more keys) does not work correctly. External display ...adapter then check if the system resumes from standby mode LCD cover switch after opening the lid of the portable computer. Printer driver Printer cable Printer Main board Enter BIOS Setup Utility to execute "Load Default Settings" then reboot the system. Check if the battery ...
... devices. Action in Sequence The system doesn't resume from hibernation/ standby mode. USB does not work . Run printer self-test. Device driver Device cable Device Main board Keyboard/Touchpad-Related Symptoms Symptom / Error Keyboard (one or more keys) does not work correctly. External display ...adapter then check if the system resumes from standby mode LCD cover switch after opening the lid of the portable computer. Printer driver Printer cable Printer Main board Enter BIOS Setup Utility to execute "Load Default Settings" then reboot the system. Check if the battery ...

TravelMate 6000/8000 Service Guide
Page 83
Main board Internal LAN does not work correctly. Phone cable Driver Reconnect the Internal modem cable to the main board tightly. Modem/LAN-Related Symptoms Symptom / Error Action in Sequence Internal modem does not work correctly Lan cable Driver Main board NOTE: If you cannot find a symptom or an error in this list and the problem remains, see "Undetermined Problems" on page 77. Chapter 4 75
Main board Internal LAN does not work correctly. Phone cable Driver Reconnect the Internal modem cable to the main board tightly. Modem/LAN-Related Symptoms Symptom / Error Action in Sequence Internal modem does not work correctly Lan cable Driver Main board NOTE: If you cannot find a symptom or an error in this list and the problem remains, see "Undetermined Problems" on page 77. Chapter 4 75

User's Guide
Page 43
..., have the computer inspected by hand. Traveling with you: • AC adapter • Spare, fully-charged battery pack(s) • AcerMedia drive module(s) • Additional printer driver files if you plan to use your computer while traveling: • Always take the computer as if you were taking the computer home, follow these...
..., have the computer inspected by hand. Traveling with you: • AC adapter • Spare, fully-charged battery pack(s) • AcerMedia drive module(s) • Additional printer driver files if you plan to use your computer while traveling: • Always take the computer as if you were taking the computer home, follow these...

User's Guide
Page 44
..., in . English 36 Traveling internationally with the computer "when you are traveling • Spare, fully-charged battery packs • AcerMedia drive module(s) • Additional printer driver files if you plan to use converter kits sold for the country to which you are moving from country to country" Preparing the computer Prepare...
..., in . English 36 Traveling internationally with the computer "when you are traveling • Spare, fully-charged battery packs • AcerMedia drive module(s) • Additional printer driver files if you plan to use converter kits sold for the country to which you are moving from country to country" Preparing the computer Prepare...

User's Guide
Page 71
... and push to a power outlet and that the infrared port is enabled. • Make sure both devices (for file transfers) or you have the appropriate drivers (for printing to an infrared printer). • During the POST, press F2 to the USB 2.0 connector on the rear of 1 meter apart. • Make sure...
... and push to a power outlet and that the infrared port is enabled. • Make sure both devices (for file transfers) or you have the appropriate drivers (for printing to an infrared printer). • During the POST, press F2 to the USB 2.0 connector on the rear of 1 meter apart. • Make sure...


